소개
Instructions on how to remove the iPod Video's front panel.
필요한 것
-
-
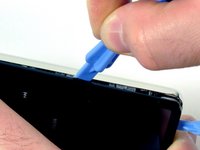
Free the first retainer clip on the bottom of the iPod using the iPod opening tool. The tool's edge should point towards the metal back case to prevent scratching the plastic front.
-
-
-
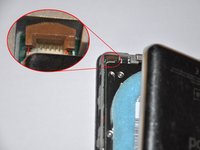
Use this photo of the OPENED iPod for the reference, in order to locate the areas where the retaining clips are - 4 per side, one on top and two at the bottom. It should save you a lot of frustration and help avoid scratching the plastic cover.
-
-
-
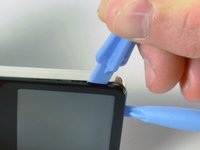
Insert the iPod opening tool into the left side of the iPod, with the edge of the tool pointing towards the metal back.
-
A small guitar pick can be extremely helpful in opening the iPod. Simply insert it and slide the pick around the case to free the clips to streamline the process.
-
Gently enlarge the existing crevice by wiggling the iPod opening tool and moving it to the left.
-
Continue doing so until the entire side of the iPod is loose.
-
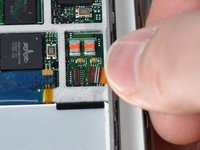
You can then insert an iPod opening tool to the right of the Hold button. Be very careful while inserting the tool, as the display is very fragile.
-
-
-
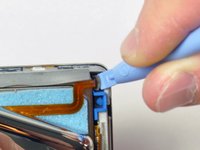
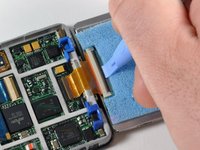
Gently glide the iPod opening tool on the top of the display, making sure to free the retaining clips.
-
The other sides of the iPod should now easily come loose. If they do not, use iPod opening tools on the right side of the iPod in the same way as on the left side of the iPod.
-
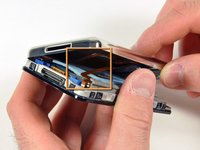
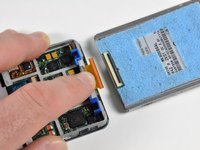
Separate the front of the iPod from the back about an inch (or a couple of centimeters).
-
-
-
이 단계에 사용된 도구:Tweezers$3.99
-
Use angled tweezers or an iPod opening tool to slide up the brown connector latch, holding the orange battery ribbon cable in place. Make sure you pull from both sides of the latch. You only need to lift the brown connector latch up about 1-2mm to free the cable. Do not lift more or remove the latch, or you might pull the white connector with it!
-
Remove the cable from the connector.
-
-
-
You should now have one orange ribbon cable still attaching the front case to the back.
-
At this point you are able to remove and replace the blue rubber bumpers, or continue with separating the case.
-
-
-
Lift up the hard drive to expose the headphone jack ribbon connector (indicated by the yellow box).
-
-
-
With the iPod opening tool, gently lift the brown tab of the headphone ribbon cable connector. The tab will rotate up 90 degrees, releasing the ribbon cable.
-
Using your fingers, pull out the headphone jack ribbon cable.
-
-
-
Use a small iPod opening tool to release the black hinge holding the hard drive ribbon cable. The tab will rotate up 90 degrees towards the logic board, releasing the ribbon cable.
-
Use your forefinger to hold the ribbon cable in place; disconnect the drive from the ribbon cable.
-
-
-
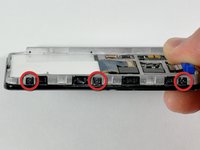
Remove the three black Phillips screws securing the front panel to the metal framework.
-
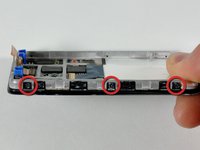
Rotate the iPod laterally 180 degrees and remove the three black Phillips screws securing the front panel to the metal framework on the other side.
-
-
-
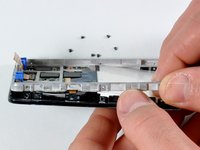
Carefully work around the edge of the iPod to separate the front panel from the metal framework.
-
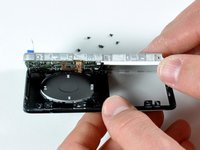
Lift the framework (including the attached display, logic board, and click wheel) away from the front panel.
-


To reassemble your device, follow these instructions in reverse order.
다른 137명이 해당 안내서를 완성하였습니다.

2가이드 댓글
Lots of helpful information. The thing to remember if you plan on doing this kind of work is take your time, and don’t get in a hurry. That’s when mistakes happen. I plan on upgrading an Apple Ipod Classic 30GB by replacing the hard drive with a micro sd card, and increasing the battery power.
Excellent guide! This is seriously some high quality work! Thank you for being so thorough when putting it together! Fortunately, the iPod Classic (iPod Video) is far easier to repair than the Nano as I worked on both recently.
Now, I totally agree with Paul about taking your time, even if you are experienced at repairs. That said, I also strongly suggest testing the device BEFORE closing it back up as it’s far too easy to accidentally miss a step! I also took the opportunity to clean and tweak anything along the way. For example, I put some 3M 9448A double-sided tape along the hard drive rails to hold them in place, repaired any foam that was falling off the hard drive, and cleaned the rubber bumpers (and subsequently replaced the tape on them too.) It was also a great opportunity to use a bit of DeoxIT on the dock connector and on the metal parts in the headphone jack.
Maintenance is 100% the key to device longevity!
As these are so modular, do plan on doing any upgrades while the iPod is still open.