주요 콘텐츠로 건너뛰기

iPod Nano 1st Generation Rear Panel Replacement

필요한 것

  1. iPod Nano 1st Generation Rear Panel Replacement, Rear Panel: 1 단계, 이미지 1/1
    • Before opening your iPod, ensure that the hold switch is in the locked position.

  2. iPod Nano 1st Generation Rear Panel Replacement: 2 단계, 이미지 1/1
    • The rear panel is secured to the front case by eleven clips permanently attached to the rear panel. These clips lock onto small tabs machined into the front case.

    • To free the tabs, they must be pushed down and away from the iPod's case. Note the location of all tabs on the rear panel. When using an iPod opening tool to free the rear panel, be sure to work the tool at the location of these clips.

  3. iPod Nano 1st Generation Rear Panel Replacement: 3 단계, 이미지 1/2 iPod Nano 1st Generation Rear Panel Replacement: 3 단계, 이미지 2/2
    • Opening the iPod can be challenging. Don't get discouraged if it takes you a few tries before the iPod is opened.

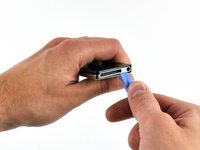
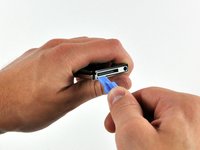
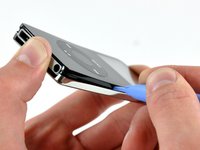
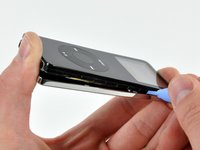
    • Insert the large iPod opening tool into the seam between the front case and rear panel of the iPod, below the dock connector. Run the tool back and forth to create an opening. The tool's edge should point toward the rear panel to prevent any accidental scratching of the aluminum front case.

  4. iPod Nano 1st Generation Rear Panel Replacement: 4 단계, 이미지 1/1
    • Insert a small iPod opening tool into the seam on the Hold button side of the iPod, with the edge of the tool pointing toward the rear panel.

  5. iPod Nano 1st Generation Rear Panel Replacement: 5 단계, 이미지 1/1
    • The large iPod opening tool is no longer needed to gain access to the left side of the iPod.

    • Gently enlarge the existing gap by pressing/wiggling the small iPod opening tool into the gap near each of the two tabs attached to the rear case, pushing the clips toward the center of the iPod until both have been freed.

  6. iPod Nano 1st Generation Rear Panel Replacement: 6 단계, 이미지 1/3 iPod Nano 1st Generation Rear Panel Replacement: 6 단계, 이미지 2/3 iPod Nano 1st Generation Rear Panel Replacement: 6 단계, 이미지 3/3
    • Repeat the same procedure listed in the previous step to free the five clips along the headphone jack side of the iPod.

  7. iPod Nano 1st Generation Rear Panel Replacement: 7 단계, 이미지 1/1
    • After ensuring all tabs are free, separate the two halves of the iPod.

    • The rear panel is now free from the iPod.

결론

To reassemble your device, follow these instructions in reverse order.

다른 19명이 해당 안내서를 완성하였습니다.

iRobot

회원 가입일: 09/24/09

1 평판

안내서 636개 작성하였습니다

댓글 0개

댓글 쓰기

조회 통계:

24 시간 전: 0

7일 전: 3

30일 전: 29

전체 시간: 14,444