주요 콘텐츠로 건너뛰기

필요한 것

해당 분해도는 수리 안내서가 아닙니다. Nintendo DSi 수리는 저희 서비스 설명서를 사용하십시오.

  1. Nintendo DSi 분해도, Nintendo DSi 분해도: 1 단계, 이미지 1/2 Nintendo DSi 분해도, Nintendo DSi 분해도: 1 단계, 이미지 2/2
    • 왔다! 왔다! 야!

    • 박스 내용:

    • 닌텐도 DSi

    • 작동 설명서

    • 빠른 시작 안내서

    • AC 어댑터 충전기

    • 추가 Stylus

    • 마리오의 모자가 보낸 Club Nintendo/클럽 닌텐도 가입 초대장.

    lol invitation from marios hat to join club nintendo

    nick0296 - 답글

  2. Nintendo DSi 분해도: 2 단계, 이미지 1/1
    • 오 다채로운 색상이다!

    • 설명서는 두께를 제외한 모든 면에서 DSi보다 방대합니다. 많은 컬러 페이지가 있습니다... 그래서 DSi는 이전 제품보다 훨씬 더 비싼지도 모르겠습니다.

  3. Nintendo DSi 분해도: 3 단계, 이미지 1/2 Nintendo DSi 분해도: 3 단계, 이미지 2/2
    • 닌텐도 DS Lite(좌)와 닌텐도 DSi(우) 비교.

    • DSi의 새로운 스킨: 무광 블랙(거의 짙은 회색) 색상은 DS Lite보다 훨씬 거친 느낌입니다. 거친 표면 덕분에 그립감이 향상되고 긁힘 방지 기능이 향상되었습니다.

    • DSi는 DS Lite보다 3mm 얇은 반면, 길이와 너비는 각각 4mm와 1mm 더 늘어났습니다.

    • DSi는 이전 모델의 3인치 패널보다 0.25인치 더 큰 3.25인치 LCD 패널이 장착되어 있습니다.

  4. Nintendo DSi 분해도: 4 단계, 이미지 1/2 Nintendo DSi 분해도: 4 단계, 이미지 2/2
    • Phillips/십자 나사 두 개가 배터리로의 접근을 막습니다. 자사의 맞춤형 드라이버를 사용하여 쉽게 풀 수 있습니다.

    • 스퍼저(또는 손톱)으로 살짝 튕기면 누르면 배터리가 하우징에서 분리됩니다.

  5. Nintendo DSi 분해도: 5 단계, 이미지 1/1
    • DSi의 하단 케이스를 고정하는 나사는 총 일곱 개 입니다:

    • 나사 세 개는 플러그나 커버를 분리하지 않아도 바로 보입니다.

    • 기기 상단에 있는 플러그 두 개를 분리해야 자사 두 개가 보입니다.

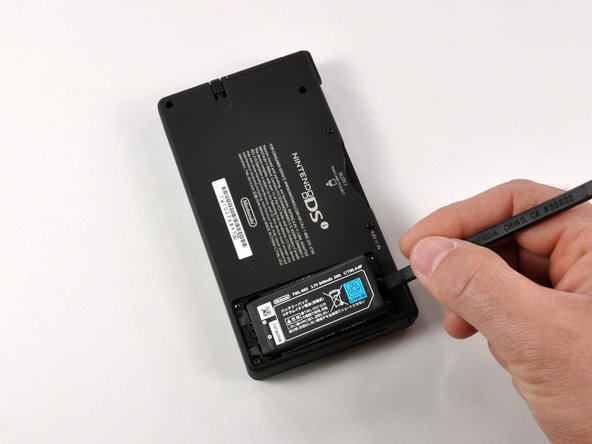
    • 배터리 칸을 분리하면 추가로 풀어야 하는 나사 두 개가 보입니다.

    What kind of screwdriver are you using to unscrew these 7 screws ? I've tried but I didn't move an inch

    lyondell - 답글

    How do I remove the plugs?

    Albert Einsteine - 답글

    I used the broad end of the spudger to try and get them out. It worked fine on the first one, but the second one split in half and I had to scrape out the rest. There's adhesive on the bottom of each plug.

    krystal -

    What do the other two screws that aren’t circled above the battery do? Are they for the screen? Should they be tampered with at all? Are they even screws?

    Ethan - 답글

    what do you do when your things are locked in

    jedd rose not my name - 답글

    %#*@ these screws are tight af. I literally destroyed my #00 !!

    Franz - 답글

  6. Nintendo DSi 분해도: 6 단계, 이미지 1/1
    • 그리고 이렇게 케이스가 바로 열립니다.

    • 주황색 커넥터가 케이스를 서로 연결합니다. DSi를 열 때는 이 커넥터를 손상하지 않도록 주의하세요.

    Hallo,

    I'm stuck on Step 6. The case is stuck on the edge under the bottom screen. I'm afraid to pull too hard, because everything can break. ;)

    Can you help me?

    Xandecs - 답글

    Wow, that happened to me too. I had to use a tiny screw to unjam the bottom. nothing looked broken, but when I put my Dsi back together, the screens got fuzzy.

    Teto -

    "And just like that, the case comes open."

    Not quite. Something holds the bottom half of the case together.

    PuyoDead - 답글

    PuyoDead로 부터 인용:

    "And just like that, the case comes open."

    Not quite. Something holds the bottom half of the case together.

    You need a very small flathead screwdriver or a strong thumbnail to work the edges apart. Come around from the edge furthest "in" which you can first enter said flathead. Pry gently! and careful about the orange connector. Go slow! Good luck!

    lindsay powers - 답글

    What does that connector do? I opened this unit up to clean the R&L triggers and now my top screen fades and is all discolored.

    I though it was cuz i messed up that connector when putting it back together.

    Chris Delgado - 답글

    There are three tabs on the case under the screen. You can see where they go in in the image (they look like 3 rectangles). I used a small plastic pry tool and pulled the case away from the screen a little bit and they came apart. You could try using an old credit/store card/thin plastic. It came away clean after that.

    javin.craig - 답글

  7. Nintendo DSi 분해도: 7 단계, 이미지 1/1
    • 구형과 신형을 비교합니다. DS Lite(좌)와 DSi(우) 에는 명확한 차이가 있습니다.

    • DSi는 더 작은 840mAh 충전식 배터리(우)를 사용하는 반면, DS Lite(좌)는 1000mAh를 사용합니다. 크기 차이는 용량 차이에 비례합니다. 오리지널 닌텐도 DS는 850mAh 배터리와 함께 제공되었습니다.

  8. Nintendo DSi 분해도: 8 단계, 이미지 1/1
    • 배터리 PCB를 분리하는 것은 매우 간단한 절차입니다:

    • 커넥터 세 개를 연결 해제 하세요.

    • Phillips/십자 나사 다섯 개를 풀어주세요.

    How do I take the second connector out?

    Albert Einsteine - 답글

    Boiiiii is this still active???

    Albert Einsteine - 답글

    Help. Hhhhhhhhhhhhh

    Albert Einsteine - 답글

    How do I do this please help

    Albert Einsteine - 답글

    OOF nvm I just found out what a taper down is

    Albert Einsteine - 답글

    What do I do? I got the whole connector off at the bottom, so do I attach it with electrical tape (I don’t have a saudering iron)

    Jamal Zahr - 답글

    Oops took that off. Yikes. I noticed the device doesn't have a black flapper. :l

    Salina - 답글

  9. Nintendo DSi 분해도: 9 단계, 이미지 1/2 Nintendo DSi 분해도: 9 단계, 이미지 2/2
    • Wi-Fi 보드는 하나의 큰 커넥터를 통해 제자리에 고정됩니다. 스퍼저의 간단한 지렛대 동작으로 메인 보드에서 분리할 수 있습니다.

    • 스퍼저를 한 번 더 튕기면 Wi-Fi 보드 커넥터 전선이 분리됩니다.

  10. Nintendo DSi 분해도: 10 단계, 이미지 1/2 Nintendo DSi 분해도: 10 단계, 이미지 2/2
    • 메인 보드는 배터리 PCB만큼이다 쉽게 분리됩니다:

    • Phillips/십자 나사 네 개를 풀어주세요.

    • 분리하기 전에 커넥터 여셧 개를 분리해야 합니다: 보이는 쪽에 다섯 개, 반대편에 한 개.

  11. Nintendo DSi 분해도: 11 단계, 이미지 1/1
    • 분해으 첫 번째 단계를 마쳤습니다.

    hahaha...mario xD

    defconhakr - 답글

  12. Nintendo DSi 분해도: 12 단계, 이미지 1/2 Nintendo DSi 분해도: 12 단계, 이미지 2/2
    • 아래의 Phillips/십자 나사를 드러내기 위해 검정색 플라스틱 커버 네 개를 풀어야 합니다.

    • Phillips/십자 나사 네 개를 풀면 상단 디스플레이에 접근할 수 있습니다.

  13. Nintendo DSi 분해도: 13 단계, 이미지 1/2 Nintendo DSi 분해도: 13 단계, 이미지 2/2
    • 외부 케이스가 분리된 상단부.

    • 무선 LAN용 안테나 보드는 섀시의 오른편 상단 모서리에 장착되어 있습니다.

    • 상단 디스플레이와 카메라의 리본 케이블은 케이스 반쪽 사이의 힌지를 통해 감겨져 있습니다. 이제 이 부품을 로봇이 조립하는 모습을 보고 싶은 목록에 추가하겠습니다.

    • 두 번째 사진에 보이는 얇은 주황색 전선은 마이크용입니다. 재생 중에 음정과 속도를 변형할 수 있는 새로운 기능에 모든 꼬마 DJ들이 침을 흘릴 것입니다.

    It just slides out >__________>

    It took me 15 minutes to figure this out

    evolutionterry - 답글

    yeah missing a step here, guess I will just man handle this and rip the cover off

    CustomZ02 - 답글

  14. Nintendo DSi 분해도: 14 단계, 이미지 1/1
    • DSi에는 (0.3메가픽셀) VGA CMOS 디지털 카메라 두 개가 있습니다: 하나는 내부 힌지에 사용자를 향해 있고 다른 하나는 외부 쉘에 있습니다.

    Now to find a way to hard mod the camera to a better one. 2 mpx anyone?

    bloodychaos - 답글

  15. Nintendo DSi 분해도: 15 단계, 이미지 1/2 Nintendo DSi 분해도: 15 단계, 이미지 2/2
    • Phillips/십자 나사 여덟 개가 배터리 칸과 stylus 트레이/SD/SDHC 확장 슬롯을 케이스에 고정합니다.

    • DSi에는 통합 SD/SDHC 확장 슬롯이 있습니다. 이제 일반 SD 카드를 사용하여 AAC 오디오 파일을 재생하고 사진 또는 다운로드한 소프트웨어를 외부 저장할 수 있습니다. 자가 제작 앱 아닌가요?

  16. Nintendo DSi 분해도: 16 단계, 이미지 1/3 Nintendo DSi 분해도: 16 단계, 이미지 2/3 Nintendo DSi 분해도: 16 단계, 이미지 3/3
    • 로직 보드의 화려함이 보입니다.

    • 흥미로운 칩들, 왼쪽에서 오른쪽으로:

    • Samsung 1세대 MoviNAND 및 KMAPF0000M: 256MB 낸드 플래시 및 MMC 컨트롤러. 통합된 MMC 컨트롤러를 통해 CPU가 플래시 메모리와 직접 상호작용하는 복잡한 작업을 오프로드할 수 있습니다.

    • 82DBS08164D-70L: Fujitsu Ltd 128-bit FCRAM (fast-cycle RAM) 칩.

    • 닌텐도의 커스텀 ARM CPU. CPU는 2008년 9월에 제조되었습니다.

  17. Nintendo DSi 분해도: 17 단계, 이미지 1/2 Nintendo DSi 분해도: 17 단계, 이미지 2/2
    • 닌텐도 Dsi... 편히 잠드시길!

    • 흥미로운 칩들:

    • Samsung 1세대 MoviNAND 및 KMAPF0000M: 256MB 낸드 플래시 및 MMC 컨트롤러. 통합된 MMC 컨트롤러를 통해 CPU가 플래시 메모리와 직접 상호작용하는 복잡한 작업을 오프로드할 수 있습니다.

    • 82DBS08164D-70L: Fujitsu Ltd 128-bit FCRAM (fast-cycle RAM) 칩.

    • 닌텐도의 커스텀 ARM CPU. CPU는 2008년 9월에 제조되었습니다.

다음 번역가들에게 특별히 감사 드립니다:

en ko

100%

이 번역자 분들은 저희가 세상을 수리하는데 동참해 주시는 분입니다! 기여하시겠습니까?
번역 시작하기 ›

Walter Galan

694,692 평판

안내서 1,203개 작성하였습니다

댓글 10개

This is Nintendo DSi Teardown

Fotini Grotenbreg - 답글

Wow I never would have guessed that

Gigabit87898 -

Hello, how do you close the system after opening it?

When I opened my dsi to clean the L and R buttons, I removed the case from the top,opposite of what you did. I dont know how to reconnect that small orange ribbon! <:(

Teto - 답글

I would like to contribute to iFixit by doing a 3DS XL Teardown. (2012), but i do not have the console.

Santi12008 - 답글

You should be careful when removing the L button assembly and moving a case. There’s a small square pocket in the case which houses a small square nut which is where the top screw from the battery lid fastens to. The black piece that keeps the L shoulder button assembly in place also holds this nut. Once you remove it, the nut is free to come out and can be easily lost.

BrunoDSL - 답글

First time disassembling my DSi and now my console doesn’t turn on. upon plugging the charger in, the orange led lights up then turns off.

Idris Anwar - 답글

skill issue lmfao

Poppy Norman -

Hey there, what you might've done is dislodge your connector.

What you want to do in order to fix it is open it up again, and look for an orange cable that connects the top to the bottom, if it is disconnected you have found your problem, if it is only partially connected, push it in until you hear a click. Hope this helps.

Cool Guy -

I have a DSi that does that too. It's caused by a blown fuse, apparently F1/F2 can cause it? The easiest repair is to just bridge the points together. I'm still not skilled enough to do that i'm 15 lmao

dontclick notgood -

What do i do if i over screw the battery screw

Foxy the dj - 답글

댓글 쓰기

조회 통계:

24 시간 전: 29

7일 전: 183

30일 전: 971

전체 시간: 324,956