소개
While phone makers and operating system developers of dubious numeracy skip straight from eight to ten, Samsung stays strong and gives us the Samsung Galaxy S9+ (sans notch, even). Only teardown will tell if this phone is a true contender, or just a weird AR Emoji machine.
We've also got a teardown of the smaller, standard Galaxy S9—check it out!
There's way more to iFixit than just teardowns! Check us out on Facebook, Twitter, and Instagram to stay up-to-date on all things tech!
필요한 것
-
-
The S9+ bumps specs, and the number of aperture sizes. Here's what we know:
-
Notchless 6.2" AMOLED Display with resolution of 2960 × 1440 (~530 ppi)
-
Qualcomm Snapdragon 845 or Samsung’s own Exynos 9810, depending on location
-
12 MP OIS dual-aperture main camera—f/1.5 and f/2.4 modes—plus a 12 MP OIS secondary camera and an 8 MP selfie cam
-
Headphone jack and microSD slot
-
IP68 water/dust-proofing rating
-
Android 8.0 Oreo
-
-
-
Topside, we find the standard SIM slot, and a slightly rearranged camera/fingerprint sensor array. Say goodbye to smudgy lenses!
-
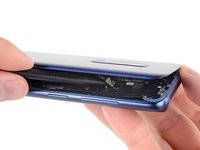
The bottom end looks almost the same as the S8—yes, that means the 3.5 mm audio jack lives!
-
At first glance , the speaker grille seems to be replaced with a port—but no, that's still a grille, with the mesh tucked wayyy back there. Is there a benefit to speaker holes you can fill with lint?
-
-
-
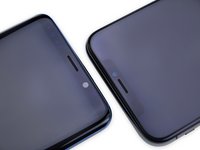
Admirably, in a sea of iPhone imitators, Samsung stays notchless, and manages some pretty teeny bezels.
-
S9+ featured left and "bezel-less" notched iPhone X on the right.
-
On the backside, the iPhone X camera bump may reach ugly heights, but the S9+ sensor arrangement is more sprawling and awkward looking in comparison.
-
These glass backs are rapidly becoming the industry standard thanks to wireless charging. Cool feature; bad news for butterfingers.
-
Of course, the iPhone 4S had a glass back you could replace in two minutes; we suspect that won't be the case here.
-
-
-
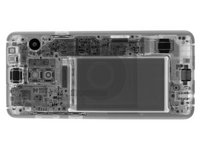
Before diving in, we call upon our friends at Creative Electron for some high-energy recon.
-
Besides a new dual camera and some shuffling of minor components, things look pretty much the same here as they did last time around.
-
-
-
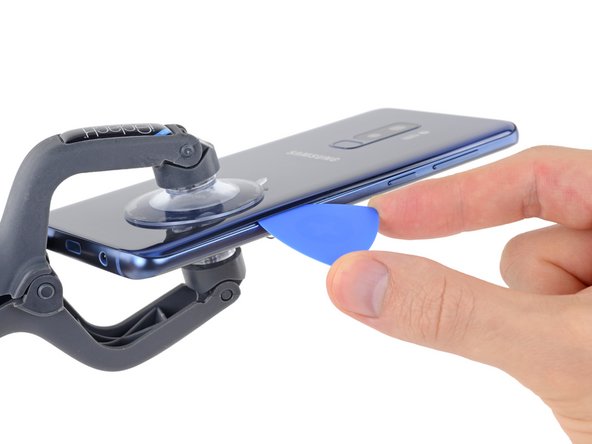
While it's no S4, the S9 is actually a welcome respite from our more recent, destructive teardowns.
-
The standard application of heat and opening pick helps us along, but it's definitely no picnic!
-
Thanks to prior experience—no thanks to Samsung—we are able to safely dispatch the sensor assembly cable with no casualties. Documentation makes the dream work!
-
-
-
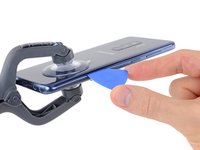
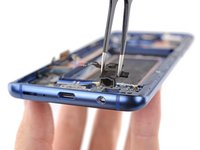
After navigating a treacherous opening, we find our way into the back of the phone.
-
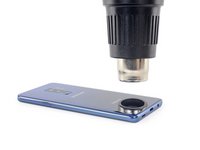
We head straight to the rear camera to get a look at the fancy new dual aperture camera in action.
-
Standard camera lenses use at least five aperture blades to keep the aperture roughly circular throughout many f-stop adjustments. This Galaxy's aperture has just two rotating, ring-like blades for its single adjustment.
-
-
-
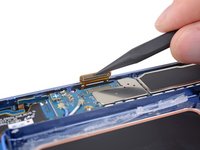
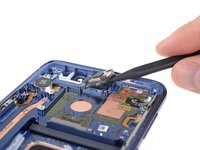
The relocated fingerprint sensor becomes our first victim as we pry it from its home. A ring of stickiness keeps the sensor in, and your liquids out.
-
We're a little disappointed Samsung hasn't yet thought up a better way to route that fingerprint sensor cable—it got ensnared in some nasty glue as we pried off the back cover, nearly costing us the sensor. Next year Samsung?
-
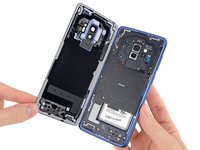
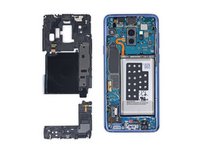
Fifteen screws later, the familiar two-piece midframe wafer pops out, with its integrated wireless charging coil, antenna assembly, and lower speaker all aboard.
-
-
-
이 단계에 사용된 도구:iFixit Adhesive Remover$19.99
-
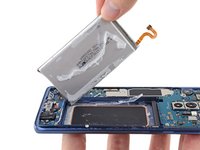
What do you need to remove a glued-down battery from a Galaxy phone?
-
Option 1: lots of heat, a pry tool, a fire extinguisher, a bucket of sand, and nerves of
steelvibranium. -
Option 2: a syringe loaded with a little iFixit Adhesive Remover.
-
We opt for the latter and splash a bit of the blue stuff into the little tub that cradles the battery. A few minutes later, we have our prize.
-
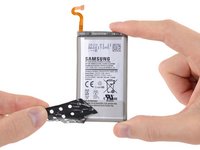
Yep, those are the exact same specs as the battery we found in the S8+ last year... and the infamous Note7.
-
By the way, Samsung really likes to put this sticky black webbing on top of their batteries, and we've never learned why. Give us a shout if you can offer a clue.
-
-
-
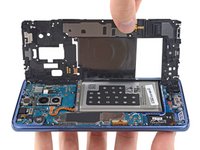
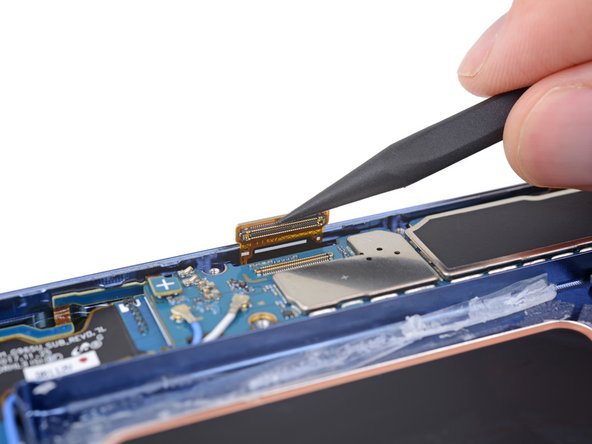
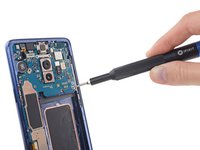
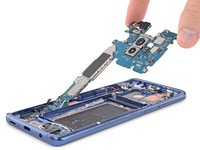
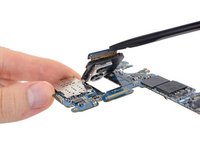
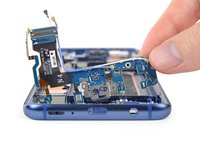
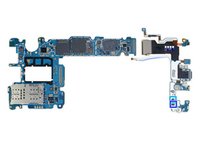
We'll have the motherboard free as soon as we twirl away two screws and spudger off a couple FPC connectors.
-
No one could have expected this display cable to be threaded through a slit in the chassis and latched onto the motherboard as if trying to pull it down to its doom...
-
...No one except for you, if you've read pretty much any of our Galaxy teardowns in recent years.
-
Samsung, we see why you did it, but we're pretty sure you're smarter than this. It's 2018—show us a display we can disconnect and replace without having to carve off a glued-down back cover. We dare you!
-
Motherboard achievement: unlocked.
-
-
-
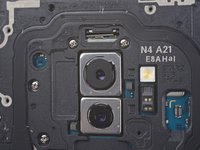
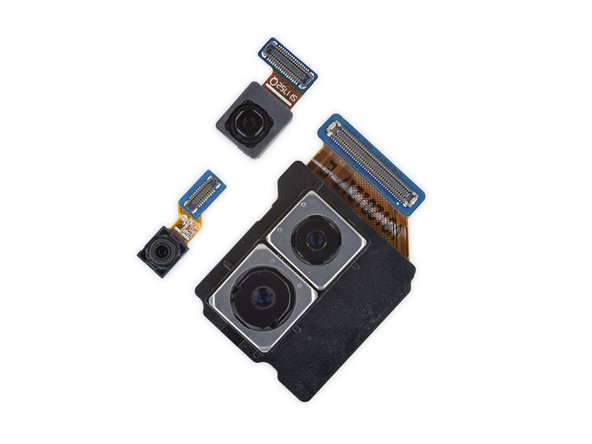
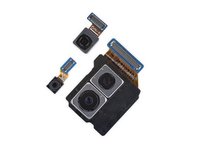
Despite the dual image sensors, this double camera is a single unit, on a single PCB, with a single connector!
-
The S9+ camera grand total now comes to four—in addition to the (newly) dual main camera, we have the selfie and iris cameras.
-
The camera line appears to be called Star this time, compared to last year's "Dream" cameras.
-
Our friends over at TechInsights pulled the camera modules apart, and there are chips lurking in there. Samsung claims that their integrated DRAM helps the camera wrangle up to four times more image data. 960 FPS slo-mo, anybody?
-
-
-
The mighty headphone jack makes a valiant return. Its gasket protects the phone, and its modularity promises an inexpensive repair should it need replacement.
-
We snag the multi-purpose daughterboard assembly, featuring coaxial interconnect cables, microphone, USB-C connector, and oodles of spring contacts.
-
Next out is the second of the speakers—the earpiece—which newly doubles as a loudspeaker, enabling not just stereo but "surround" sound (such as a phone can offer).
-
-
-
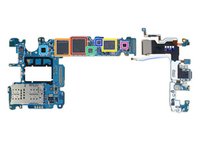
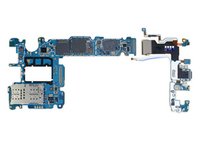
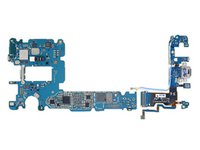
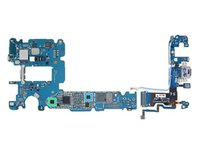
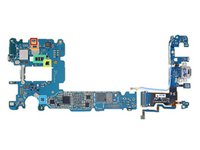
Throw that mobo on the table and give it a spin! Side A has all the big hits:
-
Samsung K3UH6H60AM-NGCJ LPDDR4X 6 GB DRAM, layered over a Qualcomm Snapdragon 845
-
Toshiba THGAF4G9N4LBAIR 64 GB UFS (NAND flash + controller)
-
Avago AFEM-9096 front end module
-
Qualcomm Aqstic™ WCD9341 audio codec
-
Maxim Integrated MAX77705F PMIC
-
Qualcomm QET4100 envelope tracker
-
Maxim MAX98512 audio amplifier
-
-
-
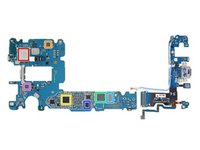
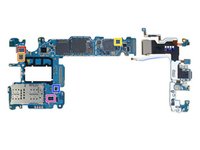
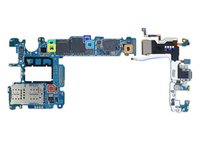
Side B has all the hits they couldn't fit:
-
Murata KM7N16048 Wi-Fi/Bluetooth module
-
NXP PN80T NFC controller
-
Qualcomm PM845 (likely PMIC)
-
Qualcomm SDR845 RF tranceiver
-
Skyworks SKY78160-11 WLAN front-end module
-
Qualcomm PM8005 PMIC
-
Skyworks SKY13716-1 low band front end module
-
-
-
IC Identification, pt. 2:
-
Qualcomm QDM3870 high-band diversity front-end module
-
Qualcomm D5319 mid-band diversity front-end module
-
RDA Microelectronics RDA6213N FM transceiver (likely)
-
Samsung S2MPB02 camera power management
-
Samsung S2DOS05 display power management
-
Samsung S2MPB03 camera power management
-
Renesas (formerly IDT) P9320S wireless power receiver
-
-
-
IC Identification, pt.3:
-
NXP Semiconductor PCAL6524 24-bit I/O expander
-
ON Semiconductor FPF3688UCX load switch
-
Texas Instruments boost converter (likely)
-
ON Semiconductor FAN48618BUC53X 1 A boost regulator
-
Vishay DG2730 2-port, 480 Mbps USB 2.0 DPDT analog switch
-
Richtek RT8010GQW 1 A step-down DC-DC converter
-
Texas Instruments TPS7A05 200 mA LDO regulator
-
-
-
IC Identification, pt. 4 (sensors):
-
STMicroelectronics LSM6DSL 3-axis accelerometer/gyroscope
-
AKM Semiconductor AK09916C 3-axis electronic compass
-
STMicroelectronics LPS22HB pressure sensor
-
heart rate sensor
-
Ablic (formerly Seiko Instruments) S-5712CCDL1-I4T1U hall sensor
-
Semtech SX9320 proximity sensor (likely)
-
-
-
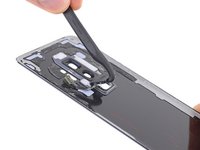
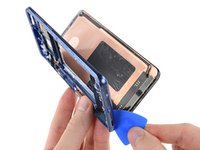
It's a hotbed of teardown activity as we attempt to unseat the display—but this glue is trying our patience, and we abandon our pile of iOpeners in favor of a heat gun once again.
-
As before, the heat and opening pick can do the job, but it's a marathon slog to get here if you're replacing a broken screen.
-
The Samsung-made display cable, like the cameras, is labeled Star, and combines both display and digitizer in one sealed unit.
-
There's two final chips piggybacked onto the display:
-
Samsung S6SY761X touch controller (as seen on the S8 series)
-
Winbond W25Q80EWUXIE 8 Mb serial NOR flash
-
-
-
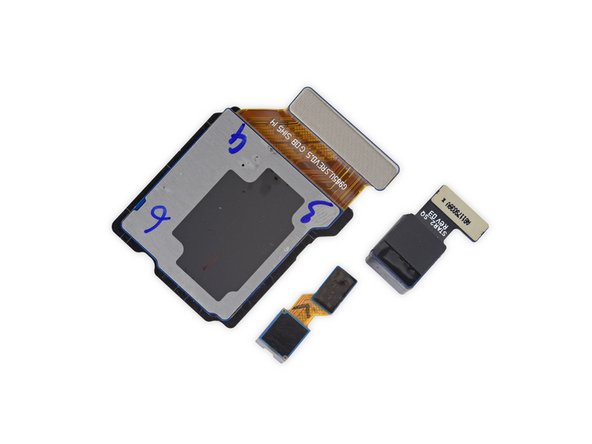
Time for a biometrics faceoff.
-
On the left, looking pretty much exactly like what we found last year, we have the S9+ hardware: iris scanner, front-facing camera, IR emitter, and proximity sensor (likely AMS TMD4906).
-
On the right, the raison d'être for Apple's infamous notch: Face ID hardware including a front-facing camera, IR dot projector, IR camera, plus room for the flood illuminator and rangefinder embedded in the display.
-
Based on early reviews, it may have been overly ambitious of Samsung to jump on the Animoji train without a hardware update to bring it up to speed.
-
- Many components are modular and can be replaced independently.
- The battery replacement is technically possible, but accessing it is an unnecessary challenge.
- Glued-down glass both front and back means greater risk of breakage, and makes repairs difficult to start.
- Screen repairs require a lot of disassembly while battling tough adhesive.


최종 의견
수리 용이성 점수


(10은 가장 쉬운 수리를 뚯함)

댓글 41개
Just like the S8 being called the “Dream”, the Note 8 was called the “Great” and the S9 is called the “Star.“ So yes, there are fingerprint sensors out there called the “Dream Finger,“ “Great Finger,“ and “Star Finger.“ Weird, yet hilarious.
Hey look at that “DREAM FINGER” right here on the S8 cable! Great info!
Lmao, I hope you understand your referring to the ribbon and not the entire sensor; I am not at liberty to correct you, but lookup the description of a fingerprint sensor from a genuine OEM authorized reseller
Yes, I do understand that I am referring to the ribbon, that’s why I called it a cable. It’s not a leap to assume that the cable is carrying the label for the assembly. Just like the “S9+” printed on the rear case represents the whole phone, not just the glass.
The sticky black webbing on the battery is most likely a thermal pad to assist with heat dissipation. An air gap, even a tiny one (microns) still acts as a poor thermal conductor.