Soldering irons are essential for electronics, DIY, and repair projects. Proper maintenance ensures optimal performance, extends the iron's lifespan, and improves soldering quality. Not to mention, soldering with a poorly maintained iron is frustrating and makes soldering a lot harder than it needs to be, much like cooking with a dull knife.
While the iron tip is the primary focus of maintenance, the entire soldering iron requires attention for optimal performance. This wiki covers how to care for both the soldering iron and its tip, detailing cleaning techniques, storage practices, and preventative measures to solder effectively and frustration-free.
General Iron Maintenance
Before getting to the tip, the soldering iron itself also requires regular maintenance:
- Inspect the Power Cord and Handle: Regularly check for signs of wear on the cord, especially where it connects to the handle. Cracked or frayed cords can be dangerous and should be replaced immediately.
- Clean the Iron Body: Dust and debris can accumulate on the iron's handle and heating element. Wipe the body down with a dry cloth or compressed air periodically, especially around any ventilation areas to prevent overheating.
- Tighten Loose Connections: If your iron has interchangeable tips or accessories, ensure all connections are tight and secure. Loose connections can lead to uneven heating and poor performance.
That about covers basic iron maintenance. Most of your focus should be centered on keeping the very tip of the iron in working condition—the “consumable” part of your iron. Irons and their tips, if of decent quality and maintained properly, should last you for years if not decades.
Before we dive into tip maintenance, it helps to understand the basics of soldering iron tip anatomy.
Tip Anatomy

[Source: Hakko]
Exact iron tip anatomy varies by manufacturer and model, but in general, this is the basic setup for electric irons:
- Heating element: A ceramic rod heated electrically at the center of the tip (not pictured).
- Copper core: Transfers heat from the heating element to the iron/chromium plating.

- Iron/nickel plating: The iron/nickel plating is exposed on the tip’s working area due to its excellent heat conductivity and ability to interact well with solder (known as "wetting").
- The exposed iron/nickel plating on the tip’s surface offers excellent heat conductivity and "wetting" properties, making it the "working area" (highlighted in red to the left) where soldering occurs. Think of the working area like the edge of a knife.
- If you see any pitting with black in it, it’s time to replace the tip.
- The exposed iron/nickel plating on the tip’s surface offers excellent heat conductivity and "wetting" properties, making it the "working area" (highlighted in red to the left) where soldering occurs. Think of the working area like the edge of a knife.
- Chromium/nickel plating: Covers all of the iron plating but the working area of the tip. Has great corrosion resistance but doesn’t wet as easily as iron.
- Tin coating: The iron-plated working zone often comes “tinned” from the manufacturer in order to prevent oxidation and to transfer heat. Maintaining this coat of tin is the most important aspect of iron longevity and effective solder wetting.
When Should I Just Replace the Tip?

If you notice pits, holes, cracks, deformations, exposed copper, or other signs of physical damage on your iron tip (as shown in the photo to the left), save yourself the headache of trying to rejuvenate it and just replace the tip.
A well-maintained and properly used tip will take many years to degrade, so if you're using a quality iron and tip and wear out tips quickly, it's probably time to revaluate your soldering and maintenance procedures.
But I Need to Complete That Last Joint!
If you really need to complete that last joint or two and can't get the solder to wet, you can use a brass wire brush or sandpaper to remove stubborn buildup, but don't expect the tip to last much longer. Make no mistake: Using mechanical abrasives on the thin iron plating of your iron's working area is a stopgap. Check out our guide on how to address extreme oxidation.
Live Long and Prosper: Keep it Clean and Tinned

Keeping your soldering iron tip clean and tinned (coated in solder) is the key to prolonging tip life and directly impacts the quality of your solder joints and the ease of heat transfer.
We recommend checking out our guide on How to Clean and Tin a Soldering Iron Tip that goes into detail about cleaning and tinning soldering iron tips; we'll just go into the basics, here.
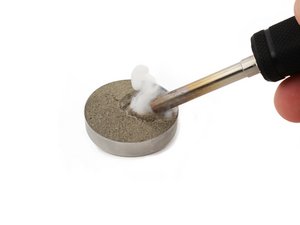
While the iron is hot, clean and tin the tip every couple of joints. Here’s how to clean the tip during use:
Use a brass sponge (also called brass wool, a brass cleaning ball, or brass tip cleaner), or a cellulose sponge damp with distilled water, to wipe off excess solder, flux, and buildup.
- Many solderers prefer brass sponge because of their longevity, gentle but effective abrasiveness, and ease of use. If you opt for a cellulose sponge, it’s important to use distilled water to dampen it because tap water contains contaminants and minerals that will build up on your tip over time.
- Feed some fresh solder onto the working area of the iron tip; this is called “tinning” the tip.
- Wipe any excess solder off with a brass cleaning ball or a cellulose sponge damp with distilled water.
Deep Cleaning the Tip (Occasionally or When Heavily Oxidized):
If your tip becomes heavily oxidized, it may stop transferring heat properly. If solder won’t wet onto the working area of your tip after a couple of rounds of cleaning and tinning, it’s time to use some tip tinner.

- Use a tip tinner (a mix of aggressive flux and solder) to remove oxidation and restore performance.
- Clean off any excess tip tinner with a brass cleaning ball or a cellulose sponge damp with distilled water.
- After the tip is clean, go ahead and tin the tip.
Extreme Oxidation
If regular cleaning/tinning and a round or two of tip tinner couldn't remove stubborn oxidation, it may be time for more extreme, last-resort actions. Check out our recommendations on how to address extreme oxidation.
Tips To Extend Tip Lifespan
Use High-quality Solder
Low-quality solder often contains impurities that can leave deposits on iron tips. Be sure to use quality solder from reputable manufacturers. Learn more about solder here.
Use the Entire Working Area Evenly
If you’re using a symmetrical tip, like a conical, wedge, or needle tip, rotate the tip or your grip periodically to spread wear evenly across the working area and extend its life; it’s similar to rotating car tires to distribute wear evenly.
Keep it Cool (When it Doesn’t Need To Be Hot)
Although the whole point of a soldering iron is to heat up, heat increases the rate of tip oxidation (rust). To get a bit nerdy, heat increases the rate of particle kinetic energy, which means more frequent particle collisions, which means more oxidation (shoutout Arrhenius equation!).

Simply put, the higher the iron temperature, and the longer it’s hot, the faster the tip it oxidizes.
[Source: Institute for Microelectronics at Tu Wien]
For larger components, a higher temperature may be needed, but avoid keeping the iron at high heat unnecessarily.
Idle Time

If your iron can automatically reduce its temperature after being inactive (like the FixHub Smart Soldering Iron), you can shorten the time it takes to idle, and, if possible, set a lower idle temperature.
Whenever you’re taking a break, or otherwise not soldering for more than a couple of minutes, go ahead and tin the tip and shut the iron off.
Storage

Flood your hot iron tip with fresh solder, and instead of wiping off the excess, just leave a healthy glob covering the entire working area.
After the iron is fully cooled, store it in a cool and dry area.
TL;DR:
- Keep the tip clean and tinned.
- Use quality solder and avoid excessive, prolonged heat.
- Store the iron in a cool and dry area with solder on the tip to prevent oxidation.


댓글 0개