Aperture Coupling Ring

질문이 없습니다. 가장 먼저 질문해보세요!
해당 기기를 고치는데 사용하는 일반 도구들 입니다. 매 절차에 모든 도구를 사용하지는 않습니다.
The Pentax MX was released by Asahi Optical Company in 1976 and was a response to the general trend of making 35mm SLRs smaller and lighter. Pentax took the pro-grade KX and shrunk it down to one of the smallest bodies available without sacrificing any features or functionality. The size of the viewfinder image was even increased slightly, to give the MX one of the nicest views of any 35mm SLR.
The operation of the camera, including the timing of the shutter speeds, is fully mechanical. The battery is only required for the light meter, but normal exposures can be made without any power. Consequently, most malfunctions are due to dirty or fouled mechanisms. Disassembling, cleaning and reassembling the affected area will resolve most issues with the camera. Occasionally, replacement parts will be needed, but the individual components are quite robust and most can be refurbished.
The general procedure for troubleshooting major faults and malfunctions is to disassemble the camera into its primary subassemblies and inspect each to see if it is functioning normally. For the Pentax MX, and many other 35mm SLRs, the major subassemblies and the functions they perform are as follows.
Before embarking on more lengthy repairs, it's recommended to have a good understanding of how the camera is supposed to function. See the accompanying wiki, How the Pentax MX Works, for detailed descriptions of the most important internal mechanisms. It's also a useful reference for troubleshooting problems and for getting the camera back together with complete functionality.
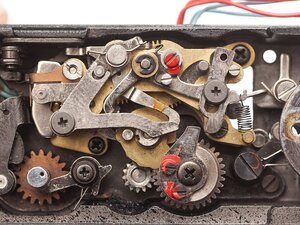
The most common issue is simply a jammed camera. The shutter won't fire and/or the film advance won't wind. The release sequence of a mechanical camera is quite complex and if any latch or lever is not functioning properly, it can result in an incomplete exposure cycle and a jammed camera. The high level solution is to disassemble the camera and inspect the different mechanical subassemblies until the root cause is identified. The most common areas to find issues are on the bottom of the camera and on the side of the mirror box. Disassembling and cleaning the mechanisms can return most jammed cameras to functionality.
Inoperable meters are somewhat common. This is usually caused by corroded battery contacts or bad internal wiring, which are repairable. The silicone diodes of the metering cells are generally more robust than older CdS cells, but they can still fail, requiring replacement parts to restore functionality.
Exposure variation within the frame is another common problem. Over time, the speed of the shutter curtains can drift causing them to become out of sync. At high speeds, the curtains must be very precisely timed in order to create a narrow slit that travels over the film. If one curtain is too fast or too slow, the slit can collapse resulting in little or no exposure on that part of the frame. While the adjustment points for curtain speed and release timing are easily accessible, making changes is not recommended without advanced equipment that can accurately measure the speed and exposure time of the shutter. Additionally, extreme exposure variation is a sign of a dirty shutter and it's best to disassemble and clean it before making adjustments to ensure good long term performance of the camera.
If you are already performing significant disassembly of the camera for a repair, consider doing a more complete overhaul of the camera to reduce the chance of future issues. The following service will address the most common failure points of the Pentax MX.
In general, cameras do not require lubrication to function. They should be able to operate normally without oil or grease. Consequently, if a camera is not functioning, adding lubrication is not the solution. But there are some areas where adding proper lubrication will improve performance or reduce wear. Whenever possible, use the service manual for your specific camera model to identify critical points. When that isn't available, some general guidelines can be used to determine what kind of lubrication a mechanism might benefit from.
Generic levers and gears: No lubrication. Most of the mechanisms in a camera shouldn't be lubricated. A latch moving back and forth or an idler gear spinning do not require lubrication. If such a mechanism is sticking, it needs to be disassembled and cleaned. Lubrication is not free and comes with drawbacks, mainly that it holds dirt and grime. If an interface is lubricated, it needs periodic cleaning and re-lubrication to maintain. So the first rule is, unless it serves a specific purpose, don't use lubrication.
Fast moving shutter mechanisms: A lightweight synthetic oil (e.g. NyOil). There are some gears and shafts in the MX that spin or move rapidly when the shutter is fired. Examples would be the winding gears, curtain rods, slow speed governor, and a couple other points. Pentax recommends lubricating these points in order to get more consistent speeds out of the shutter. If the interfaces are dirty and grimy, they need to be disassembled and cleaned before new lubrication is applied.
Latching points: A heavy weight lithium grease with molybdenum disulfide (NLGI 3-4). There are a lot of metal-to-metal interfaces where mechanisms interact with each other. Sliding, hooking, latching, etc. These are often high friction interfaces and if left unlubricated can wear over time. Choose a grease that is very sticky and will stay in place on the applied surfaces. The moly additive helps further reduce wear at the surface of the materials.
High load interfaces: A medium weight lithium grease with molybdenum disulfide (NLGI 2-3). The film advance mechanism would fit into this category. The MX service manual recommends greasing the shaft of main wind gear, which will provide a much smoother feel for the advance lever and, more importantly, prevent wear.
Knob and dial detents: A medium weight lithium grease (NLGI 1-3). Shutter speed dials, aperture rings, etc. Most of the time the clicks will be provided by some kind of spring loaded feature jumping between grooves. Picking the best lubrication for these interfaces can require some trial and error as getting the proper feel is highly dependent on the geometry of the detents, the force of the spring, and the types of interfacing materials.
The vast majority of screws in the Pentax MX are right handed or traditionally threaded. However, some applications require a left handed or reverse threaded screw that is loosened by turning clockwise. Those screws are noted as such in all of the guides but are also listed here as a quick reference.
 Advance Lever Cap |  Wind Shaft Screw |  Mirror Charge Cam Screw |
 Shutter Roller Tensioning Gears |  Speed Indicator Adjustment Lock Screw |  Mirror Charge Lever Screw |
 Opening Curtain Wind Gear Screw |
See the Pentax MX Troubleshooting page.
지난 24시간: 14
지난 7일: 84
지난 30일: 358
전체 시간: 860