주요 콘텐츠로 건너뛰기
ASUS E210MA-TB.CL464BK Wi-Fi Card Replacement

ASUS E210MA-TB.CL464BK Wi-Fi Card Replacement

John Hutchins

John Hutchins2 다른 기여자

최종 수정일 June 9, 2023

5 분
조정

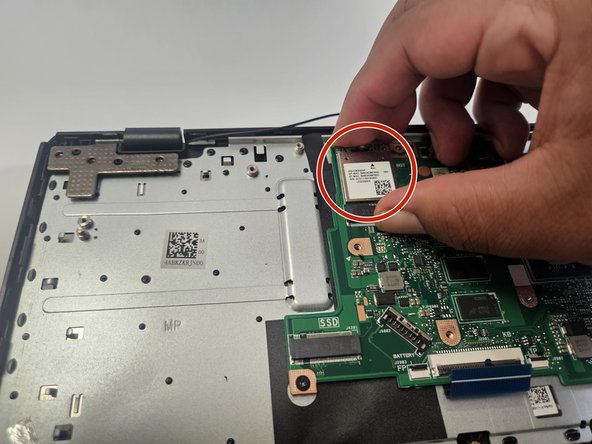
If you're experiencing difficulty connecting to a network, Its possible there is an issue with the wireless card In this guide, we go through the steps of configuration to correctly replace the wireless card. There are different types of wireless cards with different specifications and standards in our case it is a (802.11ac) (Dual band).

필요한 것

도구

더보기...

  1. ASUS E210MA-TB.CL464BK Wi-Fi Card Replacement, Wi-Fi Card: 1 단계, 이미지 3개 중 1개 ASUS E210MA-TB.CL464BK Wi-Fi Card Replacement, Wi-Fi Card: 1 단계, 이미지 3개 중 2개 ASUS E210MA-TB.CL464BK Wi-Fi Card Replacement, Wi-Fi Card: 1 단계, 이미지 3개 중 3개
    • Place the laptop with the bottom side facing up. Have the front (where the touchpad is) facing toward you.

    • Start by removing the ten 7mm screws on the bottom of the laptop using a JIS #00 screwdriver.

  2. ASUS E210MA-TB.CL464BK Wi-Fi Card Replacement: 2 단계, 이미지 1개 중 1개
    • Double-check to make sure all of the screws are removed.

    • If you have a Jimmy or other flat, straight-edge object, slide it in the crack where the halves of the case meet.

    • When the parts are separated, pull them apart to expose the insides of the case.

  3. ASUS E210MA-TB.CL464BK Wi-Fi Card Replacement: 3 단계, 이미지 2개 중 1개 ASUS E210MA-TB.CL464BK Wi-Fi Card Replacement: 3 단계, 이미지 2개 중 2개
    • Locate the card and remove it by gently lifting it up and pulling it out.

결론

To reassemble your device, follow these instructions in reverse order.

작성자

2다른 기여자 명과 함께

John Hutchins

회원 가입일: 02/07/23

763 평판

안내서 5개를 작성함

Gateway, Team 73-6, Gonzalez Spring 2023 Gateway, Team 73-6, Gonzalez Spring 2023 회원

GCC-GONZALEZ-S23S73G6

5 회원들

안내서 5개를 작성함

0가이드 댓글

댓글 쓰기

조회 통계:

지난 24시간: 2

지난 7일: 4

지난 30일: 21

전체 시간: 225