주요 콘텐츠로 건너뛰기

Acer Aspire 3000 Keyboard Replacement

필요한 것

  1. Acer Aspire 3000 Keyboard Replacement, Battery: 1 단계, 이미지 1/1
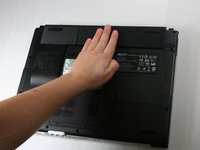
    • Begin with the device face down.

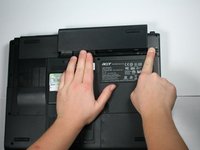
    • Orient the laptop so that the battery is on the side opposite of you and the headphone ports are facing towards you.

  2. Acer Aspire 3000 Keyboard Replacement: 2 단계, 이미지 1/2 Acer Aspire 3000 Keyboard Replacement: 2 단계, 이미지 2/2
    • Slide the button found below the battery to the left into the unlocked position.

    • You will know the battery is unlocked if the tab is pushed to the side where the symbol is unlocked.

  3. Acer Aspire 3000 Keyboard Replacement: 3 단계, 이미지 1/2 Acer Aspire 3000 Keyboard Replacement: 3 단계, 이미지 2/2
    • Locate the battery and the tab to the right of it.

    • Pull the tab to the right while simultaneously pushing the battery away from you.

    • Make sure you push the battery only when tab is held in the right position in order to avoid damage to the device.

  4. Acer Aspire 3000 Keyboard Replacement, Keyboard: 4 단계, 이미지 1/1
    • Lift the laptop to be on its edge, with the bottom of the screen in the air.

  5. Acer Aspire 3000 Keyboard Replacement: 5 단계, 이미지 1/1
    • Remove the three 4.6 mm Phillips #1 screws that are on this edge.

  6. Acer Aspire 3000 Keyboard Replacement: 6 단계, 이미지 1/2 Acer Aspire 3000 Keyboard Replacement: 6 단계, 이미지 2/2
    • Wedge a spudger into the latch on the right side.

    • Open the lid completely to facilitate removal.

    • Pull the handle of the spudger towards you to pop the first of the tabs that hold this piece in place.

    • Starting from right to left, pop the remaining tabs by lifting up on the panel and rotating the panel to the left.

  7. Acer Aspire 3000 Keyboard Replacement: 7 단계, 이미지 1/1
    • Unscrew the two 4.6 mm Phillips #1 screws.

  8. Acer Aspire 3000 Keyboard Replacement: 8 단계, 이미지 1/1
    • Gently lift the top edge of the keyboard out of its place.

    • Do not completely remove the keyboard as there is still a ribbon cable connecting it to the device.

  9. Acer Aspire 3000 Keyboard Replacement: 9 단계, 이미지 1/1
    • Lift the ZIF connector's black retaining flap. Then gently slide the ribbon cable out.

    • Remove the keyboard.

결론

To reassemble your device, follow these instructions in reverse order.

다른 한 분이 해당 안내서를 완성하였습니다.

Lykia Harper

회원 가입일: 10/29/16

258 평판

안내서 2개 작성하였습니다

Baylor, Team 4-2, Williams Fall 2016 Baylor, Team 4-2, Williams Fall 2016 회원

BU-WILLIAMS-F16S4G2

4 회원들

안내서 7개 작성하였습니다

댓글 0개

댓글 쓰기

조회 통계:

24 시간 전: 0

7일 전: 1

30일 전: 5

전체 시간: 770