주요 콘텐츠로 건너뛰기
Acer Aspire 5251-1513 RAM Replacement

Acer Aspire 5251-1513 RAM Replacement

Gicely Rodriguez

Gicely Rodriguez2 다른 기여자

최종 수정일 June 11, 2019

5 - 7 분
쉬움

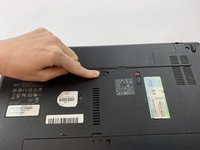
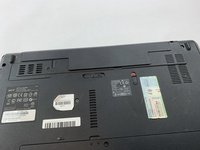
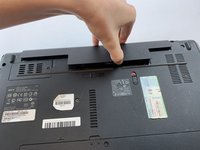
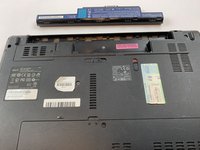
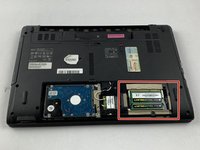
This guide will help you replace the RAM on this device. Make sure the battery is removed before beginning. RAM is used to store information for your laptop. If you are having memory issues, use these steps to replace and upgrade your RAM.

필요한 것

도구

  1. Acer Aspire 5251-1513 RAM Replacement, Battery: 1 단계, 이미지 1개 중 1개
    • Turn over the laptop so the back is facing up.

  2. Acer Aspire 5251-1513 RAM Replacement: 2 단계, 이미지 2개 중 1개 Acer Aspire 5251-1513 RAM Replacement: 2 단계, 이미지 2개 중 2개
    • Next to the battery is a switch with a lock symbol on it.

    • Unlock the switch by sliding it to reveal a red unlock symbol.

  3. Acer Aspire 5251-1513 RAM Replacement: 3 단계, 이미지 2개 중 1개 Acer Aspire 5251-1513 RAM Replacement: 3 단계, 이미지 2개 중 2개
    • Pull the other switch completely while the red unlock symbol is still present. The battery pack should pop up a bit.

  4. Acer Aspire 5251-1513 RAM Replacement: 4 단계, 이미지 2개 중 1개 Acer Aspire 5251-1513 RAM Replacement: 4 단계, 이미지 2개 중 2개
    • Remove the battery pack via the indentation at the top of the battery in between the two switches.

  5. Acer Aspire 5251-1513 RAM Replacement, RAM: 5 단계, 이미지 1개 중 1개
    • Unscrew the two 8.6 mm screws using a Phillips #0 screwdriver.

  6. Acer Aspire 5251-1513 RAM Replacement: 6 단계, 이미지 1개 중 1개
    • Use a spudger or plastic opening tool to lift the panel up. Then remove the panel entirely with your hands.

  7. Acer Aspire 5251-1513 RAM Replacement: 7 단계, 이미지 3개 중 1개 Acer Aspire 5251-1513 RAM Replacement: 7 단계, 이미지 3개 중 2개 Acer Aspire 5251-1513 RAM Replacement: 7 단계, 이미지 3개 중 3개
    • Find two metal pieces on either side of the RAM.

    • Pull the two tabs apart. The RAM will pop up when released.

  8. Acer Aspire 5251-1513 RAM Replacement: 8 단계, 이미지 1개 중 1개
    • Gently pull the RAM out

    • Please be careful pulling out the RAM, only touch the edges.

    • Repeat step 8 & 9 for the second RAM piece if applicable.

결론

To reassemble your device, follow these instructions in reverse order.

다른 한 분이 해당 안내서를 완성하였습니다.

작성자

2다른 기여자 명과 함께

Gicely Rodriguez

회원 가입일: 02/14/19

1,077 평판

안내서 5개를 작성함

USF Tampa, Team S1-G6, Leahy Spring 2019 USF Tampa, Team S1-G6, Leahy Spring 2019 회원

USFT-LEAHY-S19S1G6

4 회원들

안내서 5개를 작성함

댓글 0개

댓글 쓰기

조회 통계:

지난 24시간: 1

지난 7일: 15

지난 30일: 36

전체 시간: 928