주요 콘텐츠로 건너뛰기

Acer Aspire E1-510P-4637 Hard Drive Replacement

필요한 것

  1. Acer Aspire E1-510P-4637 Hard Drive Replacement, Battery: 1 단계, 이미지 1/1
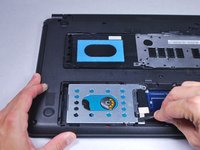
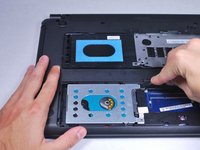
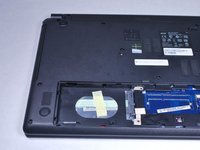
    • To release the battery, depress the battery release with a nylon spudger. Hold the latch down and slide it over.

  2. Acer Aspire E1-510P-4637 Hard Drive Replacement: 2 단계, 이미지 1/1
    • Firmly grab hold of the battery and slide it out of the laptop.

  3. Acer Aspire E1-510P-4637 Hard Drive Replacement, Hard Drive: 3 단계, 이미지 1/1
    • Remove the M2.5x8 screw with a PH1 screwdriver.

  4. Acer Aspire E1-510P-4637 Hard Drive Replacement: 4 단계, 이미지 1/1
    • Use the plastic opening tool to pop off the small back cover.

  5. Acer Aspire E1-510P-4637 Hard Drive Replacement: 5 단계, 이미지 1/1
    • Use a PH0 Phillips screwdriver to remove the screw securing the hard drive.

  6. Acer Aspire E1-510P-4637 Hard Drive Replacement: 6 단계, 이미지 1/2 Acer Aspire E1-510P-4637 Hard Drive Replacement: 6 단계, 이미지 2/2
    • Use a nylon spudger to slightly pry up the hard drive near the screw holes.

  7. Acer Aspire E1-510P-4637 Hard Drive Replacement: 7 단계, 이미지 1/3 Acer Aspire E1-510P-4637 Hard Drive Replacement: 7 단계, 이미지 2/3 Acer Aspire E1-510P-4637 Hard Drive Replacement: 7 단계, 이미지 3/3
    • Grab hold of the plastic tab and pull the hard drive away from the connectors. This will release the hard drive.

    • The hard drive connector is fragile. Handle with care.

결론

To reassemble your device, follow these instructions in reverse order.

다른 3명이 해당 안내서를 완성하였습니다.

Caleb lindsay

회원 가입일: 04/11/16

778 평판

안내서 6개 작성하였습니다

Cal Poly, Team 34-15, Maness Spring 2016 Cal Poly, Team 34-15, Maness Spring 2016 회원

CPSU-MANESS-S16S34G15

4 회원들

안내서 6개 작성하였습니다

댓글 0개

댓글 쓰기

조회 통계:

24 시간 전: 0

7일 전: 3

30일 전: 7

전체 시간: 1,923