주요 콘텐츠로 건너뛰기
Acer Aspire E5-573G Hard Drive Replacement

Acer Aspire E5-573G Hard Drive Replacement

Alex Bahm

Alex Bahm2 다른 기여자

최종 수정일 January 22, 2020

10 - 30 분
조정
액션 샷
더 나은 이미지가 필요함

Hard drives store all your data, but they are slow and can fail. This guide will show you how to replace a broken or slow hard drive with a different hard drive or solid state drive.

필요한 것

수리 키트

이 키트는 이 안내서를 완료하는데 필요한 모든 부품과 도구를 포함하고 있습니다.

부품

도구

더보기...

  1. Acer Aspire E5-573G Hard Drive Replacement, Optical Drive: 1 단계, 이미지 1개 중 1개
    • Ensure your device is OFF before beginning this procedure.

    • Unscrew the 5 mm Phillips head screw holding the drive in place.

  2. Acer Aspire E5-573G Hard Drive Replacement: 2 단계, 이미지 1개 중 1개
    • Pull out the disk drive.

  3. Acer Aspire E5-573G Hard Drive Replacement, Hard Drive: 3 단계, 이미지 2개 중 1개 Acer Aspire E5-573G Hard Drive Replacement, Hard Drive: 3 단계, 이미지 2개 중 2개
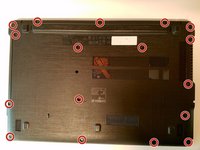
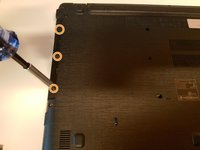
    • Unscrew all 17 (5mm) Philips head screws from the bottom.

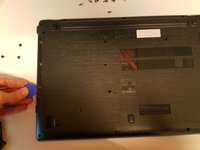
    • Unscrew the 3 (2.5mm) Philips head screws underneath the optical drive.

  4. Acer Aspire E5-573G Hard Drive Replacement: 4 단계, 이미지 2개 중 1개 Acer Aspire E5-573G Hard Drive Replacement: 4 단계, 이미지 2개 중 2개
    • Run a pick around the edge of the laptop (between the two parts) to open it.

    • Lift the left side of the case up and unplug the speaker cable before fully taking the bottom off.

  5. Acer Aspire E5-573G Hard Drive Replacement: 5 단계, 이미지 1개 중 1개
    • Remove the hard drive by pulling it out to the left.

결론

To reassemble your device, follow these instructions in reverse order.

다른 9명이 해당 안내서를 완성하였습니다.

작성자

2다른 기여자 명과 함께

Alex Bahm

회원 가입일: 01/18/18

2,311 평판

안내서 6개를 작성함

Cal Poly, Team S12-G5, Banghart Winter 2018 Cal Poly, Team S12-G5, Banghart Winter 2018 회원

CPSU-BANGHART-W18S12G5

2 회원들

안내서 15개를 작성함

0가이드 댓글

댓글 쓰기

조회 통계:

지난 24시간: 0

지난 7일: 12

지난 30일: 43

전체 시간: 9,494