주요 콘텐츠로 건너뛰기
Acer Aspire M5-583P-6423 Hard Drive Replacement

Acer Aspire M5-583P-6423 Hard Drive Replacement

Ty Bulot

Ty Bulot4 다른 기여자

최종 수정일 April 28, 2021

10 - 15 분
쉬움

Hard drives are a common failure point on a PC. Signs that you might need to replace your HDD can include, running out of storage capacity, a very slow PC, weird clicking sounds from the PC, blue screen errors, and other random errors/crashes when trying to access saved files.

The traditional style hard disk drives (HDD) have disks spinning inside that can eventually wear out and “crash”. HDDs can also sustain significant damage if the laptop is dropped.

If you are replacing the drive, it is much better to use a solid state drive (SSD) instead. This newer style drive operates much faster, is less likely to fail as there are no moving parts, and will not slow down when nearing capacity. This guide will explain how to safely remove the Acer Aspire M5-583P-6423 hard drive. To avoid harming any components, you’ll need the iFixit opening tool and a Phillips #00 screwdriver. The steps are not difficult, but it’s important to follow all of them in the order that they are mentioned.

필요한 것

부품

도구

더보기...

  1. Acer Aspire M5-583P-6423 Hard Drive Replacement, Battery: 1 단계, 이미지 3개 중 1개 Acer Aspire M5-583P-6423 Hard Drive Replacement, Battery: 1 단계, 이미지 3개 중 2개 Acer Aspire M5-583P-6423 Hard Drive Replacement, Battery: 1 단계, 이미지 3개 중 3개
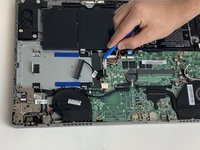
    • Turn the computer off and close it. Disconnect the charging cable from the laptop and place the laptop upside down.

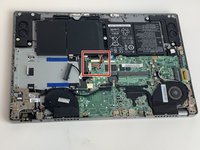
    • Remove seventeen M2.5x8mm screws on the back cover of the laptop with the Phillips #00 screwdriver.

  2. Acer Aspire M5-583P-6423 Hard Drive Replacement: 2 단계, 이미지 2개 중 1개 Acer Aspire M5-583P-6423 Hard Drive Replacement: 2 단계, 이미지 2개 중 2개
    • Push the back cover up from each side using the iFixit opening tool.

    • You’ll hear a popping sound as you lift the back cover.

    • Once the back cover is separated, you’ll see all the internal components of the laptop.

  3. Acer Aspire M5-583P-6423 Hard Drive Replacement: 3 단계, 이미지 2개 중 1개 Acer Aspire M5-583P-6423 Hard Drive Replacement: 3 단계, 이미지 2개 중 2개
    • Pull the rainbow cord out by using the iFixit opening tool on each side of its connecting slot.

    • This step can be done by using your fingers, but its highly recommended to use the iFixit removal tool instead.

  4. Acer Aspire M5-583P-6423 Hard Drive Replacement: 4 단계, 이미지 1개 중 1개
    • Remove the M2.5 x 3mm screw that holds down the battery using the Phillips #00 screwdriver.

  5. Acer Aspire M5-583P-6423 Hard Drive Replacement: 5 단계, 이미지 1개 중 1개
    • Lift the battery up from its edges and pull back slightly towards the hinges to remove the battery.

    • The battery is now detached from the laptop and can be set aside.

  6. Acer Aspire M5-583P-6423 Hard Drive Replacement, Hard Drive: 6 단계, 이미지 1개 중 1개
    • Remove two M2x3mm screws by using the Phillips #00 Screwdriver.

  7. Acer Aspire M5-583P-6423 Hard Drive Replacement: 7 단계, 이미지 1개 중 1개
    • Lift the hard drive and grip the gray housing from the sides. Then, pull apart the hard drive and the housing.

    • Do not pull on the cord. Doing so repetitively will damage it.

결론

To reassemble your device, follow these instructions in reverse order.

다른 한 분이 해당 안내서를 완성하였습니다.

작성자

4다른 기여자 명과 함께

Ty Bulot

회원 가입일: 01/14/20

446 평판

안내서 2개를 작성함

댓글 0개

댓글 쓰기

조회 통계:

지난 24시간: 0

지난 7일: 20

지난 30일: 32

전체 시간: 756