주요 콘텐츠로 건너뛰기
Acer Chromebook C740 Solid State Drive Replacement

Acer Chromebook C740 Solid State Drive Replacement

Flor De La Rosa

Flor De La Rosa5 다른 기여자

최종 수정일 October 27, 2019

10 분
쉬움

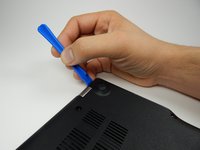
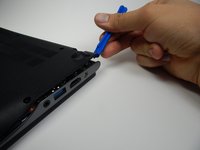
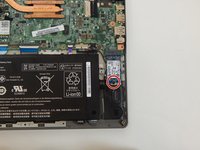
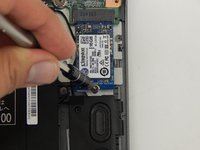
The solid state drive replacement for the Acer Chromebook C740 requires removing the back panel and removing one screw. The solid sate drive stores data from the laptop.

필요한 것

부품

도구

더보기...

  1. Acer Chromebook C740 Solid State Drive Replacement, Back Panel: 1 단계, 이미지 1개 중 1개
    • Power down the Chromebook and disconnect the power adapter.

  2. Acer Chromebook C740 Solid State Drive Replacement: 2 단계, 이미지 2개 중 1개 Acer Chromebook C740 Solid State Drive Replacement: 2 단계, 이미지 2개 중 2개
    • Place the chromebook bottom side up on a flat surface.

    • Remove the thirteen 7 mm screws with a Phillips #0 screwdriver.

  3. Acer Chromebook C740 Solid State Drive Replacement: 3 단계, 이미지 3개 중 1개 Acer Chromebook C740 Solid State Drive Replacement: 3 단계, 이미지 3개 중 2개 Acer Chromebook C740 Solid State Drive Replacement: 3 단계, 이미지 3개 중 3개
    • Insert the plastic opening tool into the slit near the hinges and pry upwards to lift the back panel.

    • Applying pressure may be necessary. A click indicates the panel is ready to come off.

  4. Acer Chromebook C740 Solid State Drive Replacement, Solid State Drive: 4 단계, 이미지 2개 중 1개 Acer Chromebook C740 Solid State Drive Replacement, Solid State Drive: 4 단계, 이미지 2개 중 2개
    • Remove the 3.75 mm screw with a Phillips #0 screwdriver.

  5. Acer Chromebook C740 Solid State Drive Replacement: 5 단계, 이미지 1개 중 1개
    • Unplug the solid state drive.

결론

To reassemble your device, follow these instructions in reverse order.

다른 9명이 해당 안내서를 완성하였습니다.

작성자

5다른 기여자 명과 함께

Flor De La Rosa

회원 가입일: 04/25/17

875 평판

안내서 4개를 작성함

Cal Poly, Team S22-G2, Livingston Spring 2017 Cal Poly, Team S22-G2, Livingston Spring 2017 회원

CPSU-LIVINGSTON-S17S22G2

4 회원들

안내서 12개를 작성함

댓글 0개

댓글 쓰기

조회 통계:

지난 24시간: 1

지난 7일: 16

지난 30일: 53

전체 시간: 5,261