주요 콘텐츠로 건너뛰기
Acer Chromebook Spin 511 (C741L) N20Q8 Keyboard Replacement

Acer Chromebook Spin 511 (C741L) N20Q8 Keyboard Replacement

Lauryn F

Lauryn F2 다른 기여자

최종 수정일 January 6, 2025

20 - 25 분
조정

If several keys or the mouse/touch pad are unresponsive, or the entire keyboard on your Acer Chromebook (Spin 511 (C741L) N20Q8) stops registering your input, then a replacement is needed to be fully functional again.

Ensure that your laptop is powered down for this replacement, then follow this guide.

필요한 것

도구

더보기...

  1. Acer Chromebook Spin 511 (C741L) N20Q8 Keyboard Replacement, Back Cover: 1 단계, 이미지 2개 중 1개 Acer Chromebook Spin 511 (C741L) N20Q8 Keyboard Replacement, Back Cover: 1 단계, 이미지 2개 중 2개
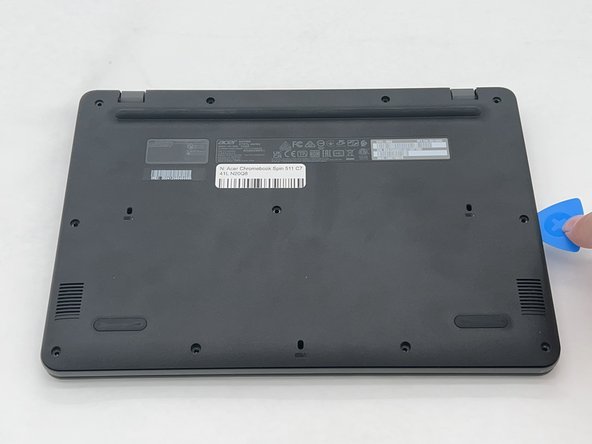
    • Remove the eleven 2.4 mm screws securing the back plate and internals of the Chromebook using a Phillips #1 screwdriver.

  2. Acer Chromebook Spin 511 (C741L) N20Q8 Keyboard Replacement: 2 단계, 이미지 2개 중 1개 Acer Chromebook Spin 511 (C741L) N20Q8 Keyboard Replacement: 2 단계, 이미지 2개 중 2개
    • Use an opening pick to remove the backplate of the laptop revealing the internals of the Chromebook.

  3. Acer Chromebook Spin 511 (C741L) N20Q8 Keyboard Replacement, Battery: 3 단계, 이미지 3개 중 1개 Acer Chromebook Spin 511 (C741L) N20Q8 Keyboard Replacement, Battery: 3 단계, 이미지 3개 중 2개 Acer Chromebook Spin 511 (C741L) N20Q8 Keyboard Replacement, Battery: 3 단계, 이미지 3개 중 3개
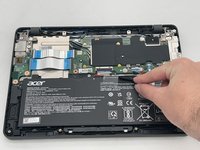
    • Gently remove the electrical tape from the battery.

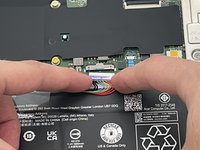
    • Detach the colored wires from the wire connector on the motherboard.

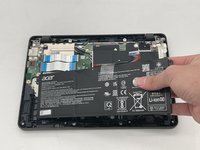
    • Remove the battery from the laptop.

  4. Acer Chromebook Spin 511 (C741L) N20Q8 Keyboard Replacement, Keyboard: 4 단계, 이미지 2개 중 1개 Acer Chromebook Spin 511 (C741L) N20Q8 Keyboard Replacement, Keyboard: 4 단계, 이미지 2개 중 2개
    • Remove the six 2.4 mm screws from the hinges using a Phillips #1 screwdriver.

  5. Acer Chromebook Spin 511 (C741L) N20Q8 Keyboard Replacement: 5 단계, 이미지 2개 중 1개 Acer Chromebook Spin 511 (C741L) N20Q8 Keyboard Replacement: 5 단계, 이미지 2개 중 2개
    • Flip up the hinges on each side that were previously secured down by the screws.

  6. Acer Chromebook Spin 511 (C741L) N20Q8 Keyboard Replacement: 6 단계, 이미지 2개 중 1개 Acer Chromebook Spin 511 (C741L) N20Q8 Keyboard Replacement: 6 단계, 이미지 2개 중 2개
    • Remove the tape from the black connector and gently remove it from the socket.

  7. Acer Chromebook Spin 511 (C741L) N20Q8 Keyboard Replacement: 7 단계, 이미지 3개 중 1개 Acer Chromebook Spin 511 (C741L) N20Q8 Keyboard Replacement: 7 단계, 이미지 3개 중 2개 Acer Chromebook Spin 511 (C741L) N20Q8 Keyboard Replacement: 7 단계, 이미지 3개 중 3개
    • Detach the connector from the motherboard.

    • Carefully remove the pin connector containing the black, white, and red wires from its socket.

  8. Acer Chromebook Spin 511 (C741L) N20Q8 Keyboard Replacement: 8 단계, 이미지 2개 중 1개 Acer Chromebook Spin 511 (C741L) N20Q8 Keyboard Replacement: 8 단계, 이미지 2개 중 2개
    • Carefully remove the blue, yellow, and black wires from their connectors.

  9. Acer Chromebook Spin 511 (C741L) N20Q8 Keyboard Replacement: 9 단계, 이미지 2개 중 1개 Acer Chromebook Spin 511 (C741L) N20Q8 Keyboard Replacement: 9 단계, 이미지 2개 중 2개
    • Remove the long connector from the socket.

  10. Acer Chromebook Spin 511 (C741L) N20Q8 Keyboard Replacement: 10 단계, 이미지 2개 중 1개 Acer Chromebook Spin 511 (C741L) N20Q8 Keyboard Replacement: 10 단계, 이미지 2개 중 2개
    • Gently pull and remove the keyboard from the screen.

결론

To reassemble your device, follow these instructions in reverse order.

작성자

2다른 기여자 명과 함께

Lauryn F

회원 가입일: 09/26/24

710 평판

안내서 5개를 작성함

댓글 0개

댓글 쓰기

조회 통계:

지난 24시간: 0

지난 7일: 8

지난 30일: 32

전체 시간: 94