
Asus EeeBook X205TA Motherboard Replacement
This guide will help you replace your Asus EeeBook X205TA motherboard in case it is damaged, you want a faster RAM, better data transfers or better graphics. If disposing motherboard , please follow the laws and regulations for proper disposal.
필요한 것
도구


더보기...
-
-
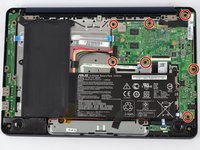
Unscrew all 10 2mm screws located on the bottom of the laptop using a Phillips #2 screwdriver.
-
-


To reassemble your device, follow these instructions in reverse order.
To reassemble your device, follow these instructions in reverse order.
다른 10명이 해당 안내서를 완성하였습니다.
팀

USF Tampa, Team 2-2, Sullivan Fall 2016 USF Tampa, Team 2-2, Sullivan Fall 2016 회원
USFT-SULLIVAN-F16S2G2
3 회원들
안내서 10개를 작성함
3가이드 댓글
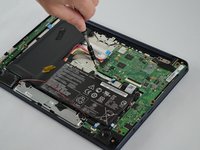
Here is a more detailed view of all the cables that have to be unplugged before the motherboard can be extracted: https://ibb.co/jcgwUQ
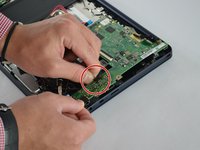
Also, be aware that, even after all screws and cables are removed, it will still require a little bit of force to remove the motherboard, due to the thermal adhesive on the CPU and GPU. Do not be afraid to pull the motherboard! As long as you followed the instructions and disconnected all the EIGHT cables and SEVEN screws, you are not going to damage anything, it’s just thermal tape!
I guess because if the spill damage, the motherboard stop my keyboard from working and the usual from