주요 콘텐츠로 건너뛰기
Asus MeMO Pad HD 7 Speaker Assembly  Replacement

Asus MeMO Pad HD 7 Speaker Assembly Replacement

Julien Daigle

Julien Daigle6 다른 기여자

최종 수정일 July 26, 2024

예상시간 없음
조정

This guide will direct you in replacing the entire speaker assembly for the tablet. The guide will require a few simple steps and removing a few small screws form the device.

필요한 것

부품

도구

  • iFixit Opening Tool
    iFixit Opening Tool
  • Spudger
    Spudger
  • Phillips #000 Screwdriver
    Phillips #000 Screwdriver

더보기...

iFixit은 귀하가 이 링크를 통해 구매할 때 커미션을 받습니다.
  1. Asus MeMO Pad HD 7 Speaker Assembly  Replacement, Remove Rear Panel: 1 단계, 이미지 3개 중 1개 Asus MeMO Pad HD 7 Speaker Assembly  Replacement, Remove Rear Panel: 1 단계, 이미지 3개 중 2개 Asus MeMO Pad HD 7 Speaker Assembly  Replacement, Remove Rear Panel: 1 단계, 이미지 3개 중 3개
    • Carefully remove the back panel by using a plastic opening tool to remove the panel off the device.

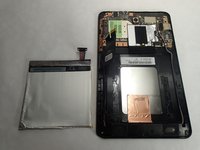
    • Pull the back panel away from the device.

    • The volume buttons can fall out of the case. Pay attention so as not to lose them.

  2. Asus MeMO Pad HD 7 Speaker Assembly  Replacement: 2 단계, 이미지 1개 중 1개
    • Unlock the ZIF connectors on the data cables.

    • Raise the white locking tabs by lifting their upper edge - furthest from the battery - they hinge across the width of the connector.

    • Remove the cable from its slot by gently pulling downward on the tabs.

    • Check that the touchscreen cables are fully seated when reassembling or touchscreen may have unresponsive areas.

  3. Asus MeMO Pad HD 7 Speaker Assembly  Replacement: 3 단계, 이미지 1개 중 1개
    • Locate the battery connector by following the wires that come from the top right of the battery. To disconnect the battery just lift up gently on the wires. Use a spudger or blue plastic opening tool to gently lift the wires if it is hard to get a grip.

  4. Asus MeMO Pad HD 7 Speaker Assembly  Replacement, Remove Battery: 4 단계, 이미지 3개 중 1개 Asus MeMO Pad HD 7 Speaker Assembly  Replacement, Remove Battery: 4 단계, 이미지 3개 중 2개 Asus MeMO Pad HD 7 Speaker Assembly  Replacement, Remove Battery: 4 단계, 이미지 3개 중 3개
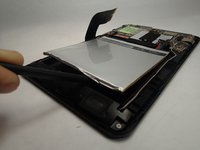
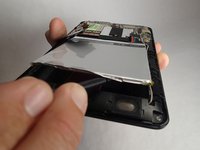
    • Using a spudger carefully pry the battery up. It is glued down so slight pressure may be needed.

    • The battery has a soft casing, be careful not to tear the battery casing as chemicals could leak out.

  5. Asus MeMO Pad HD 7 Speaker Assembly  Replacement, Speaker Assembly: 5 단계, 이미지 1개 중 1개
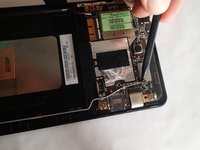
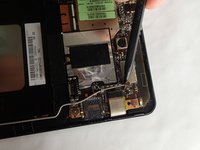
    • Unscrew two Philip's #000 2 mm screws located on the left and right side of the speaker housing.

  6. Asus MeMO Pad HD 7 Speaker Assembly  Replacement: 6 단계, 이미지 1개 중 1개
    • Locate the speaker wires to the left side of the battery. Remove the connector by pulling up gently or prying with a tool if you can not get a good grip.

  7. Asus MeMO Pad HD 7 Speaker Assembly  Replacement: 7 단계, 이미지 2개 중 1개 Asus MeMO Pad HD 7 Speaker Assembly  Replacement: 7 단계, 이미지 2개 중 2개
    • Pry the GPS Antenna cable straight up using a spudger or similar prying tool. It will be the grey wire that runs up the right side of the device coming from the speaker housing up to the logic board.

  8. Asus MeMO Pad HD 7 Speaker Assembly  Replacement: 8 단계, 이미지 1개 중 1개
    • Using a spudger, carefully pry the GPS antenna from the bottom of the speaker housing.

    • With the GPS antenna removed from the bottom of the speaker housing it can be removed from the device.

결론

To reassemble your device, follow these instructions in reverse order.

다른 3명이 해당 안내서를 완성하였습니다.

작성자

6다른 기여자 명과 함께

Julien Daigle

회원 가입일: 01/20/15

1,235 평판

안내서 5개를 작성함

USF Tampa, Team 11-3, Blackwell Winter 2015 USF Tampa, Team 11-3, Blackwell Winter 2015 회원

USFT-BLACKWELL-W15S11G3

4 회원들

안내서 5개를 작성함

댓글 0개

댓글 쓰기

조회 통계:

지난 24시간: 2

지난 7일: 9

지난 30일: 15

전체 시간: 1,010