주요 콘텐츠로 건너뛰기
Asus X553MA-BPD07051 RAM Replacement

Asus X553MA-BPD07051 RAM Replacement

Stephanie DeCarvalho

Stephanie DeCarvalho다른 한 명의 기여자

최종 수정일 December 30, 2019

30 분 - 1 시간
어려움

If you are having trouble with your Asus X553MA-BPD07051 running very slow or giving you the Blue Screen of Death, check what the RAM is running at. If it is running at 40% or higher, your RAM should be replaced. For additional information, check out this troubleshooting page. Use this page to assist you in replacing your RAM. Before beginning, make sure that the laptop has been turned off and battery removed first in order to avoid being shocked.

필요한 것

도구

더보기...

  1. Asus X553MA-BPD07051 RAM Replacement, Battery: 1 단계, 이미지 2개 중 1개 Asus X553MA-BPD07051 RAM Replacement, Battery: 1 단계, 이미지 2개 중 2개
    • Use a Phillips #0 screwdriver (PH0 bit) to remove the four 5.0 mm screws that are securing the bottom of the laptop.

    • Use a Phillips #0 screwdriver (PH0 bit) to remove the six 11.0 mm screws that are securing the bottom of the laptop.

  2. Asus X553MA-BPD07051 RAM Replacement: 2 단계, 이미지 1개 중 1개
    • Lift the edges of the keyboard using the plastic iFixit opening tool and raise the keyboard slightly to see the inside of the laptop.

    • Do not lift the keyboard too high as the keyboard is connected to the motherboard by two ribbon connectors that must be detached.

  3. Asus X553MA-BPD07051 RAM Replacement: 3 단계, 이미지 2개 중 1개 Asus X553MA-BPD07051 RAM Replacement: 3 단계, 이미지 2개 중 2개
    • Lift back the clip on the ribbon tape, and pull the tape out in order to remove the keyboard from the laptop.

    • Remove both pieces of the ribbon tape connecting the keyboard to the motherboard.

  4. Asus X553MA-BPD07051 RAM Replacement: 4 단계, 이미지 1개 중 1개
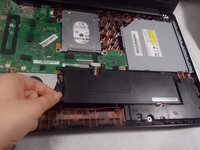
    • Remove the bundled cable connector attaching the battery to the motherboard with the plastic iFixit opening tool.

    • Make sure that you do not remove the entire connector by applying too much force. Only the white plastic connector should be removed from the metal part on the motherboard.

  5. Asus X553MA-BPD07051 RAM Replacement: 5 단계, 이미지 2개 중 1개 Asus X553MA-BPD07051 RAM Replacement: 5 단계, 이미지 2개 중 2개
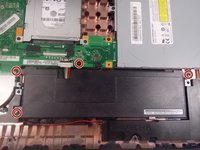
    • Use Phillips #0 screwdriver (PH0 bit) to remove the four 6.0 mm screws attaching the battery to the laptop.

  6. Asus X553MA-BPD07051 RAM Replacement: 6 단계, 이미지 2개 중 1개 Asus X553MA-BPD07051 RAM Replacement: 6 단계, 이미지 2개 중 2개
    • Lift the battery up and remove it completely from the laptop.

  7. Asus X553MA-BPD07051 RAM Replacement, Hard Drive: 7 단계, 이미지 2개 중 1개 Asus X553MA-BPD07051 RAM Replacement, Hard Drive: 7 단계, 이미지 2개 중 2개
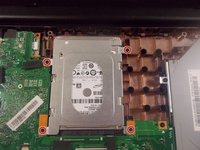
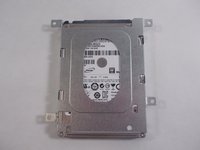
    • Use a Phillips #0 screwdriver (PH0 bit) to remove the four 6.0 mm screws that are securing the hard drive.

  8. Asus X553MA-BPD07051 RAM Replacement: 8 단계, 이미지 2개 중 1개 Asus X553MA-BPD07051 RAM Replacement: 8 단계, 이미지 2개 중 2개
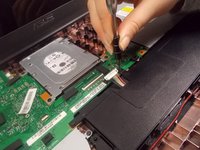
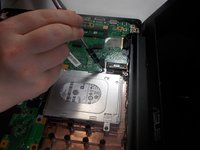
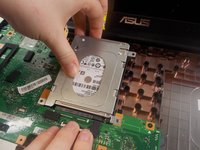
    • Lift the hard drive up and pull it towards the screen so that it disconnects from the motherboard.

    • Use caution when disconnecting the hard drive from the motherboard, so that neither connector gets broken.

  9. Asus X553MA-BPD07051 RAM Replacement, Optical Drive: 9 단계, 이미지 2개 중 1개 Asus X553MA-BPD07051 RAM Replacement, Optical Drive: 9 단계, 이미지 2개 중 2개
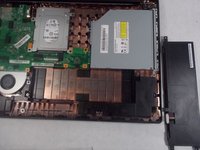
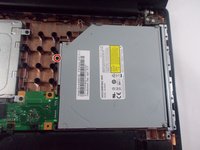
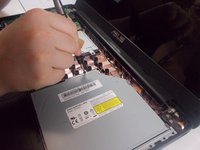
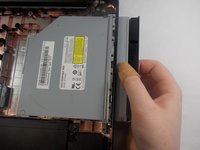
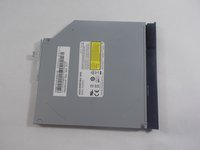
    • Use a Phillips #0 screwdriver (PH0 bit) to remove the one 6.0 mm screw holding in the optical drive.

  10. Asus X553MA-BPD07051 RAM Replacement: 10 단계, 이미지 2개 중 1개 Asus X553MA-BPD07051 RAM Replacement: 10 단계, 이미지 2개 중 2개
    • Gently slide the optical drive out from the motherboard.

  11. Asus X553MA-BPD07051 RAM Replacement, Motherboard: 11 단계, 이미지 3개 중 1개 Asus X553MA-BPD07051 RAM Replacement, Motherboard: 11 단계, 이미지 3개 중 2개 Asus X553MA-BPD07051 RAM Replacement, Motherboard: 11 단계, 이미지 3개 중 3개
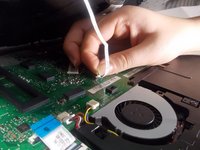
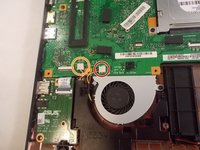
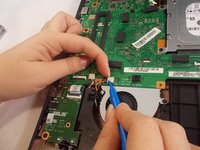
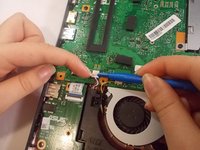
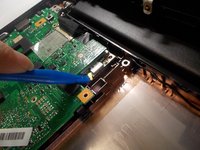
    • Remove the bundled cable connector that connects the fan to the motherboard using the plastic iFixit opening tool.

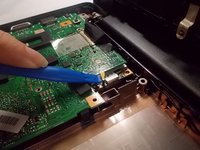
    • Remove the bundled cable connector that attaches the audio to the motherboard with the plastic iFixit opening tool.

  12. Asus X553MA-BPD07051 RAM Replacement: 12 단계, 이미지 2개 중 1개 Asus X553MA-BPD07051 RAM Replacement: 12 단계, 이미지 2개 중 2개
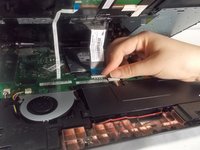
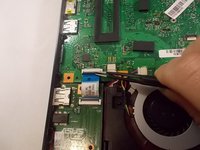
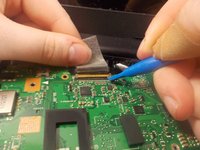
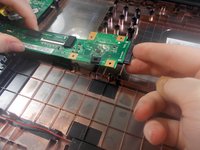
    • Lift the metal clip holding the ZIF connector ribbon down.

    • Pull the ribbon out from the connector, away from the motherboard.

  13. Asus X553MA-BPD07051 RAM Replacement: 13 단계, 이미지 2개 중 1개 Asus X553MA-BPD07051 RAM Replacement: 13 단계, 이미지 2개 중 2개
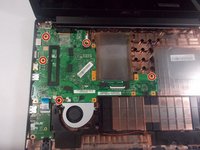
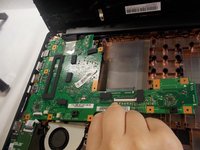
    • Use a Phillips #0 screwdriver (PH0 bit) to remove the five 6.0 mm screws attaching the motherboard to the base of the laptop.

  14. Asus X553MA-BPD07051 RAM Replacement: 14 단계, 이미지 1개 중 1개
    • Remove the tape from the motherboard.

  15. Asus X553MA-BPD07051 RAM Replacement: 15 단계, 이미지 2개 중 1개 Asus X553MA-BPD07051 RAM Replacement: 15 단계, 이미지 2개 중 2개
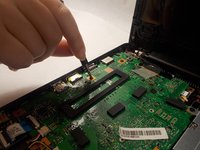
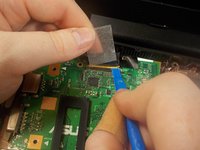
    • Lift the metal clips holding the ZIF connector down.

    • Push the gold metal connector away from the motherboard.

    • Be careful not to break the connector.

  16. Asus X553MA-BPD07051 RAM Replacement: 16 단계, 이미지 2개 중 1개 Asus X553MA-BPD07051 RAM Replacement: 16 단계, 이미지 2개 중 2개
    • Lift the coaxial connector from the wifi chip with the plastic iFixit opening tool.

  17. Asus X553MA-BPD07051 RAM Replacement: 17 단계, 이미지 3개 중 1개 Asus X553MA-BPD07051 RAM Replacement: 17 단계, 이미지 3개 중 2개 Asus X553MA-BPD07051 RAM Replacement: 17 단계, 이미지 3개 중 3개
    • Lift the motherboard to remove it fully.

    • Do not pull too hard, the motherboard should come off easily once it has been separated from the base of the laptop.

  18. Asus X553MA-BPD07051 RAM Replacement, RAM: 18 단계, 이미지 3개 중 1개 Asus X553MA-BPD07051 RAM Replacement, RAM: 18 단계, 이미지 3개 중 2개 Asus X553MA-BPD07051 RAM Replacement, RAM: 18 단계, 이미지 3개 중 3개
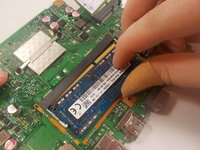
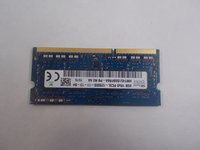
    • Remove the RAM by lifting and pulling it up from the back of the motherboard.

결론

To reassemble your device, follow these instructions in reverse order.

다른 2명이 해당 안내서를 완성하였습니다.

작성자

1다른 기여자 명과 함께

Stephanie DeCarvalho

회원 가입일: 10/21/19

949 평판

안내서 5개를 작성함

UMass Dartmouth, Team S1-G4, Botvin Fall 2019 UMass Dartmouth, Team S1-G4, Botvin Fall 2019 회원

UMASSD-BOTVIN-F19S1G4

3 회원들

안내서 5개를 작성함

댓글 0개

댓글 쓰기

조회 통계:

지난 24시간: 5

지난 7일: 11

지난 30일: 24

전체 시간: 1,946