Axa Security Greenline bicycle lamp disassembly

They are easy to fix, but opening the casing is tricky, since it was designed to be waterproof rather than fixable.
-
-
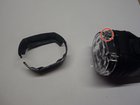
To open the lamp housing, you first have to remove the black cover at the front. This is the part that covers the screws that you have to get at first. Unfortunately, it is glued in some places. It is best to use a sturdy plastic tool so that the plastic does not break (as it did with me).
-
Also, start from the side rather than from the front to avoid scratching the lens.
-
-
-
-
The black one should be soldered to "GND"
-
The red wire belongs where it says "Bat.+"
-
Now you can pull out the main circuit board. Be careful not to tear off any more of the tiny wires. Also be careful not to short-circuit the LiPo battery pack (1s2P 1000mAh).
-
The wires with transparent insulation are for the charging connection. When you have soldered everything back into place, slide the circuit board back into place on the top of the battery. Pay attention to the tiny plastic part of the on/off switch, which should be in its place in the orange silicone cover and will easily fall out.
-
Don't force the board into place, or you'll probably rip another cable. Once everything is in place, test the lighting (test the light AND the charging process!) before screwing everything back together.
-
Finally, glue the black lens cover back on. Don't use too much glue in case you need to open the lamp again later. Also, be careful not to touch the lens with glue on your fingers! A piece of tape works well as a protective covering until the glue has dried.
-


Repeat the steps in order to reassemble your device.
Repeat the steps in order to reassemble your device.
다른 2명이 해당 안내서를 완성하였습니다.
다음 번역가들에게 특별히 감사 드립니다:
100%


이 번역인들은 저희가 세상을 수리하는 데 도움을 주고 있어요! 기여하시겠습니까?
번역 시작하기 ›

댓글 2개
Thanks Martin! Using your guide I was able to fix a loose wire from the battery after a small drop on the ground.
Thank you very much! The micro switch is broken and now I can fix it, I thought everything was just glued together and not repairable.