주요 콘텐츠로 건너뛰기
수리 커뮤니티 가입 - 계정 만들기

Blackberry 7520 LCD Screen Replacement

필요한 것

  1. Blackberry 7520 LCD Screen Replacement, Battery: 1 단계, 이미지 2개 중 1개 Blackberry 7520 LCD Screen Replacement, Battery: 1 단계, 이미지 2개 중 2개
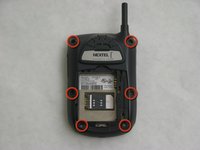
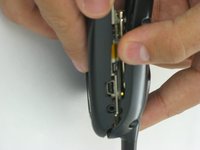
    • Turn the phone upside down.

    • Push down on the black button on the back of the phone to slide the rear panel off.

    • The battery should be visible now.

  2. Blackberry 7520 LCD Screen Replacement: 2 단계, 이미지 3개 중 1개 Blackberry 7520 LCD Screen Replacement: 2 단계, 이미지 3개 중 2개 Blackberry 7520 LCD Screen Replacement: 2 단계, 이미지 3개 중 3개
    • Hold the BlackBerry in one hand face-up with the screen facing towards you.

    • Gently smack the phone against your hand to dislodge the battery.

  3. Blackberry 7520 LCD Screen Replacement, Motherboard: 3 단계, 이미지 2개 중 1개 Blackberry 7520 LCD Screen Replacement, Motherboard: 3 단계, 이미지 2개 중 2개
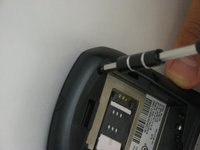
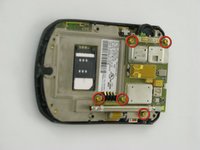
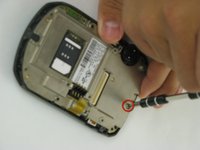
    • Use a T6 Torx screwdriver to remove the 6 screws holding the rear of the phone.

  4. Blackberry 7520 LCD Screen Replacement: 4 단계, 이미지 2개 중 1개 Blackberry 7520 LCD Screen Replacement: 4 단계, 이미지 2개 중 2개
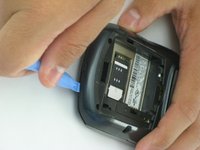
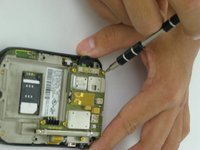
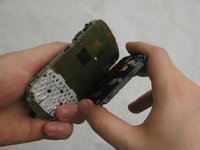
    • Use a pick or plastic opening tool to push the clips holding the rear away from you.

    • Applying too much pressure could break the plastic clips and permanently damage your Blackberry.

  5. Blackberry 7520 LCD Screen Replacement: 5 단계, 이미지 1개 중 1개
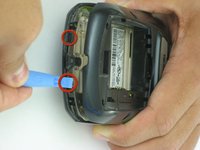
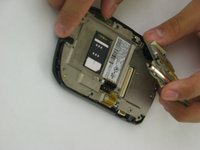
    • Repeat the process of unlatching the clips for the top section of the Blackberry.

  6. Blackberry 7520 LCD Screen Replacement: 6 단계, 이미지 2개 중 1개 Blackberry 7520 LCD Screen Replacement: 6 단계, 이미지 2개 중 2개
    • Slide the rear panel forward to reveal the motherboard.

  7. Blackberry 7520 LCD Screen Replacement: 7 단계, 이미지 2개 중 1개 Blackberry 7520 LCD Screen Replacement: 7 단계, 이미지 2개 중 2개
    • Remove the indicated screws using a T6 Torx screwdriver.

  8. Blackberry 7520 LCD Screen Replacement: 8 단계, 이미지 2개 중 1개 Blackberry 7520 LCD Screen Replacement: 8 단계, 이미지 2개 중 2개
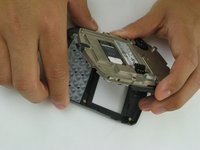
    • Remove the motherboard.

    • Remove the indicated screw using the T6 Torx screwdriver.

  9. Blackberry 7520 LCD Screen Replacement: 9 단계, 이미지 2개 중 1개 Blackberry 7520 LCD Screen Replacement: 9 단계, 이미지 2개 중 2개
    • Pull the metal plate away from the front panel of the cell phone.

  10. Blackberry 7520 LCD Screen Replacement: 10 단계, 이미지 1개 중 1개
    • Place the faceplate face-down and the interior of the phone face-up, as shown.

  11. Blackberry 7520 LCD Screen Replacement, LCD Screen: 11 단계, 이미지 1개 중 1개
    • Turn the phone so that it faces towards you.

  12. Blackberry 7520 LCD Screen Replacement: 12 단계, 이미지 1개 중 1개
    • Use a pick or other small tool to pop the small plastic clip holding the LCD panel on

  13. Blackberry 7520 LCD Screen Replacement: 13 단계, 이미지 2개 중 1개 Blackberry 7520 LCD Screen Replacement: 13 단계, 이미지 2개 중 2개
    • Pull the LCD screen off of the board.

결론

To reassemble your device, follow these instructions in reverse order.

다른 한 분이 해당 안내서를 완성하였습니다.

작성자

3다른 기여자 명과 함께

Nathan

회원 가입일: 01/18/10

31 평판

안내서 6개를 작성함

Cal Poly, Team 5-7, Forte Winter 2010 Cal Poly, Team 5-7, Forte Winter 2010 회원

CPSU-FORTE-W10S5G7

5 회원들

안내서 12개를 작성함

1가이드 댓글

It’s too bad that iFixit didn’t post a teardown listing the parts for the BlackBerry 7520, since so little is known about its parts.

amosbatto - 답글 공유

댓글 쓰기

조회 통계:

지난 24시간: 1

지난 7일: 4

지난 30일: 28

전체 시간: 1,634