주요 콘텐츠로 건너뛰기

Canon Powershot A70 Rear Exterior Panel Replacement

필요한 것

  1. Canon Powershot A70 Rear Exterior Panel Replacement, Rear Exterior Panel: 1 단계, 이미지 1/1
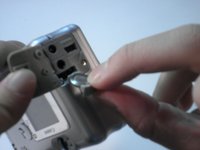
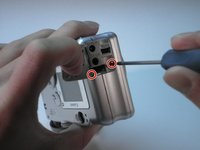
    • Unscrew the three small screws on the bottom of the camera with a Phillips #00 screwdriver.

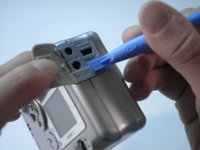
    • Remove the wrist strap.

  2. Canon Powershot A70 Rear Exterior Panel Replacement: 2 단계, 이미지 1/1
    • Remove the screw in the CF compartment with a Phillips #00 screwdriver.

  3. Canon Powershot A70 Rear Exterior Panel Replacement: 3 단계, 이미지 1/3 Canon Powershot A70 Rear Exterior Panel Replacement: 3 단계, 이미지 2/3 Canon Powershot A70 Rear Exterior Panel Replacement: 3 단계, 이미지 3/3
    • Open the rubber Digital AV Out compartment flap.

    • Pry the battery with an opening tool.

    • Carefully pull out the battery with two fingers.

    • Remove the two screws that are now visible with a Phillips #00 screwdriver.

  4. Canon Powershot A70 Rear Exterior Panel Replacement: 4 단계, 이미지 1/2 Canon Powershot A70 Rear Exterior Panel Replacement: 4 단계, 이미지 2/2
    • Starting from the bottom, carefully pull the casing off.

    • The casing will now pivot at the top.

    • There are three catches that hold the back casing to the body.

    • You may have to pull with some force. The rear panel will make a snapping noise when it separates from the body.

  5. Canon Powershot A70 Rear Exterior Panel Replacement: 5 단계, 이미지 1/1
    • The interior of the camera should look like this.

결론

To reassemble your device, follow these instructions in reverse order.

Shalan Ertis

회원 가입일: 01/26/10

68 평판

안내서 3개 작성하였습니다

Cal Poly, Team 14-40, Regan Winter 2010 Cal Poly, Team 14-40, Regan Winter 2010 회원

CPSU-REGAN-W10S14G40

5 회원들

안내서 15개 작성하였습니다

댓글 0개

댓글 쓰기

조회 통계:

24 시간 전: 0

7일 전: 1

30일 전: 2

전체 시간: 3,239