주요 콘텐츠로 건너뛰기

Chef's Choice M115 Motor Assembly Replacement

필요한 것

  1. Chef's Choice M115 Motor Assembly Replacement, Case: 1 단계, 이미지 1/2 Chef's Choice M115 Motor Assembly Replacement, Case: 1 단계, 이미지 2/2
    • Remove the two rubber feet on the motor side of the device.

    • Remove the five Phillips screws from the bottom of the case.

    • These screws are recessed deep in the device, so a long, thin screwdriver is required.

  2. Chef's Choice M115 Motor Assembly Replacement: 2 단계, 이미지 1/1
    • Remove the two hex-cap screws on the bottom using a pair of pliers.

  3. Chef's Choice M115 Motor Assembly Replacement: 3 단계, 이미지 1/1
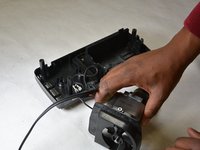
    • Carefully flip the device right-side-up while grasping the top and bottom pieces.

    • The white cover should lift off with no resistance. If it does not, ensure all screws were removed in previous step.

  4. Chef's Choice M115 Motor Assembly Replacement: 4 단계, 이미지 1/1
    • Remove the sharpener guard by gently pulling up on it.

    • If the sharpener guard does not come off easily, ensure all screws were removed in step 1.

  5. Chef's Choice M115 Motor Assembly Replacement, Power Cord: 5 단계, 이미지 1/2 Chef's Choice M115 Motor Assembly Replacement, Power Cord: 5 단계, 이미지 2/2
    • Carefully lift the entire motor assembly out of the case.

  6. Chef's Choice M115 Motor Assembly Replacement: 6 단계, 이미지 1/1
    • Remove the spade connectors from the switch by pulling only on the connector, not the wire.

    • These should come off without tools, but will require a fair bit of force. Mark each wire with tape if you are unsure of the wiring layout of the device.

  7. Chef's Choice M115 Motor Assembly Replacement: 7 단계, 이미지 1/1
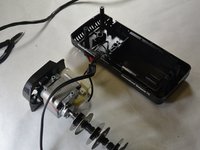
    • Disconnect the spade connector on the motor by pulling only on the connector, not the cord.

  8. Chef's Choice M115 Motor Assembly Replacement, Motor Assembly: 8 단계, 이미지 1/1
    • Reconnect the wires of the new motor assembly with the power cord and reassemble the device.

    • If your replacement motor assembly does not come with grinding discs or linkage pins, refer to our guides below:

    • Grinding Discs Guide

    • Linkage Pins Guide

결론

To reassemble your device, follow these instructions in reverse order.

다른 2명이 해당 안내서를 완성하였습니다.

Zachary Grounds

회원 가입일: 09/17/15

580 평판

안내서 3개 작성하였습니다

IUPUI, Team 3-3, Harley Fall 2015 IUPUI, Team 3-3, Harley Fall 2015 회원

IUPUI-HARLEY-F15S3G3

5 회원들

안내서 12개 작성하였습니다

댓글 2개

Any idea what might be wrong when ... stones don't spin, but you can hear the motor is turned on? Sounds like what would happen if something was jammed and the shaft won't turn BUT I've checked and the disks spin freely when the motor is off. I'm not sure it's worth messing with unless someone can tell me what to check.

Dan M - 답글

I’m having the same problem! I’m guessing that this problem (of the motor turning on but not spinning the wheels) is in fact the motor not working. Obviously this is an old comment, but if anyone else knows if this is true, please let me know.

Gretchen Ela -

댓글 쓰기

조회 통계:

24 시간 전: 1

7일 전: 2

30일 전: 9

전체 시간: 1,568