주요 콘텐츠로 건너뛰기

Chromo Noria Speaker Replacement

필요한 것

  1. Chromo Noria Speaker  Replacement, Back Panel: 1 단계, 이미지 1/3 Chromo Noria Speaker  Replacement, Back Panel: 1 단계, 이미지 2/3 Chromo Noria Speaker  Replacement, Back Panel: 1 단계, 이미지 3/3
    • Insert your Plastic Opening Tool into the crease between the front panel and back panel.

    • Slide the Opening Tool around the entire device. As you progress, you should see the device open.

  2. Chromo Noria Speaker  Replacement: 2 단계, 이미지 1/1
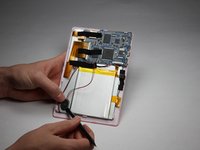
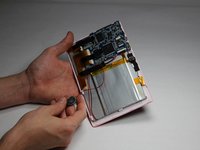
    • Carefully turn the device over.

    • Lay the back panel aside so you can see the device's parts.

  3. Chromo Noria Speaker  Replacement, Speaker: 3 단계, 이미지 1/1
    • Using your spudger tool, remove speaker from the backboard.

  4. Chromo Noria Speaker  Replacement: 4 단계, 이미지 1/2 Chromo Noria Speaker  Replacement: 4 단계, 이미지 2/2
    • Using the spudger tool, detach the speaker from the back of the screen.

  5. Chromo Noria Speaker  Replacement: 5 단계, 이미지 1/1
    • Soldering irons get very hot! Be careful when handling one. If you'd like a tutorial on how to use one, click here.

    • Using a Soldering Iron, desolder both wires from the motherboard.

결론

To reassemble your device, follow these instructions in reverse order.

Ryan Rho

회원 가입일: 10/31/16

201 평판

안내서 2개 작성하였습니다

Baylor, Team 5-6, Williams Fall 2016 Baylor, Team 5-6, Williams Fall 2016 회원

BU-WILLIAMS-F16S5G6

3 회원들

안내서 12개 작성하였습니다

댓글 0개

댓글 쓰기

조회 통계:

24 시간 전: 1

7일 전: 2

30일 전: 2

전체 시간: 135