주요 콘텐츠로 건너뛰기
Compaq Presario CQ60 Motherboard Replacement

Compaq Presario CQ60 Motherboard Replacement

Mike B

Mike B다른 한 명의 기여자

최종 수정일 October 31, 2021

1 시간
조정
커뮤니티-기여 안내서

필요한 것

도구

  • Phillips #0 Screwdriver
    Phillips #0 Screwdriver
  • Spudger
    Spudger
  • Phillips #1 Screwdriver
    Phillips #1 Screwdriver

더보기...

  1. Compaq Presario CQ60 Motherboard Replacement, Slide battery latch: 1 단계, 이미지 2개 중 1개 Compaq Presario CQ60 Motherboard Replacement, Slide battery latch: 1 단계, 이미지 2개 중 2개
    • Slide battery latch to left

    • Simultaneously lift battery

  2. Compaq Presario CQ60 Motherboard Replacement: 2 단계, 이미지 3개 중 1개 Compaq Presario CQ60 Motherboard Replacement: 2 단계, 이미지 3개 중 2개 Compaq Presario CQ60 Motherboard Replacement: 2 단계, 이미지 3개 중 3개
    • Lift and remove battery

  3. Compaq Presario CQ60 Motherboard Replacement, Remove hard drive cover: 3 단계, 이미지 1개 중 1개
    • Loosen 2 phillips screws

    • Lift and remove cover

  4. Compaq Presario CQ60 Motherboard Replacement, Remove drive caddy: 4 단계, 이미지 3개 중 1개 Compaq Presario CQ60 Motherboard Replacement, Remove drive caddy: 4 단계, 이미지 3개 중 2개 Compaq Presario CQ60 Motherboard Replacement, Remove drive caddy: 4 단계, 이미지 3개 중 3개
    • Remove 3 M2.5x4mm screws

    • Slide caddy forwards

    • Lift tab to remove caddy

  5. Compaq Presario CQ60 Motherboard Replacement: 5 단계, 이미지 1개 중 1개
    • Remove 4 phillips screws to remove drive from caddy

  6. Compaq Presario CQ60 Motherboard Replacement, Unscrew keyboard: 6 단계, 이미지 2개 중 1개 Compaq Presario CQ60 Motherboard Replacement, Unscrew keyboard: 6 단계, 이미지 2개 중 2개
    • Remove 3x M2.5x4mm

  7. Compaq Presario CQ60 Motherboard Replacement, Lift keyboard: 7 단계, 이미지 3개 중 1개 Compaq Presario CQ60 Motherboard Replacement, Lift keyboard: 7 단계, 이미지 3개 중 2개 Compaq Presario CQ60 Motherboard Replacement, Lift keyboard: 7 단계, 이미지 3개 중 3개
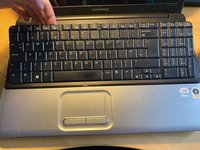
    • Lift the keyboard in the middle with a spudger

    • Remove 4 clips by bending keyboard in middle, do not force the clips at the sides

    • Do not remove the keyboard fully, it is attached via a ribbon cable

  8. Compaq Presario CQ60 Motherboard Replacement, Detach ribbon cable: 8 단계, 이미지 3개 중 1개 Compaq Presario CQ60 Motherboard Replacement, Detach ribbon cable: 8 단계, 이미지 3개 중 2개 Compaq Presario CQ60 Motherboard Replacement, Detach ribbon cable: 8 단계, 이미지 3개 중 3개
    • Lift keyboard slightly

    • Push each side of ribbon cable connector

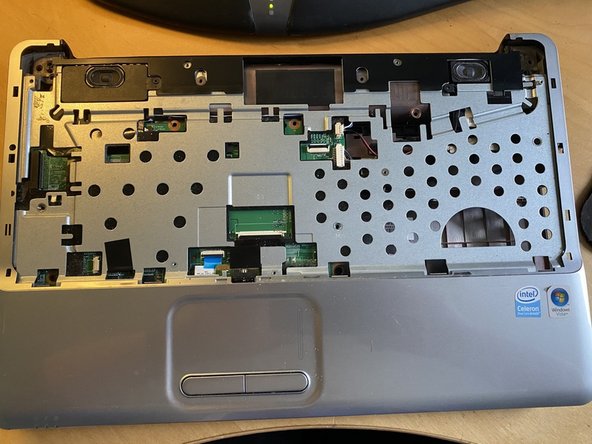
    • Fully remove keyboard

  9. Compaq Presario CQ60 Motherboard Replacement, Remove screws: 9 단계, 이미지 3개 중 1개 Compaq Presario CQ60 Motherboard Replacement, Remove screws: 9 단계, 이미지 3개 중 2개 Compaq Presario CQ60 Motherboard Replacement, Remove screws: 9 단계, 이미지 3개 중 3개
    • Remove 2x Phillips M2.5x8mm screws from under the display

    • Remove 4x Phillips M2x2.8mm screws from the battery compartment

  10. Compaq Presario CQ60 Motherboard Replacement, Disconnect ribbon cable: 10 단계, 이미지 3개 중 1개 Compaq Presario CQ60 Motherboard Replacement, Disconnect ribbon cable: 10 단계, 이미지 3개 중 2개 Compaq Presario CQ60 Motherboard Replacement, Disconnect ribbon cable: 10 단계, 이미지 3개 중 3개
    • Turn over the laptop

    • Use a spudger to lift the ribbon cable hinged clip

    • Pull the ribbon cable out of the connector

  11. Compaq Presario CQ60 Motherboard Replacement: 11 단계, 이미지 2개 중 1개 Compaq Presario CQ60 Motherboard Replacement: 11 단계, 이미지 2개 중 2개
    • Lifting the bezel by the screen

    • Slide the bezel back towards the screen to release it from the clips

  12. Compaq Presario CQ60 Motherboard Replacement, Remove bezel: 12 단계, 이미지 1개 중 1개
    • Fully remove bezel

  13. Compaq Presario CQ60 Motherboard Replacement, Remove screws: 13 단계, 이미지 2개 중 1개 Compaq Presario CQ60 Motherboard Replacement, Remove screws: 13 단계, 이미지 2개 중 2개
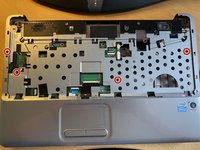
    • Remove 4x #1 Phillips M2.5x8mm screws from the bottom case

    • Remove 2x #0 Phillips M2x4mm screws from hard drive bay

  14. Compaq Presario CQ60 Motherboard Replacement, Disconnect mouse ribbon cable: 14 단계, 이미지 2개 중 1개 Compaq Presario CQ60 Motherboard Replacement, Disconnect mouse ribbon cable: 14 단계, 이미지 2개 중 2개
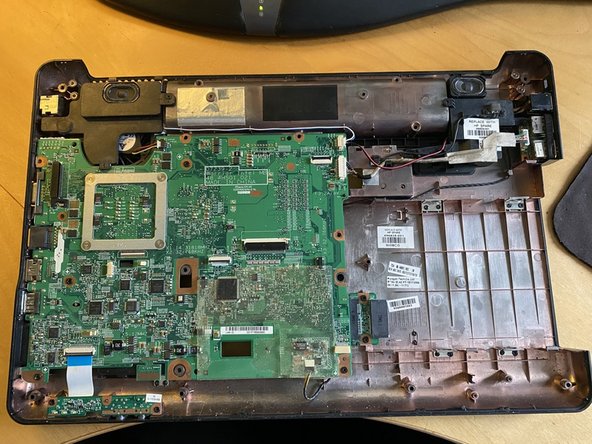
    • Using a spudger lift the mouse ribbon cabe latch

    • Do not remove yet

  15. Compaq Presario CQ60 Motherboard Replacement: 15 단계, 이미지 2개 중 1개 Compaq Presario CQ60 Motherboard Replacement: 15 단계, 이미지 2개 중 2개
    • Remove 4x #1 Phillips M2x5mm

    • Remove 1x #0 Phillips M2x2.6

  16. Compaq Presario CQ60 Motherboard Replacement: 16 단계, 이미지 2개 중 1개 Compaq Presario CQ60 Motherboard Replacement: 16 단계, 이미지 2개 중 2개
    • Starting at the edge by the screen, use a spudger to unclip the top case

    • Work around both sides and finish with the touchpad

  17. Compaq Presario CQ60 Motherboard Replacement: 17 단계, 이미지 2개 중 1개 Compaq Presario CQ60 Motherboard Replacement: 17 단계, 이미지 2개 중 2개
    • Lift top base off of laptop, being careful to disconnect the touchpad ribbon cable

  18. Compaq Presario CQ60 Motherboard Replacement, Motherboard: 18 단계, 이미지 2개 중 1개 Compaq Presario CQ60 Motherboard Replacement, Motherboard: 18 단계, 이미지 2개 중 2개
    • Disconnect CMOS battery backup connector from bottom of laptop

  19. Compaq Presario CQ60 Motherboard Replacement: 19 단계, 이미지 2개 중 1개 Compaq Presario CQ60 Motherboard Replacement: 19 단계, 이미지 2개 중 2개
    • Disconnect speaker connector. This connector is easy to break, there are 2 tabs on the bottom that need to be lifted slightly to remove. Use a spudger carefully under the connector to lift slightly and pull gently on the wires all together to remove.

    • Disconnect the USB connector

  20. Compaq Presario CQ60 Motherboard Replacement: 20 단계, 이미지 2개 중 1개 Compaq Presario CQ60 Motherboard Replacement: 20 단계, 이미지 2개 중 2개
    • Remove 2x #1 Phillips M2.5x4.5mm screws holding the optical drive connector

    • Remove the modem port connector

  21. Compaq Presario CQ60 Motherboard Replacement: 21 단계, 이미지 3개 중 1개 Compaq Presario CQ60 Motherboard Replacement: 21 단계, 이미지 3개 중 2개 Compaq Presario CQ60 Motherboard Replacement: 21 단계, 이미지 3개 중 3개
    • Lift audio/status light connector tab using a spudger and remove ribbon cable

  22. Compaq Presario CQ60 Motherboard Replacement: 22 단계, 이미지 3개 중 1개 Compaq Presario CQ60 Motherboard Replacement: 22 단계, 이미지 3개 중 2개 Compaq Presario CQ60 Motherboard Replacement: 22 단계, 이미지 3개 중 3개
    • Remove 1x #0 Phillips M2x2.8mm screw from left speaker

    • Lift speaker out and place out of the way of the motherboard

  23. Compaq Presario CQ60 Motherboard Replacement: 23 단계, 이미지 2개 중 1개 Compaq Presario CQ60 Motherboard Replacement: 23 단계, 이미지 2개 중 2개
    • Remove 4x #1 Phillips M2.5x4mm screws

  24. Compaq Presario CQ60 Motherboard Replacement: 24 단계, 이미지 3개 중 1개 Compaq Presario CQ60 Motherboard Replacement: 24 단계, 이미지 3개 중 2개 Compaq Presario CQ60 Motherboard Replacement: 24 단계, 이미지 3개 중 3개
    • Lift motherboard from right hand side and slide towards right

    • Be careful of power connector releasing from case

  25. Compaq Presario CQ60 Motherboard Replacement: 25 단계, 이미지 2개 중 1개 Compaq Presario CQ60 Motherboard Replacement: 25 단계, 이미지 2개 중 2개
    • Motherboard (with RAM) is removed

결론

To reassemble your device, follow these instructions in reverse order.

다른 한 분이 해당 안내서를 완성하였습니다.

작성자

1다른 기여자 명과 함께

Mike B

회원 가입일: 11/07/13

1,045 평판

안내서 9개를 작성함

댓글 0개

댓글 쓰기

조회 통계:

지난 24시간: 0

지난 7일: 3

지난 30일: 19

전체 시간: 1,497