주요 콘텐츠로 건너뛰기
Dell Inspiron 13-7353 Heat Sink Replacement

Dell Inspiron 13-7353 Heat Sink Replacement

Stephany Marin Restrepo

Stephany Marin Restrepo8 다른 기여자

최종 수정일 June 21, 2022

10 분
조정
커뮤니티-기여 안내서

If your Dell Inspiron Laptop (Model 13-7353) is overheating and your computer's fan is functioning properly, replacing the heat sink may help.

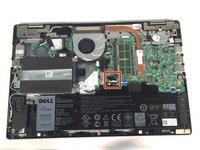
The heat sink is a component, typically made of metal, that increases heat flow away from a hot device. In a laptop computer, space is limited, so the heat sink often sits on top of a component that generates a lot of heat, such as the processor. The heat sink works by absorbing excess heat and dissipating it throughout the device. The heat sink is often next to the fan.

Before following this guide, back up your computer's data on the cloud or an external hard drive.

Before starting your repair, make sure to power down your device and disconnect it from any external power source.

필요한 것

도구

더보기...

  1. Dell Inspiron 13-7353 Heat Sink Replacement, Flip the Computer: 1 단계, 이미지 1개 중 1개
    • WARNING: Please read the safety information shipped with your computer and follow recommended steps before working inside your computer. When finished working inside your computer, follow the instructions included in the safety information.

    • Close the computer display and turn the computer over so that the base of the computer is facing up.

  2. Dell Inspiron 13-7353 Heat Sink Replacement, Secure the Base: 2 단계, 이미지 1개 중 1개
    • Remove the ten screws that secure the base cover to the base of the computer.

  3. Dell Inspiron 13-7353 Heat Sink Replacement, Pry the Base cover: 3 단계, 이미지 1개 중 1개
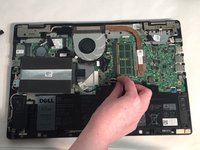
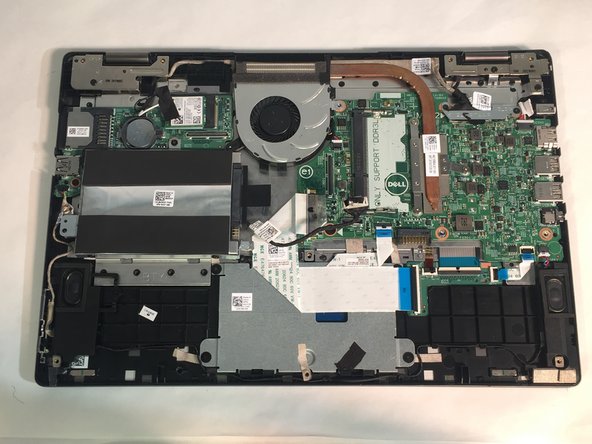
    • Using a plastic scribe (plastic opening tool), pry the base cover off of the base of the computer.

  4. Dell Inspiron 13-7353 Heat Sink Replacement, RAM: 4 단계, 이미지 2개 중 1개 Dell Inspiron 13-7353 Heat Sink Replacement, RAM: 4 단계, 이미지 2개 중 2개
    • Before opening your device, ensure that all data is backed up on a hard drive to prevent data loss.

    • Loosen and then unplug the hard drive cable.

  5. Dell Inspiron 13-7353 Heat Sink Replacement: 5 단계, 이미지 2개 중 1개 Dell Inspiron 13-7353 Heat Sink Replacement: 5 단계, 이미지 2개 중 2개
    • Remove the two M2 3mm screws attaching the battery using the Phillips #1 screwdriver.

    • Remove the battery.

  6. Dell Inspiron 13-7353 Heat Sink Replacement: 6 단계, 이미지 3개 중 1개 Dell Inspiron 13-7353 Heat Sink Replacement: 6 단계, 이미지 3개 중 2개 Dell Inspiron 13-7353 Heat Sink Replacement: 6 단계, 이미지 3개 중 3개
    • Pry open the two clips.

    • Gently lift the RAM stick and pull it out of the motherboard.

  7. Dell Inspiron 13-7353 Heat Sink Replacement, Fan: 7 단계, 이미지 3개 중 1개 Dell Inspiron 13-7353 Heat Sink Replacement, Fan: 7 단계, 이미지 3개 중 2개 Dell Inspiron 13-7353 Heat Sink Replacement, Fan: 7 단계, 이미지 3개 중 3개
    • Unplug the daughterboard cable in two places, then remove the daughterboard.

    • Unplug the fan cable.

  8. Dell Inspiron 13-7353 Heat Sink Replacement: 8 단계, 이미지 2개 중 1개 Dell Inspiron 13-7353 Heat Sink Replacement: 8 단계, 이미지 2개 중 2개
    • Remove two 3mm screws from the cooling fan using the Phillips #1 screwdriver.

    • Remove the cooling fan from the laptop.

  9. Dell Inspiron 13-7353 Heat Sink Replacement, Heat Sink: 9 단계, 이미지 3개 중 1개 Dell Inspiron 13-7353 Heat Sink Replacement, Heat Sink: 9 단계, 이미지 3개 중 2개 Dell Inspiron 13-7353 Heat Sink Replacement, Heat Sink: 9 단계, 이미지 3개 중 3개
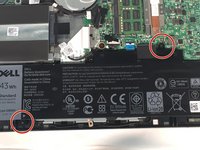
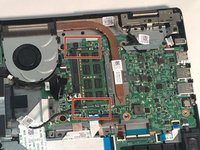
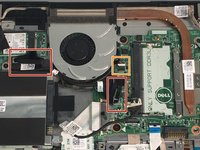
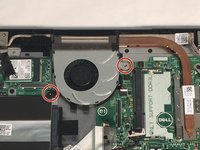
    • Remove three 2mm screws from the heat sink using a Phillips #0 screwdriver.

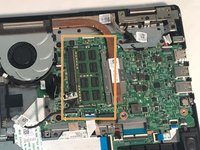
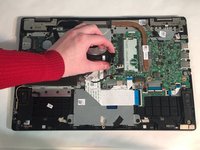
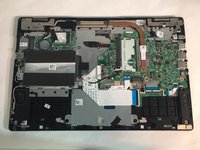
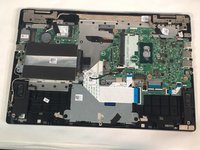
    • Remove the heat sink.

결론

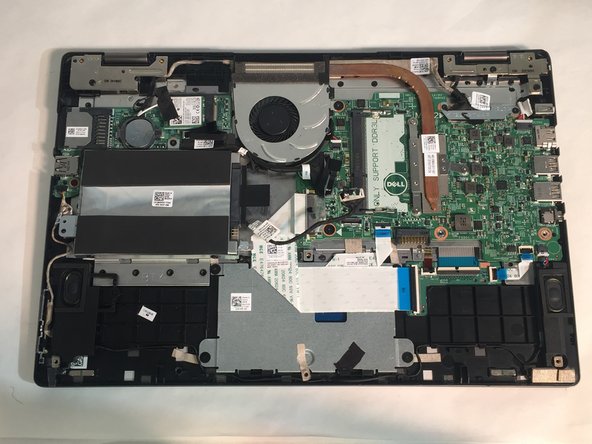
To reassemble your device, follow these instructions in reverse order.

다른 한 분이 해당 안내서를 완성하였습니다.

작성자

8다른 기여자 명과 함께

Stephany Marin Restrepo

회원 가입일: 03/19/18

613 평판

안내서 5개를 작성함

댓글 0개

댓글 쓰기

조회 통계:

지난 24시간: 1

지난 7일: 7

지난 30일: 12

전체 시간: 300