주요 콘텐츠로 건너뛰기
Dell Inspiron 15-3542 LCD Screen Replacement

Dell Inspiron 15-3542 LCD Screen Replacement

Najeemdeen Lamidi

Najeemdeen Lamidi다른 한 명의 기여자

최종 수정일 December 14, 2020

5 분
쉬움

In this guide, you will learn how to replace a Dell Inspiron 15-3542 LCD.

The screen on a laptop serves as an output device for the operating system. One of the ways that a screen is damaged is when you see multiple color lines on the screen. The most common cause of screen damage occurs from dropping the laptop. Applying too much pressure on the screen will also cause the screen to break. Therefore, always make sure your laptop screen is handled with care.

필요한 것

도구

  1. Dell Inspiron 15-3542 LCD Screen Replacement, LCD Screen: 1 단계, 이미지 3개 중 1개 Dell Inspiron 15-3542 LCD Screen Replacement, LCD Screen: 1 단계, 이미지 3개 중 2개 Dell Inspiron 15-3542 LCD Screen Replacement, LCD Screen: 1 단계, 이미지 3개 중 3개
    • Power off the laptop.

    • Flip the laptop over so the bottom is facing up.

    • Slide the right button to the unlock symbol.

    • Slide the left button to the other unlock symbol.

    • While holding the left button, use your right finger to raise the battery up from the laptop.

  2. Dell Inspiron 15-3542 LCD Screen Replacement: 2 단계, 이미지 3개 중 1개 Dell Inspiron 15-3542 LCD Screen Replacement: 2 단계, 이미지 3개 중 2개 Dell Inspiron 15-3542 LCD Screen Replacement: 2 단계, 이미지 3개 중 3개
    • Flip the laptop over so the top is facing up and open the laptop.

    • Using both hands, unsnap the tabs around the perimeter of the bezel and remove it from the laptop.

  3. Dell Inspiron 15-3542 LCD Screen Replacement: 3 단계, 이미지 3개 중 1개 Dell Inspiron 15-3542 LCD Screen Replacement: 3 단계, 이미지 3개 중 2개 Dell Inspiron 15-3542 LCD Screen Replacement: 3 단계, 이미지 3개 중 3개
    • Remove the four screws from the corners of the LCD using a Phillips screwdriver.

    • Lift the screen up and place it on the keyboard.

  4. Dell Inspiron 15-3542 LCD Screen Replacement: 4 단계, 이미지 3개 중 1개 Dell Inspiron 15-3542 LCD Screen Replacement: 4 단계, 이미지 3개 중 2개 Dell Inspiron 15-3542 LCD Screen Replacement: 4 단계, 이미지 3개 중 3개
    • Gently peel off the yellow clear tape securing the video connector.

    • Use an opening tool to flip open the video connector bracket.

    • Make sure not to force the video cable when removing it from the connector bracket.

    • Disconnect the cable from the LCD screen and remove the LCD from the laptop.

결론

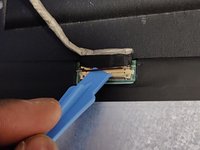
To reassemble your device, follow these instructions in reverse order.

다른 한 분이 해당 안내서를 완성하였습니다.

작성자

1다른 기여자 명과 함께

Najeemdeen Lamidi

회원 가입일: 09/19/20

130 평판

안내서 1개를 작성함

댓글 0개

댓글 쓰기

조회 통계:

지난 24시간: 3

지난 7일: 3

지난 30일: 8

전체 시간: 1,180