Dell Inspiron 15-3543 Hard Drive Replacement

Is the hard drive in your Dell Inspiron 15-3543 failing, or has it already failed? If so, here is the guide to fix the problem by simply replacing your disk drive. All you need is the standard #0 Phillips Screwdriver head in order to remove the two screws involved with this replacement.
필요한 것

-
-
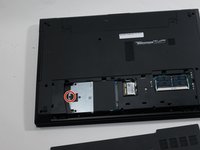
Flip the device over so the bottom is facing up.
-
Using a #0 Phillips screwdriver, remove the 2.0mm screw from the back of laptop beside the vents.
-
-


To reassemble your device, follow these instructions in reverse order.
To reassemble your device, follow these instructions in reverse order.
다른 3명이 해당 안내서를 완성하였습니다.

팀

Western Carolina University, Team S1-G6, Virtue Spring 2018 Western Carolina University, Team S1-G6, Virtue Spring 2018 회원
WCU-VIRTUE-S18S1G6
3 회원들
안내서 5개를 작성함