주요 콘텐츠로 건너뛰기
Dell Inspiron 15-5558 Hard Drive Replacement

Dell Inspiron 15-5558 Hard Drive Replacement

Adam Lourenco

Adam Lourenco5 다른 기여자

최종 수정일 November 16, 2022

10 분
조정

The hard drive is a primary storage component. If you are losing files or experience the Blue Screen of Death, this might be because of a faulty hard drive. This guide shows you how to remove your hard drive in order to replace it.

필요한 것

수리 키트

이 키트는 이 안내서를 완료하는데 필요한 모든 부품과 도구를 포함하고 있습니다.

부품

도구

  • Spudger
    Spudger
  • Phillips #0 Screwdriver
    Phillips #0 Screwdriver

더보기...

  1. Dell Inspiron 15-5558 Hard Drive Replacement, Battery: 1 단계, 이미지 1개 중 1개
    • Make sure you turn off the device before starting.

    • Flip the device over and so the white bar code is on the right.

  2. Dell Inspiron 15-5558 Hard Drive Replacement: 2 단계, 이미지 1개 중 1개
    • Slide the battery latch all the way to the left until you hear the click and see the battery prop up.

  3. Dell Inspiron 15-5558 Hard Drive Replacement: 3 단계, 이미지 2개 중 1개 Dell Inspiron 15-5558 Hard Drive Replacement: 3 단계, 이미지 2개 중 2개
    • Rotate the battery up and remove it.

  4. Dell Inspiron 15-5558 Hard Drive Replacement, Hard Drive: 4 단계, 이미지 3개 중 1개 Dell Inspiron 15-5558 Hard Drive Replacement, Hard Drive: 4 단계, 이미지 3개 중 2개 Dell Inspiron 15-5558 Hard Drive Replacement, Hard Drive: 4 단계, 이미지 3개 중 3개
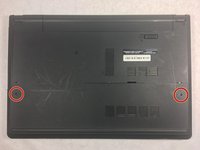
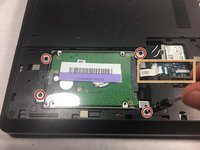
    • Using a Phillips #0 screwdriver, unscrew the two 8mm screws from the panel.

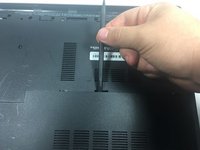
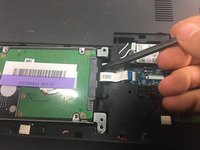
    • Take a spudger and wedge it between the panel and the base of the device.

    • Push down on the spudger until you hear a click sound.

    • Slide the spudger along the panel and continue to push down until the panel is completely detached.

    • Remove the panel.

  5. Dell Inspiron 15-5558 Hard Drive Replacement: 5 단계, 이미지 3개 중 1개 Dell Inspiron 15-5558 Hard Drive Replacement: 5 단계, 이미지 3개 중 2개 Dell Inspiron 15-5558 Hard Drive Replacement: 5 단계, 이미지 3개 중 3개
    • Using the Phillips #0 screwdriver, remove the four 8mm screws holding down the hard drive.

    • Take the spudger and prop up the connector so it is no longer attached.

    • Use the spudger and prop up the hard drive and remove it.

결론

To reassemble your device, follow these instructions in reverse order.

다른 4명이 해당 안내서를 완성하였습니다.

작성자

5다른 기여자 명과 함께

Adam Lourenco

회원 가입일: 10/19/17

793 평판

안내서 5개를 작성함

UMass Dartmouth, Team S3-G4, Bailey Fall 2017 UMass Dartmouth, Team S3-G4, Bailey Fall 2017 회원

UMASSD-BAILEY-F17S3G4

3 회원들

안내서 5개를 작성함

댓글 0개

댓글 쓰기

조회 통계:

지난 24시간: 0

지난 7일: 22

지난 30일: 39

전체 시간: 4,925