주요 콘텐츠로 건너뛰기

Dell Inspiron 15-5558 Palm-Rest Assembly Replacement

필요한 것

  1. Dell Inspiron 15-5558 Palm-Rest Assembly Replacement, Eject CD Tray and Turn Off Laptop: 1 단계, 이미지 1/2 Dell Inspiron 15-5558 Palm-Rest Assembly Replacement, Eject CD Tray and Turn Off Laptop: 1 단계, 이미지 2/2
    • Eject the CD tray while the laptop is on.

    • Turn off the laptop using the power button.

    • Or remove the 2x5 securing screw and push through the battery compartment to slide the optical drive out.

  2. Dell Inspiron 15-5558 Palm-Rest Assembly Replacement, Battery Removal: 2 단계, 이미지 1/3 Dell Inspiron 15-5558 Palm-Rest Assembly Replacement, Battery Removal: 2 단계, 이미지 2/3 Dell Inspiron 15-5558 Palm-Rest Assembly Replacement, Battery Removal: 2 단계, 이미지 3/3
    • Make sure that the laptop is turned off before proceeding.

    • Move the unlocking switch to the left to eject the battery.

    • The battery is designed to rotate slightly before lifting out.

    • Remove the 2.5x5 screws inside the compartment.

  3. Dell Inspiron 15-5558 Palm-Rest Assembly Replacement, Keyboard Removal: 3 단계, 이미지 1/2 Dell Inspiron 15-5558 Palm-Rest Assembly Replacement, Keyboard Removal: 3 단계, 이미지 2/2
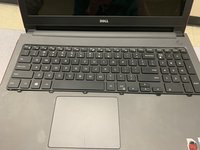
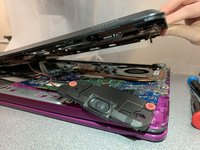
    • Turn the laptop over and open up the front screen to show the keyboard.

    • Use a (Philips) flathead near the top, center of the keyboard to begin popping out the keyboard.

    • Push straight down on the securing clips and they will move towards the screen - away from the top of the keyboard.

    • You may also use your hands once you begin the process.

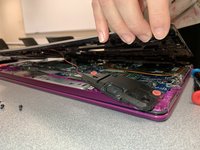
    • Remove the bottom tabs of the keyboard by pulling the keyboard up towards the screen.

  4. Dell Inspiron 15-5558 Palm-Rest Assembly Replacement, Keyboard Disconnection: 4 단계, 이미지 1/2 Dell Inspiron 15-5558 Palm-Rest Assembly Replacement, Keyboard Disconnection: 4 단계, 이미지 2/2
    • Carefully lift up the keyboard

    • There should be cables hooked to underside of the keyboard.

    • Remove tape, if there is tape, and disconnect all flaps and cables by lifting up.

  5. Dell Inspiron 15-5558 Palm-Rest Assembly Replacement, Disconnect Cables: 5 단계, 이미지 1/3 Dell Inspiron 15-5558 Palm-Rest Assembly Replacement, Disconnect Cables: 5 단계, 이미지 2/3 Dell Inspiron 15-5558 Palm-Rest Assembly Replacement, Disconnect Cables: 5 단계, 이미지 3/3
    • Remove all connected cables by pulling the black tapes up to unlock each cable.

    • To reconnect the cables, align and place the end of a cable into the slot of the black tab. Then push the black tab down to lock the cable in place.

  6. Dell Inspiron 15-5558 Palm-Rest Assembly Replacement, Base Cover Removal: 6 단계, 이미지 1/3 Dell Inspiron 15-5558 Palm-Rest Assembly Replacement, Base Cover Removal: 6 단계, 이미지 2/3 Dell Inspiron 15-5558 Palm-Rest Assembly Replacement, Base Cover Removal: 6 단계, 이미지 3/3
    이 단계에 사용된 도구:
    Flathead 3/32" or 2.5 mm Screwdriver
    $5.49
    구매
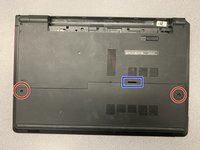
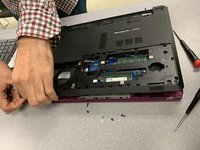
    • Use Phillips #00 screwdriver to remove 2.5 x 8 screws securing the base cover.

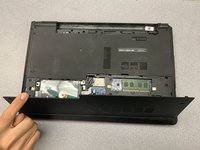
    • Use the 3/32 Flathead screwdriver to gently pry off the base cover around the top , slotted section .

  7. Dell Inspiron 15-5558 Palm-Rest Assembly Replacement, Hard Drive Removal: 7 단계, 이미지 1/2 Dell Inspiron 15-5558 Palm-Rest Assembly Replacement, Hard Drive Removal: 7 단계, 이미지 2/2
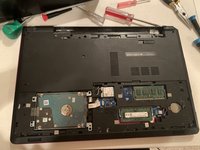
    • Remove screws securing the hard drive to the laptop.

    • Disconnect the black cable by pulling it away from the hard drive.

    • Lift the black latch to unlock the cable.

    • Remove the hard drive cable from the lower, blue circuit board

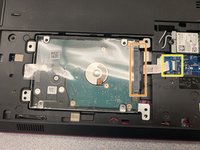
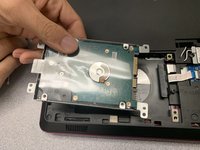
    • Remove the hard drive from the laptop.

    • Or, unlatching the cable lets you keep the black adapter attached to the hard drive to remove as one unit.

    • My latch was white and it rotates in the black base.

  8. Dell Inspiron 15-5558 Palm-Rest Assembly Replacement, Wireless Card Removal: 8 단계, 이미지 1/3 Dell Inspiron 15-5558 Palm-Rest Assembly Replacement, Wireless Card Removal: 8 단계, 이미지 2/3 Dell Inspiron 15-5558 Palm-Rest Assembly Replacement, Wireless Card Removal: 8 단계, 이미지 3/3
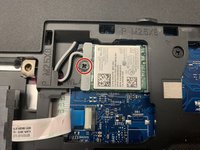
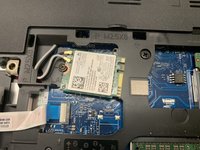
    • Unscrew the M2x3 screw

    • Note how the bracket covers the antenna leads. There is a small tab on the bracket to keep it aligned.

    • Lift off wireless card bracket

    • Gently unplug the wireless card by pulling it out to the left

    • Disconnect the black and white antenna cables

    • Remember when re-assembling this item to plug in the white cable to the lower plug and the black cable to the higher plug.

  9. Dell Inspiron 15-5558 Palm-Rest Assembly Replacement: 9 단계, 이미지 1/2 Dell Inspiron 15-5558 Palm-Rest Assembly Replacement: 9 단계, 이미지 2/2
    • Remove the screws securing the palmrest and base.

    • Note the panhead screws securing the base in the optical drive opening.

    • Use the Philips flathead and your hands to lift up the computer base.

    • Bits of plastic tabs may break off.

    • Be careful to lift up the keyboard around the hinges.

  10. Dell Inspiron 15-5558 Palm-Rest Assembly Replacement, Remove the Speakers: 10 단계, 이미지 1/2 Dell Inspiron 15-5558 Palm-Rest Assembly Replacement, Remove the Speakers: 10 단계, 이미지 2/2
    • The speakers may be removed from the computer base by unattaching from the computer base or disconnecting the cable and leaving the speakers on the computer base.

  11. Dell Inspiron 15-5558 Palm-Rest Assembly Replacement, Remove the Optical Drive Assembly: 11 단계, 이미지 1/3 Dell Inspiron 15-5558 Palm-Rest Assembly Replacement, Remove the Optical Drive Assembly: 11 단계, 이미지 2/3 Dell Inspiron 15-5558 Palm-Rest Assembly Replacement, Remove the Optical Drive Assembly: 11 단계, 이미지 3/3
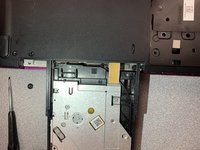
    • Disconnect the optical drive cable that is attached to the innermost layer of computer components.

    • While lifting up, unscrew all screws holding the optical drive to the computer base.

    • Remove the optical drive assembly

  12. Dell Inspiron 15-5558 Palm-Rest Assembly Replacement, Remove I/O Board: 12 단계, 이미지 1/2 Dell Inspiron 15-5558 Palm-Rest Assembly Replacement, Remove I/O Board: 12 단계, 이미지 2/2
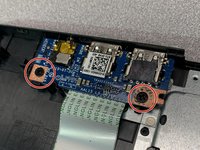
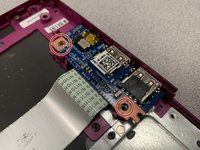
    • Unscrew the two screws securing the I/O Board to the laptop.

    • Remove the I/O board

  13. Dell Inspiron 15-5558 Palm-Rest Assembly Replacement, Left and Right Hinges: 13 단계, 이미지 1/3 Dell Inspiron 15-5558 Palm-Rest Assembly Replacement, Left and Right Hinges: 13 단계, 이미지 2/3 Dell Inspiron 15-5558 Palm-Rest Assembly Replacement, Left and Right Hinges: 13 단계, 이미지 3/3
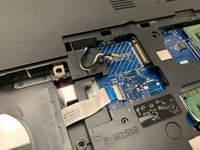
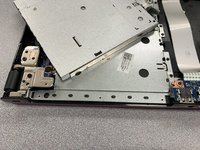
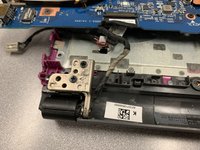
    • Unscrew all screws securing the left and right hinges.

    • Lift the hinges up towards the screen to expose the lower components.

    • The lift hinge when facing the laptop towards the screen has a circuit board under the hinge. This should be removed after taking out the screws.

    • If a golden threaded screw component breaks off the plastic base, use pilers to hold the component while unscrewing the screw to remove the screw.

  14. Dell Inspiron 15-5558 Palm-Rest Assembly Replacement, Remove Motherboard and Heatsink: 14 단계, 이미지 1/2 Dell Inspiron 15-5558 Palm-Rest Assembly Replacement, Remove Motherboard and Heatsink: 14 단계, 이미지 2/2
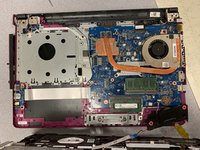
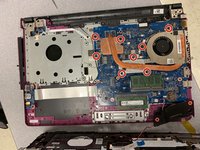
    • Unscrew the following screws from the motherboard and heatsink.

    • Disconnect the power button cable.

    • Lift from the laptop the motherboard and the heatsink assembly.

  15. Dell Inspiron 15-5558 Palm-Rest Assembly Replacement, Remove Screen: 15 단계, 이미지 1/1
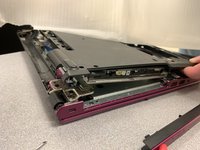
    • Remove the screen from the lower assembly by lifting it up from the now disconnected right and left hinges.

  16. Dell Inspiron 15-5558 Palm-Rest Assembly Replacement, Remove the Mousepad: 16 단계, 이미지 1/3 Dell Inspiron 15-5558 Palm-Rest Assembly Replacement, Remove the Mousepad: 16 단계, 이미지 2/3 Dell Inspiron 15-5558 Palm-Rest Assembly Replacement, Remove the Mousepad: 16 단계, 이미지 3/3
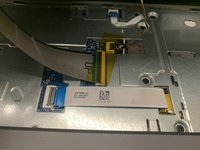
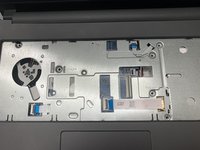
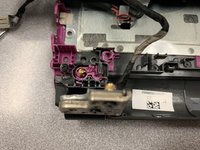
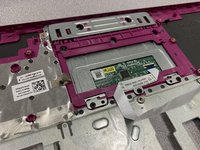
    • Take off the two gold pieces of tape.

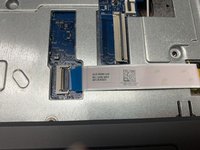
    • Unscrew the circuit board near the left hinge, when looking at the laptop from the front. (This is connected to the mousepad)

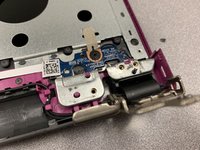
    • Remove tape and lift off the black and white antenna cables starting at the mousepad to the left hinge.

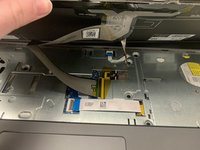
    • Take off the tan golden tape.

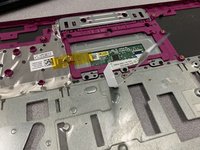
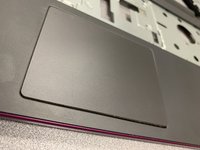
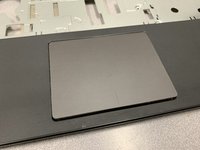
    • From the back, pop out the mousepad from the assembly. Be careful to lift out the tabs correctly.

  17. Dell Inspiron 15-5558 Palm-Rest Assembly Replacement, Replace the Palm-Rest Assembly: 17 단계, 이미지 1/1
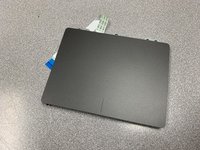
    • Remove the original palm-rest assembly component from the laptop

    • Get out the replacement palm-rest assembly component.

    • From this step onward, use the new replacement palm-rest assembly component.

  18. Dell Inspiron 15-5558 Palm-Rest Assembly Replacement, Attach the Mousepad: 18 단계, 이미지 1/3 Dell Inspiron 15-5558 Palm-Rest Assembly Replacement, Attach the Mousepad: 18 단계, 이미지 2/3 Dell Inspiron 15-5558 Palm-Rest Assembly Replacement, Attach the Mousepad: 18 단계, 이미지 3/3
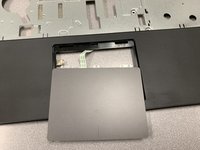
    • Fit the mousepad into the new palm-rest assembly component from the front of the laptop

    • Make sure to fit the cables through the back.

    • Put golden tape back on.

    • Adjust the cable for the mousepad back through slots on the internal side of the palm-rest assembly

결론

To reassemble your device, follow these instructions in reverse order with the new replacement palm-rest assembly component.

다른 4명이 해당 안내서를 완성하였습니다.

KES Company

회원 가입일: 12/02/19

368 평판

안내서 1개 작성함

KES Company KES Company 회원

Community

1 회원

안내서 1개 작성하였습니다

댓글 0개

댓글 쓰기

조회 통계:

24 시간 전: 0

7일 전: 3

30일 전: 16

전체 시간: 1,668