주요 콘텐츠로 건너뛰기
수리 커뮤니티 가입 - 계정 만들기
Dell Inspiron 15R N5110 Memory Module Replacement

Dell Inspiron 15R N5110 Memory Module Replacement

Terrence15

Terrence153 다른 기여자

최종 수정일 2019년 11월 24일

3 - 5 분
쉬움
커뮤니티-기여 안내서

In this guide, we will be showing you how to remove and replace the Memory Module.

필요한 것

도구

  1. Dell Inspiron 15R N5110 Memory Module Replacement, Loosen the Screw: 1 단계, 이미지 1개 중 1개
    • WARNING: Before working inside your computer, read the safety information that shipped with your computer and follow the steps in "Before You Begin".

    • Loosen the captive screw that secures the memory-module cover to the computer base.

  2. Dell Inspiron 15R N5110 Memory Module Replacement, Lifting the Memory Module Cover: 2 단계, 이미지 1개 중 1개
    • Using your fingertips, lift the memory-module cover out of the slots on the computer base.

  3. Dell Inspiron 15R N5110 Memory Module Replacement, Popping up the Memory Module: 3 단계, 이미지 2개 중 1개 Dell Inspiron 15R N5110 Memory Module Replacement, Popping up the Memory Module: 3 단계, 이미지 2개 중 2개
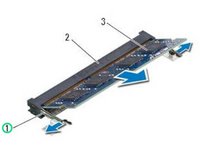
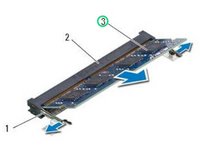
    • Use your fingertips to carefully spread apart the securing clips on each end of the memory-module connector until the memory module pops up.

  4. Dell Inspiron 15R N5110 Memory Module Replacement, Remove the Memory Module: 4 단계, 이미지 1개 중 1개
    • Remove the memory module from the memory-module connector.

    • Align the notch on the NEW memory module with the tab on the memory-module connector.

  5. Dell Inspiron 15R N5110 Memory Module Replacement, Sliding the Memory Module: 6 단계, 이미지 1개 중 1개
    • Slide the memory module firmly into the connector at a 45-degree angle and press the memory module down until it clicks into place.

    • NOTE: If you do not hear the click, remove the memory module and reinstall it.

  6. Dell Inspiron 15R N5110 Memory Module Replacement, Slide the Tabs: 7 단계, 이미지 1개 중 1개
    • Slide the tabs on the memory-module cover into the slots on the computer base and snap the memory-module cover into place.

  7. Dell Inspiron 15R N5110 Memory Module Replacement, Tighten the Screw: 8 단계, 이미지 1개 중 1개
    • Tighten the captive screw that secures the memory-module cover to the computer base.

결승점

향후 수리를 위한 준비

모두 쇼핑하기

작성자

3다른 기여자 명과 함께

Terrence15

회원 가입일: 12/18/17

79,825 평판

안내서 441개를 작성함

RampUP America, Inc. RampUP America, Inc. 회원

Community

43 회원들

안내서 1,991개를 작성함

0가이드 댓글

댓글 쓰기

조회 통계:

지난 24시간: 0

지난 7일: 4

지난 30일: 12

전체 시간: 458