주요 콘텐츠로 건너뛰기

Dell Inspiron Mini 1012 Hard Drive Replacement

필요한 것

  1. Dell Inspiron Mini 1012 Hard Drive Replacement, Hard Drive: 1 단계, 이미지 1/2 Dell Inspiron Mini 1012 Hard Drive Replacement, Hard Drive: 1 단계, 이미지 2/2
    • Turn the device over so that the back (white side) of the device is facing up.

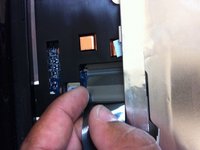
    • Remove battery from laptop by pushing the two tabs outward and pull the battery outward. The tabs are highlighted in blue. Place the battery off to the side.

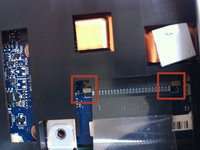
    • Remove the 3 screws highlighted in red that secure the keyboard to the case using the screw driver with largest phillips head in the box.

    • Make sure to keep the screws separated by step to ensure that they can be put back in the correct location when reversing the steps.

    • Notes about the reversal of steps will appear as a caution mark.

  2. Dell Inspiron Mini 1012 Hard Drive Replacement: 2 단계, 이미지 1/1
    • Turn the device right side up and open the device to view the keyboard.

    • Remove the keyboard away from the case, using a plastic spudger if necessary.

    • The keyboard will still be attached to the motherboard by a ribbon cable.

  3. Dell Inspiron Mini 1012 Hard Drive Replacement: 3 단계, 이미지 1/2 Dell Inspiron Mini 1012 Hard Drive Replacement: 3 단계, 이미지 2/2
    • Pull the ribbon cable to release the keyboard.

    • If necessary push the release tabs highlighted in red with a plastic spudger, these secure the keyboard ribbon cable. Lay the keyboard face down off to the side of your work space.

    • Be sure to lift up the release tabs that hold the ribbon in place, slide the ribbon in, and close the flap securing the ribbon in place. Lay the keyboard back down in its original location giving it a slight push to secure it in place.

  4. Dell Inspiron Mini 1012 Hard Drive Replacement: 4 단계, 이미지 1/2 Dell Inspiron Mini 1012 Hard Drive Replacement: 4 단계, 이미지 2/2
    • Remove the 2 Phillips head screws securing hard drive to case. Use the same screw driver bit as before.

    • Pull the plastic tab connected to the hard drive outward in the left hand direction to remove hard drive from case. Place the hard drive off to the side.

    • When putting the hard drive back slide it in to the space so that the screw holes line up and press down until there is a snug fit.

결론

To reassemble your device, follow these instructions in reverse order.

다른 16명이 해당 안내서를 완성하였습니다.

Barrington Edman

회원 가입일: 07/10/12

1,145 평판

안내서 3개 작성하였습니다

댓글 4개

What kind of hard drive type is this? I wants to replace mine with an SSD (Solid State Drive) but is this something I can buy at my nearest computer store?

kendee - 답글

Its a standard 2.5" SATA and yes you can replace it with a SSD from any local computer store or even Best Buy.

Barrington Edman - 답글

I bought a Kingston SSD to upgrade mine, but cloning the old hard drive or even trying to install the SSD cleanly doesn’t work, Windows says it wont install and it doesn’t boot. The BIOS isn’t very helpful either.

Josh Sadoway - 답글

This guide should not be rated moderate because everything is straight forward. The trickiest step was removing the keyboard. Once it is disassembled to the point of replacing the hard drive, you can also replace pretty much everything else also.

Willam T. Purnell - 답글

댓글 쓰기

조회 통계:

24 시간 전: 1

7일 전: 5

30일 전: 36

전체 시간: 27,040