주요 콘텐츠로 건너뛰기
Dell Vostro 3560 Back Panel Removal

Dell Vostro 3560 Back Panel Removal

Max Bareilles

Max Bareilles다른 한 명의 기여자

최종 수정일 February 16, 2024

2 분
쉬움
커뮤니티-기여 안내서

This guide will show you how to remove the back panel of your Dell Vostro 3560 laptop to access the RAM, hard drive, and optical drive. Some of this guide was made with information from this video.

필요한 것

도구

  1. Dell Vostro 3560 Back Panel Removal, Identify your laptop: 1 단계, 이미지 2개 중 1개 Dell Vostro 3560 Back Panel Removal, Identify your laptop: 1 단계, 이미지 2개 중 2개
    • Make sure you have the right laptop by checking the sticker.

  2. Dell Vostro 3560 Back Panel Removal, Remove Battery: 2 단계, 이미지 2개 중 1개 Dell Vostro 3560 Back Panel Removal, Remove Battery: 2 단계, 이미지 2개 중 2개
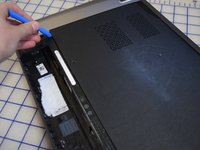
    • Start with your PC shut off and upside down.

    • Pull out tabs.

    • Pull up on rail to remove battery.

  3. Dell Vostro 3560 Back Panel Removal, Remove Back Panel: 3 단계, 이미지 1개 중 1개
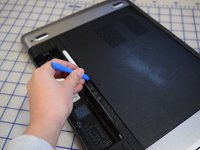
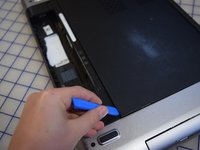
    • Remove the two screws:

    • One M2 Phillips screw (Fixed)

    • One 5-mm M2 Phillips screw

  4. Dell Vostro 3560 Back Panel Removal: 4 단계, 이미지 3개 중 1개 Dell Vostro 3560 Back Panel Removal: 4 단계, 이미지 3개 중 2개 Dell Vostro 3560 Back Panel Removal: 4 단계, 이미지 3개 중 3개
    • Use a iFixit opening tool to remove the back panel.

  5. Dell Vostro 3560 Back Panel Removal: 5 단계, 이미지 1개 중 1개
    • From here you can access:

    • The hard drive

    • The RAM.

    • The CD Drive.

결론

To reassemble your device, follow these instructions in reverse order.

다른 3명이 해당 안내서를 완성하였습니다.

작성자

1다른 기여자 명과 함께

Max Bareilles

회원 가입일: 02/24/20

664 평판

안내서 5개를 작성함

댓글 0개

댓글 쓰기

조회 통계:

지난 24시간: 1

지난 7일: 7

지난 30일: 22

전체 시간: 1,160