주요 콘텐츠로 건너뛰기
Dell XPS 15 9560 Touchpad Replacement

Dell XPS 15 9560 Touchpad Replacement

Taylor Hancock

Taylor Hancock9 다른 기여자

최종 수정일 March 5, 2025

15 분 - 1 시간
조정
액션 샷
더 많은 이미지가 필요함
학생이 작성 중
헷갈리는 텍스트
더 나은 이미지가 필요함

How to replace a scratched, cracked, or unresponsive trackpad on a Dell XPS 15 9560 laptop.

Before using this guide, check for other possible causes of trackpad issues.

  • Trackpad Drivers: Your issue may be related to drivers. Watch this video by MDTechVideos for a fix.
  • Dust or Debris: Clean the trackpad by spraying isopropyl alcohol on a microfiber cloth. Apply medium pressure and wipe in small circles on and around the trackpad.

필요한 것

도구

더보기...

iFixit은 귀하가 이 링크를 통해 구매할 때 커미션을 받습니다.
  1. Dell XPS 15 9560 Touchpad Replacement, Back Panel: 1 단계, 이미지 1개 중 1개
    • Before beginning, unplug the charger and any peripheries. If possible, discharge your battery below 25%.

    • Shut the laptop down.

  2. Dell XPS 15 9560 Touchpad Replacement: 2 단계, 이미지 1개 중 1개
    • Using a T5 Torx screwdriver, remove ten 4.0 mm screws from the back panel of the laptop.

  3. Dell XPS 15 9560 Touchpad Replacement: 3 단계, 이미지 1개 중 1개
    • Using a Phillips screwdriver, remove two 5 mm screws underneath the XPS badge door.

  4. Dell XPS 15 9560 Touchpad Replacement: 4 단계, 이미지 1개 중 1개
    • Wedge the scribe between the backplate and remove the bottom base cover.

  5. Dell XPS 15 9560 Touchpad Replacement, Battery: 5 단계, 이미지 1개 중 1개
    • Using a T5 Torx screwdriver, remove the six 4.0 mm screws.

  6. Dell XPS 15 9560 Touchpad Replacement: 6 단계, 이미지 1개 중 1개
    • Unplug the battery cable.

  7. Dell XPS 15 9560 Touchpad Replacement: 7 단계, 이미지 1개 중 1개
    • Remove the battery.

  8. Dell XPS 15 9560 Touchpad Replacement, Hard Drive: 8 단계, 이미지 1개 중 1개
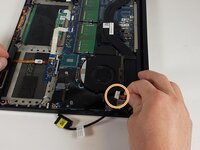
    • Using a Phillips #0 screwdriver, remove four 4.0 mm screws of the hard drive bracket.

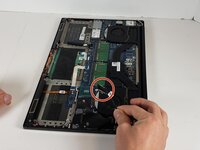
    • Unplug the hard drive cable.

  9. Dell XPS 15 9560 Touchpad Replacement: 9 단계, 이미지 1개 중 1개
    • Remove the hard drive bracket. Then, unplug and remove the hard drive.

  10. Dell XPS 15 9560 Touchpad Replacement, Trackpad: 10 단계, 이미지 1개 중 1개
    • Remove the two 5 mm mounting screws.

  11. Dell XPS 15 9560 Touchpad Replacement: 11 단계, 이미지 1개 중 1개
    • Use a screwdriver to remove the single 5mm screw securing the silver plate.

  12. Dell XPS 15 9560 Touchpad Replacement: 12 단계, 이미지 1개 중 1개
    • Lift the latch and pull out the smallest cord.

  13. Dell XPS 15 9560 Touchpad Replacement: 13 단계, 이미지 2개 중 1개 Dell XPS 15 9560 Touchpad Replacement: 13 단계, 이미지 2개 중 2개
    • Unplug the black cord.

    • Unplug the cord with a white plug.

  14. Dell XPS 15 9560 Touchpad Replacement: 14 단계, 이미지 2개 중 1개 Dell XPS 15 9560 Touchpad Replacement: 14 단계, 이미지 2개 중 2개
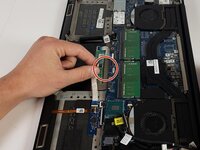
    • Gently pull the white ribbon cables out from their housings. To disconnect, use a spudger or your fingernail to gently lift the looped tab away from the connector. It should pop up easily.

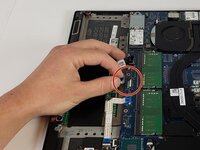
    • Next, use the spudger or your fingernail to push the plastic tab away from the socket. It should move slightly.

    • Now, pull the white ribbon cables out.

  15. Dell XPS 15 9560 Touchpad Replacement: 15 단계, 이미지 1개 중 1개
    • Lift the laptop as shown.

    • Separate the touchpad from the keyboard.

결론

To reassemble your device, follow these instructions in reverse order.

작성자

9다른 기여자 명과 함께

Taylor Hancock

회원 가입일: 01/18/22

133 평판

안내서 1개를 작성함

댓글 0개

댓글 쓰기

조회 통계:

지난 24시간: 0

지난 7일: 3

지난 30일: 30

전체 시간: 4,523