주요 콘텐츠로 건너뛰기
Dell XPS 15-L502X Keyboard Replacement

Dell XPS 15-L502X Keyboard Replacement

Vishal

Vishal2 다른 기여자

최종 수정일 September 10, 2020

5 분
조정
액션 샷

This guide will allow you to replace the keyboard completely. You may need to remove this in order to replace the screen.

필요한 것

도구

  • Spudger
    Spudger
  1. Dell XPS 15-L502X Keyboard Replacement, Front Cover: 1 단계, 이미지 1개 중 1개
    • Before prying up on the cover, you may have to first remove a screw located inside the battery compartment (M2X3) and release the two latches. If you don't release the latches, you may snap the cover.

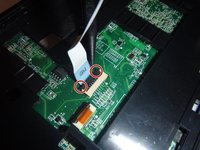
    • Pry up the top of the cover first by using a spudger to wedge in between the cover and base of the computer.

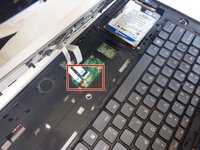
    • Once the spudger is between the cover and the base of the computer, wedge underneath the remaining border surrounding the keyboard.

    • Cracking sounds are normal. Be careful and take your time removing this panel.

  2. Dell XPS 15-L502X Keyboard Replacement: 2 단계, 이미지 1개 중 1개
    • Work your fingers underneath the cover. Then, delicately pull the cover off of the computer.

    • The mouse pad is connected to the rest of the computer via two cables underneath the cover. These cables must be unhooked before the cover can be completely removed.

  3. Dell XPS 15-L502X Keyboard Replacement: 3 단계, 이미지 2개 중 1개 Dell XPS 15-L502X Keyboard Replacement: 3 단계, 이미지 2개 중 2개
    • Unhook the cables connected to the mouse pad by flipping up the black tabs that hold either cable in place.

    • Releasing these cables can be done by hand or by using a spudger.

  4. Dell XPS 15-L502X Keyboard Replacement, Keyboard: 4 단계, 이미지 1개 중 1개
    • Use a spudger to release both clips that hold the keyboard in place.

  5. Dell XPS 15-L502X Keyboard Replacement: 5 단계, 이미지 2개 중 1개 Dell XPS 15-L502X Keyboard Replacement: 5 단계, 이미지 2개 중 2개
    • Slowly lift the top of the keyboard and then pull the keyboard towards the screen.

    • There are cables attached to the back of the keyboard. To keep from damaging these, do not pull the keyboard completely off.

  6. Dell XPS 15-L502X Keyboard Replacement: 6 단계, 이미지 1개 중 1개
    • Using a spudger, slowly open up the two black clips holding down both cables.

    • Separate the unfastened cables from the base of the computer.

    • Once the cables are detached from the keyboard, you may pull the keyboard away completely and set it aside.

결론

To reassemble your device, follow these instructions in reverse order.

다른 3명이 해당 안내서를 완성하였습니다.

작성자

2다른 기여자 명과 함께

Vishal

회원 가입일: 09/21/15

775 평판

안내서 6개를 작성함

IUPUI, Team 2-3, Baechle Fall 2015 IUPUI, Team 2-3, Baechle Fall 2015 회원

IUPUI-BAECHLE-F15S2G3

3 회원들

안내서 8개를 작성함

댓글 한 개

Very helpful. I changed my xps dell laptop by my self referring this article. It saved me some money which I would have to give for repairing to shop person.

tulipdas - 답글

댓글 쓰기

조회 통계:

지난 24시간: 4

지난 7일: 16

지난 30일: 24

전체 시간: 5,816