주요 콘텐츠로 건너뛰기
Etekcity Lasergrip 1080 Battery Connector Replacement

Etekcity Lasergrip 1080 Battery Connector Replacement

Patrick Crawford

Patrick Crawford3 다른 기여자

최종 수정일 November 4, 2015

3 분
조정

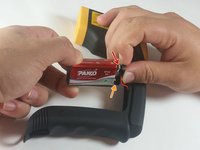
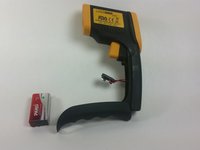
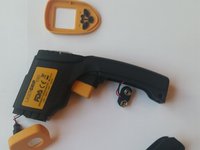
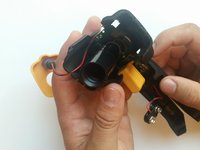
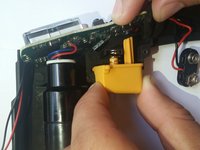
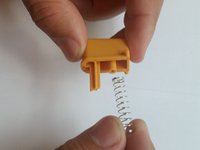
This guide will show you how to replace the battery connector. This replacement is necessary if a new battery is installed and the device still won't work or if the wires break. This will use a screwdriver and a soldering iron. Be careful when using the soldering iron as it is very hot. There is a link to a soldering guide in the Troubleshooting section of the device page.

필요한 것

도구

더보기...

  1. Etekcity Lasergrip 1080 Battery Connector Replacement, Battery: 1 단계, 이미지 1개 중 1개
    • Pull the battery cover away from the handle by gripping near the thumb groove.

  2. Etekcity Lasergrip 1080 Battery Connector Replacement: 2 단계, 이미지 1개 중 1개
    • Gently pull the battery out of the handle.

    • Excessive force could damage wires.

  3. Etekcity Lasergrip 1080 Battery Connector Replacement: 3 단계, 이미지 2개 중 1개 Etekcity Lasergrip 1080 Battery Connector Replacement: 3 단계, 이미지 2개 중 2개
    • Disconnect the battery by pulling the connector away from it.

    • Positive first

    • Negative second

    • When replacing the battery, this order is reversed.

  4. Etekcity Lasergrip 1080 Battery Connector Replacement, Buttons: 4 단계, 이미지 2개 중 1개 Etekcity Lasergrip 1080 Battery Connector Replacement, Buttons: 4 단계, 이미지 2개 중 2개
    • Remove the battery cover from the device by pulling it straight out.

  5. Etekcity Lasergrip 1080 Battery Connector Replacement: 5 단계, 이미지 2개 중 1개 Etekcity Lasergrip 1080 Battery Connector Replacement: 5 단계, 이미지 2개 중 2개
    • Using the plastic opening tool remove the front and rear yellow covers.

    • When removing the back cover, be careful not to lose the buttons as they are not connected.

  6. Etekcity Lasergrip 1080 Battery Connector Replacement: 6 단계, 이미지 1개 중 1개
    • Remove the two 3.1 mm Phillips #0 screws.

  7. Etekcity Lasergrip 1080 Battery Connector Replacement: 7 단계, 이미지 2개 중 1개 Etekcity Lasergrip 1080 Battery Connector Replacement: 7 단계, 이미지 2개 중 2개
    • Pull the two halves apart.

    • Be careful not to lose any components on the inside.

  8. Etekcity Lasergrip 1080 Battery Connector Replacement: 8 단계, 이미지 1개 중 1개
    • Realign the buttons with the button terminals.

    • Red terminal to red button.

    • Orange terminal to orange button.

    • Yellow terminal to yellow button.

  9. Etekcity Lasergrip 1080 Battery Connector Replacement, Etekcity Lasergrip 1080 Trigger Replacement: 9 단계, 이미지 2개 중 1개 Etekcity Lasergrip 1080 Battery Connector Replacement, Etekcity Lasergrip 1080 Trigger Replacement: 9 단계, 이미지 2개 중 2개
    • Carefully pull the trigger out.

    • The trigger is spring loaded, so be careful that you do not lose the spring as you pull the trigger out.

    • To put the trigger back in, align the peg with the hole in the handle and align the shaft with the button terminal.

  10. Etekcity Lasergrip 1080 Battery Connector Replacement, Battery Connector: 10 단계, 이미지 1개 중 1개
    • Pull the motherboard out of its slot in the device.

  11. Etekcity Lasergrip 1080 Battery Connector Replacement: 11 단계, 이미지 1개 중 1개
    • Use a soldering iron and melt the solder where the battery connector's wires are attached to the motherboard.

    • Soldering irons are hot and should only be handled by those who know what they are doing and are wearing proper safety equipment. There is a link to a soldering guide in the Troubleshooting section of the device page.

결론

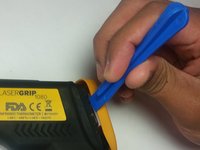
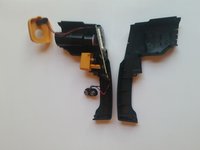
To reassemble your device, follow these instructions in reverse order.

작성자

3다른 기여자 명과 함께

Patrick Crawford

회원 가입일: 08/26/15

762 평판

안내서 6개를 작성함

USF Tampa, Team 5-1, Blackwell Fall 2015 USF Tampa, Team 5-1, Blackwell Fall 2015 회원

USFT-BLACKWELL-F15S5G1

3 회원들

안내서 9개를 작성함

댓글 0개

댓글 쓰기

조회 통계:

지난 24시간: 2

지난 7일: 2

지난 30일: 5

전체 시간: 761