주요 콘텐츠로 건너뛰기
GATEWAY NE56R09u  Wireless Card Replacement

GATEWAY NE56R09u Wireless Card Replacement

Luis Cardoso

Luis Cardoso5 다른 기여자

최종 수정일 July 14, 2020

2 - 3 분
조정
더 나은 이미지가 필요함
학생이 작성 중

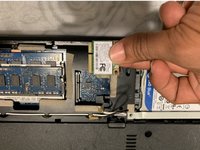
The wireless card is a key factor for your everyday laptop use. This wireless card is refereed to as a NIC or Network Interface Card it is square in shape, and is located in the middle section in the back of the laptop where the memory cards and hard drive both are. Also, before attempting to do a replacement, make sure your device is powered off and make sure to read through the guide first before jumping straight into a repair. Safety is always first!

필요한 것

도구

  • Spudger
    Spudger
  • Phillips #1 Screwdriver
    Phillips #1 Screwdriver
  1. GATEWAY NE56R09u  Wireless Card Replacement, Battery: 1 단계, 이미지 1개 중 1개
    • Before doing anything, first make sure the laptop is turned off and flipped over. In this position your laptop's bottom side should be facing up.

  2. GATEWAY NE56R09u  Wireless Card Replacement: 2 단계, 이미지 1개 중 1개
    • Using a nylon spudger or your fingers, push down on the battery clip to release the battery.

  3. GATEWAY NE56R09u  Wireless Card Replacement: 3 단계, 이미지 1개 중 1개
    • Finally, remove the battery by detaching it from the laptop casing. Once removed, set the battery aside and insert the new battery.

  4. GATEWAY NE56R09u  Wireless Card Replacement, Wireless card: 4 단계, 이미지 1개 중 1개
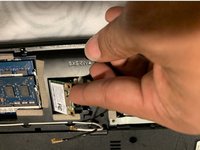
    • Next, using the PH1 head from the tool kit and the adjustable screwdriver, remove the 2 M3x5.0mm screws on the casing to get to the wireless card.

  5. GATEWAY NE56R09u  Wireless Card Replacement: 5 단계, 이미지 1개 중 1개
    • Once the cover is off, locate the wireless card.

  6. GATEWAY NE56R09u  Wireless Card Replacement: 6 단계, 이미지 1개 중 1개
    • When located, remove the black and white cables from the wireless card. These are main and auxiliary antenna câbles.

  7. GATEWAY NE56R09u  Wireless Card Replacement: 7 단계, 이미지 1개 중 1개
    • Using the PH1 head from the tool kit and the adjustable screwdriver, remove the M3x5.0mm screw with that is keeping the wireless card intact.

  8. GATEWAY NE56R09u  Wireless Card Replacement: 8 단계, 이미지 2개 중 1개 GATEWAY NE56R09u  Wireless Card Replacement: 8 단계, 이미지 2개 중 2개
    • Remove the wireless card from the laptop

결론

To reassemble your device, please follow these instructions in reverse order.

작성자

5다른 기여자 명과 함께

Luis Cardoso

회원 가입일: 04/01/19

171 평판

안내서 1개를 작성함

UMass Dartmouth, Team S6-G1, Peak Spring 2019 UMass Dartmouth, Team S6-G1, Peak Spring 2019 회원

UMASSD-PEAK-S19S6G1

2 회원들

안내서 8개를 작성함

댓글 0개

댓글 쓰기

조회 통계:

지난 24시간: 0

지난 7일: 2

지난 30일: 6

전체 시간: 297