소개
This is a guide for the removal of the full keyboard from the Gateway LT41P10u laptop. If you want to re-use the keyboard you are taking out, be careful not to bend the keyboard as you are removing it, since it can bend easily if you use too much force removing it.
필요한 것
-
-
-
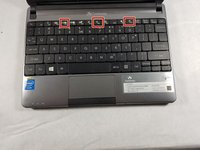
Once the battery is removed, flip the laptop over and open it up so you can see the keyboard.
-
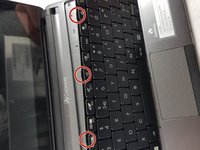
Underneath the f4, f8, and f12 keys there are indents (see the second image) to fit a spudger or plastic opening tool to pop the keyboard off.
-
Once you find an indent with your spudger, carefully move it so the top of the keyboard comes away from the rest of the computer, followed by the bottom of the keyboard.
-
-
-
Once you pull the keyboard off, you will see a ribbon wire connecting the keyboard to the rest of the laptop.
-
To detach the keyboard from the rest of the computer, you have to unlock the ribbon by pulling up on the small black lock keeping the ribbon from being removed. You won't have to pull very hard, so be gentle to avoid damaging it.
-
Once the ribbon is disconnected from the computer, you are able to pull the ribbon out from underneath the lock, and then pull the keyboard away.
-


To reinstall your keyboard, follow these instructions in reverse order.
팀

UMass Dartmouth, Team S66-G8, Rockett Fall 2017 UMass Dartmouth, Team S66-G8, Rockett Fall 2017 회원
UMASSD-ROCKETT-F17S66G8
3 회원들
안내서 12개를 작성함