주요 콘텐츠로 건너뛰기
HP Elitebook x360 1040 G5 Screen display Replacement

HP Elitebook x360 1040 G5 Screen display Replacement

Tyler A Cobb

Tyler A Cobb2 다른 기여자

최종 수정일 December 23, 2023

30 - 45 분
조정

If the screen on your laptop has cracks in it or if the screen no longer comes on, chances are it needs replaced. This guide is designed to help users successfully remove the screen on the HP Elitebook x360 1040 G5 for replacement. Minimal tools are required; however caution should be executed when using a heat gun. Using this tool improperly can cause serious burns, damage to your electronics and possibly start a fire. Make certain that you’ve read and understand the manufacturer provided instructions before attempting to use this tool.
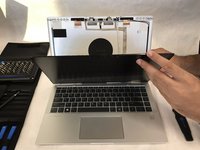
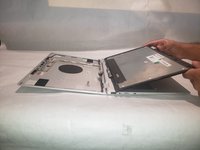
필요한 것

도구

더보기...

  1. HP Elitebook x360 1040 G5 Screen display Replacement, Screen display: 1 단계, 이미지 3개 중 1개 HP Elitebook x360 1040 G5 Screen display Replacement, Screen display: 1 단계, 이미지 3개 중 2개 HP Elitebook x360 1040 G5 Screen display Replacement, Screen display: 1 단계, 이미지 3개 중 3개
    • Open your laptop.

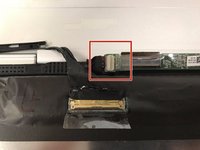
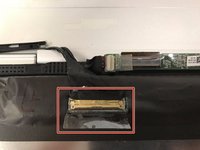
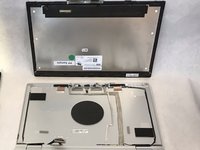
    • Apply heat to the perimeter of screen display using the low setting on the heat gun or hair dryer. Keep the heat gun at least 6 inches away from the device at all time to prevent damage to other components.

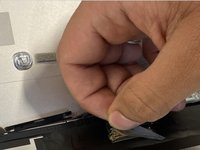
    • Continue to apply heat for 5 to 10 minutes.

  2. HP Elitebook x360 1040 G5 Screen display Replacement: 2 단계, 이미지 3개 중 1개 HP Elitebook x360 1040 G5 Screen display Replacement: 2 단계, 이미지 3개 중 2개 HP Elitebook x360 1040 G5 Screen display Replacement: 2 단계, 이미지 3개 중 3개
    • Using the jimmy tool pry outward on the screen display, starting near one of the top corners.

    • Carefully pry along the perimeter of the display until the screen can be easily removed.

    • Lay the screen face down on the keyboard for the next step.

  3. HP Elitebook x360 1040 G5 Screen display Replacement: 3 단계, 이미지 2개 중 1개 HP Elitebook x360 1040 G5 Screen display Replacement: 3 단계, 이미지 2개 중 2개
    • Carefully remove the clear adhesive protector from the smallest ribbon cable, located closest to the laptop hinge.

    • Gently slide the connector out of the harness, moving it towards the side of the laptop with the power button.

  4. HP Elitebook x360 1040 G5 Screen display Replacement: 4 단계, 이미지 3개 중 1개 HP Elitebook x360 1040 G5 Screen display Replacement: 4 단계, 이미지 3개 중 2개 HP Elitebook x360 1040 G5 Screen display Replacement: 4 단계, 이미지 3개 중 3개
    • Carefully remove the clear adhesive protector from the last ribbon cable, located on the large black strip on the back of the screen display.

    • Gently remove the ribbon cable from the harness by moving it toward the laptop hinge.

  5. HP Elitebook x360 1040 G5 Screen display Replacement: 5 단계, 이미지 3개 중 1개 HP Elitebook x360 1040 G5 Screen display Replacement: 5 단계, 이미지 3개 중 2개 HP Elitebook x360 1040 G5 Screen display Replacement: 5 단계, 이미지 3개 중 3개
    • Remove the screen from the laptop.

결론

To reassemble your device, follow these instructions in reverse order.

다른 한 분이 해당 안내서를 완성하였습니다.

작성자

2다른 기여자 명과 함께

Tyler A Cobb

회원 가입일: 09/03/19

321 평판

안내서 2개를 작성함

IUPUI, Team S1-G1, Hovde Fall 2019 IUPUI, Team S1-G1, Hovde Fall 2019 회원

IUPUI-HOVDE-F19S1G1

3 회원들

안내서 4개를 작성함

댓글 0개

댓글 쓰기

조회 통계:

지난 24시간: 2

지난 7일: 13

지난 30일: 44

전체 시간: 1,858