주요 콘텐츠로 건너뛰기
HP Envy x360 13-y013cl Power Jack Replacement

HP Envy x360 13-y013cl Power Jack Replacement

Petersee

Petersee2 다른 기여자

최종 수정일 May 22, 2023

5 분
쉬움

The power jack on the HP Envy x360 13-y013cl can wear out or become dislodged over time. This guide shows a complete replacement procedure for the power jack. The power supply is critical to the overall functionality of the computer, delivering charge to the battery. Before using this guide, check for foreign objects lodged in the port. Before starting the guide, ensure to power off the device and disconnect the power jack.

필요한 것

도구

더보기...

  1. HP Envy x360 13-y013cl Power Jack Replacement, Power Jack: 1 단계, 이미지 3개 중 1개 HP Envy x360 13-y013cl Power Jack Replacement, Power Jack: 1 단계, 이미지 3개 중 2개 HP Envy x360 13-y013cl Power Jack Replacement, Power Jack: 1 단계, 이미지 3개 중 3개
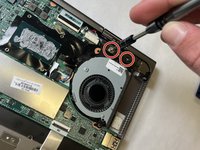
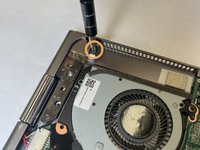
    • Unscrew and remove the 7.8 mm screws with a T5 screwdriver.

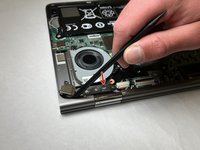
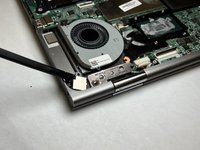
    • Use a plastic opening tool to pry the bottom cover off the laptop.

  2. HP Envy x360 13-y013cl Power Jack Replacement: 2 단계, 이미지 1개 중 1개
    • Locate the copper-colored heat sync.

    • Use a JIS #0 screwdriver to remove the four 2.7 mm screws that secure the heatsink.

    • After removing the screws, lift the heatsink directly off the computer.

  3. HP Envy x360 13-y013cl Power Jack Replacement: 3 단계, 이미지 2개 중 1개 HP Envy x360 13-y013cl Power Jack Replacement: 3 단계, 이미지 2개 중 2개
    • Locate the right hinge just above the fan.

    • Use a JIS #0 screwdriver to remove two 4 mm screws from the hinge display assembly hinge.

    • Use a JIS #0 screwdriver to remove the 4.2 mm screw from directly below the power jack.

  4. HP Envy x360 13-y013cl Power Jack Replacement: 4 단계, 이미지 2개 중 1개 HP Envy x360 13-y013cl Power Jack Replacement: 4 단계, 이미지 2개 중 2개
    • Using the plastic black spudger, pry the hinge back as shown with the red arrow.

    • Continuing with the black plastic spudger, dislodge the power supply's metal frame from the computer.

  5. HP Envy x360 13-y013cl Power Jack Replacement: 5 단계, 이미지 1개 중 1개
    • Disconnect the EH-JST connector and remove the entire power supply from computer (metal frame, wire, and connector).

결론

To reassemble your device, follow these instructions in reverse order.

작성자

2다른 기여자 명과 함께

Petersee

회원 가입일: 03/28/23

382 평판

안내서 3개를 작성함

IUPUI, Team 3-2, Harley Spring 2023 IUPUI, Team 3-2, Harley Spring 2023 회원

IUPUI-HARLEY-S23S3G2

3 회원들

안내서 3개를 작성함

댓글 0개

댓글 쓰기

조회 통계:

지난 24시간: 0

지난 7일: 3

지난 30일: 16

전체 시간: 303