주요 콘텐츠로 건너뛰기
HP Pavilion 15-ab165us Hard Drive Replacement

HP Pavilion 15-ab165us Hard Drive Replacement

Preston Palmer

Preston Palmer3 다른 기여자

최종 수정일 November 17, 2022

5 분
조정

In this guide, you will learn how to remove the hard drive in the HP Pavilion 15-ab165us laptop.

필요한 것

수리 키트

이 키트는 이 안내서를 완료하는데 필요한 모든 부품과 도구를 포함하고 있습니다.

부품

도구

더보기...

  1. HP Pavilion 15-ab165us Hard Drive Replacement, Battery and Back Cover: 1 단계, 이미지 2개 중 1개 HP Pavilion 15-ab165us Hard Drive Replacement, Battery and Back Cover: 1 단계, 이미지 2개 중 2개
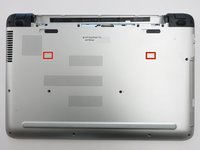
    • Flip the computer over so that the bottom cover is facing you.

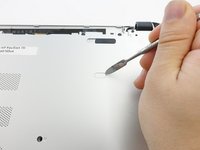
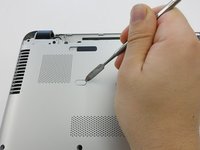
    • Slide the two locks to the "unlock" position and remove the battery.

  2. HP Pavilion 15-ab165us Hard Drive Replacement: 2 단계, 이미지 3개 중 1개 HP Pavilion 15-ab165us Hard Drive Replacement: 2 단계, 이미지 3개 중 2개 HP Pavilion 15-ab165us Hard Drive Replacement: 2 단계, 이미지 3개 중 3개
    • Remove the two 8mm screws underneath with a Phillips #1 screwdriver.

    • Use a plastic opening tool to remove the plastic feet.

  3. HP Pavilion 15-ab165us Hard Drive Replacement: 3 단계, 이미지 3개 중 1개 HP Pavilion 15-ab165us Hard Drive Replacement: 3 단계, 이미지 3개 중 2개 HP Pavilion 15-ab165us Hard Drive Replacement: 3 단계, 이미지 3개 중 3개
    • Remove the two plastic tabs with a metal spudger.

  4. HP Pavilion 15-ab165us Hard Drive Replacement: 4 단계, 이미지 1개 중 1개
    • Remove the sixteen 8mm screws that hold the bottom cover with a Phillips #1 screwdriver.

  5. HP Pavilion 15-ab165us Hard Drive Replacement: 5 단계, 이미지 1개 중 1개
    • Pull the Optical Drive out.

  6. HP Pavilion 15-ab165us Hard Drive Replacement: 6 단계, 이미지 1개 중 1개
    • Remove the 3mm screws that were hidden under the Optical Drive with a Phillips #0 screwdriver.

  7. HP Pavilion 15-ab165us Hard Drive Replacement: 7 단계, 이미지 2개 중 1개 HP Pavilion 15-ab165us Hard Drive Replacement: 7 단계, 이미지 2개 중 2개
    • Flip the computer back over.

    • Use a plastic opening tool to release the clips holding the keyboard section in place.

  8. HP Pavilion 15-ab165us Hard Drive Replacement: 8 단계, 이미지 1개 중 1개
    • Close the lid and pull the screen and keyboard section up and away from the disconnected bottom cover.

    • The hard drive is NOT screwed into place on the underside of the keyboard section.

  9. HP Pavilion 15-ab165us Hard Drive Replacement, Hard Drive: 9 단계, 이미지 1개 중 1개
    • Locate the ribbon cable connecting the hard drive to the motherboard.

  10. HP Pavilion 15-ab165us Hard Drive Replacement: 10 단계, 이미지 1개 중 1개
    • On the motherboard, lift the white tab up to release the ribbon cable.

  11. HP Pavilion 15-ab165us Hard Drive Replacement: 11 단계, 이미지 1개 중 1개
    • Pull the blue tab up and out from the motherboard to disconnect the ribbon cable.

  12. HP Pavilion 15-ab165us Hard Drive Replacement: 12 단계, 이미지 1개 중 1개
    • Pull the hard drive out of the enclosure.

결론

To reassemble your device, follow these instructions in reverse order.

다른 4명이 해당 안내서를 완성하였습니다.

작성자

3다른 기여자 명과 함께

Preston Palmer

회원 가입일: 11/01/17

218 평판

안내서 1개를 작성함

UW Tacoma, Team S1-G2, Rose Fall 2017 UW Tacoma, Team S1-G2, Rose Fall 2017 회원

UWT-ROSE-F17S1G2

5 회원들

안내서 14개를 작성함

댓글 0개

댓글 쓰기

조회 통계:

지난 24시간: 0

지난 7일: 17

지난 30일: 31

전체 시간: 2,456