주요 콘텐츠로 건너뛰기
HP Pavilion 15-ba003ds Screen Replacement

HP Pavilion 15-ba003ds Screen Replacement

Joseph Chia

Joseph Chia3 다른 기여자

최종 수정일 December 28, 2020

35 분 - 1 시간
매우 어려움

If your HP Pavilion 15-ba003ds has a screen that is damaged or will not turn on, you might need to replace it. Use this guide to disassemble and remove your old screen without damaging any other components of your laptop.

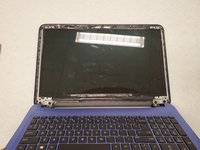
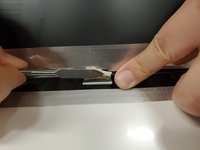
The screen itself is a thin display module that is fastened behind the frame of the upper portion of your laptop. Aside from obvious cracks, symptoms of a bad or damaged screen include the appearance of “dead” pixels, blotches, or a screen that is having trouble reaching its full brightness.

Before using this guide, check the settings on your device for brightness and contrast to see if the image cannot be corrected.

This instruction requires a steady hand and attention to technique. A mistake in this process could result in damage to the screen or wires within your HP Pavilion.

Check to make sure that you have all of the required tools and parts before beginning this guide.

Before you get started, power off the device completely and disconnect the device from any external power source.

필요한 것

도구

  1. HP Pavilion 15-ba003ds Screen Replacement, Screen: 1 단계, 이미지 3개 중 1개 HP Pavilion 15-ba003ds Screen Replacement, Screen: 1 단계, 이미지 3개 중 2개 HP Pavilion 15-ba003ds Screen Replacement, Screen: 1 단계, 이미지 3개 중 3개
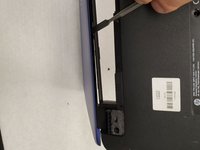
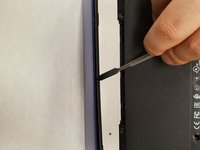
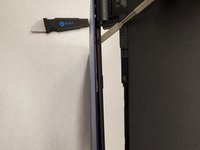
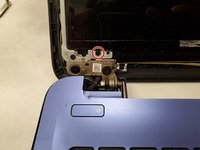
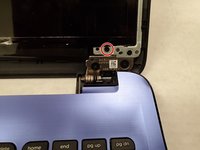
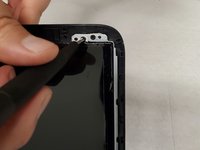
    • Apply firm pressure and slide the metal spudger along the outside edges of the front panel screen.

    • When using the metal spudger, be careful not to press into the plastic panel too hard. It may damage internal cables or the panel.

  2. HP Pavilion 15-ba003ds Screen Replacement: 2 단계, 이미지 3개 중 1개 HP Pavilion 15-ba003ds Screen Replacement: 2 단계, 이미지 3개 중 2개 HP Pavilion 15-ba003ds Screen Replacement: 2 단계, 이미지 3개 중 3개
    • Continue sliding the metal spudger to the bottom of the screen.

    • Don't pull on the frame outwards as this will put pressure on the panel and damage it.

  3. HP Pavilion 15-ba003ds Screen Replacement: 3 단계, 이미지 3개 중 1개 HP Pavilion 15-ba003ds Screen Replacement: 3 단계, 이미지 3개 중 2개 HP Pavilion 15-ba003ds Screen Replacement: 3 단계, 이미지 3개 중 3개
    • Flip the laptop so the bottom is facing upwards.

    • Using the metal spudger, separate the plastic panel off the screen.

  4. HP Pavilion 15-ba003ds Screen Replacement: 4 단계, 이미지 3개 중 1개 HP Pavilion 15-ba003ds Screen Replacement: 4 단계, 이미지 3개 중 2개 HP Pavilion 15-ba003ds Screen Replacement: 4 단계, 이미지 3개 중 3개
    • Once the panel is separated from the screen, gently pull it off and set it aside.

    • Remove two 6mm Phillips #00 screws from the bottom of the screen.

  5. HP Pavilion 15-ba003ds Screen Replacement: 5 단계, 이미지 3개 중 1개 HP Pavilion 15-ba003ds Screen Replacement: 5 단계, 이미지 3개 중 2개 HP Pavilion 15-ba003ds Screen Replacement: 5 단계, 이미지 3개 중 3개
    • Remove two 6mm Phillips #00 screws from the top of the screen.

  6. HP Pavilion 15-ba003ds Screen Replacement: 6 단계, 이미지 3개 중 1개 HP Pavilion 15-ba003ds Screen Replacement: 6 단계, 이미지 3개 중 2개 HP Pavilion 15-ba003ds Screen Replacement: 6 단계, 이미지 3개 중 3개
    • Flip the screen down.

    • Remove the tape from over the connector.

    • Pull out the connector using your fingers.

  7. HP Pavilion 15-ba003ds Screen Replacement: 7 단계, 이미지 1개 중 1개
    • Lift the screen away from the laptop.

결론

To reassemble your device, follow these instructions in reverse order.

작성자

3다른 기여자 명과 함께

Joseph Chia

회원 가입일: 01/14/20

355 평판

안내서 3개를 작성함

York University, Team S1-G9, Woodhouse Winter 2020 York University, Team S1-G9, Woodhouse Winter 2020 회원

YORK-WOODHOUSE-W20S1G9

3 회원들

안내서 8개를 작성함

댓글 0개

댓글 쓰기

조회 통계:

지난 24시간: 0

지난 7일: 11

지난 30일: 17

전체 시간: 333