주요 콘텐츠로 건너뛰기
HP Pavilion 17-e020dx RAM Replacement

HP Pavilion 17-e020dx RAM Replacement

Dylan Hayes

Dylan Hayes2 다른 기여자

최종 수정일 December 3, 2020

5 분
쉬움
추천 학생 안내서

If your HP Pavilion 17-e020dx has stopped responding, slowed down, or shown “Blue Screen(s) of Death”, the Random Access Memory or RAM may be to blame.

RAM stores commonly accessed files on your computer, allowing you to open and view these files quicker than other, less commonly used files on your computer

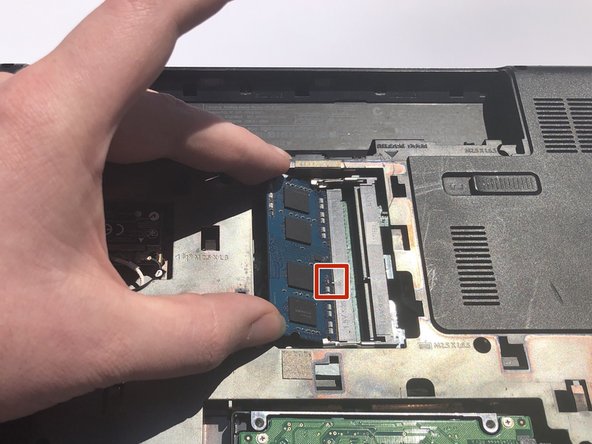
When replacing the RAM, make sure to use ESD safe tools to avoid causing damage to the device.

Before beginning, make sure to power off the device and remove any chargers.

필요한 것

부품

도구

  • Phillips #0 Screwdriver
    Phillips #0 Screwdriver
  • Spudger
    Spudger

더보기...

  1. HP Pavilion 17-e020dx RAM Replacement, RAM: 1 단계, 이미지 3개 중 1개 HP Pavilion 17-e020dx RAM Replacement, RAM: 1 단계, 이미지 3개 중 2개 HP Pavilion 17-e020dx RAM Replacement, RAM: 1 단계, 이미지 3개 중 3개
    • Locate the battery release switch on the bottom of the device.

    • Push the switch to the left to release the battery.

    • Remove the battery by lifting upwards from the raised edge of the battery.

  2. HP Pavilion 17-e020dx RAM Replacement: 2 단계, 이미지 3개 중 1개 HP Pavilion 17-e020dx RAM Replacement: 2 단계, 이미지 3개 중 2개 HP Pavilion 17-e020dx RAM Replacement: 2 단계, 이미지 3개 중 3개
    • Loosen the screw under the battery with a Phillips #00 screwdriver.

    • The screw will not come out completely. Loosen the screw until it moves freely in its place.

    • Slide the access tray back until it pops out of its slots.

    • Lift upwards to remove the access tray.

  3. HP Pavilion 17-e020dx RAM Replacement: 3 단계, 이미지 3개 중 1개 HP Pavilion 17-e020dx RAM Replacement: 3 단계, 이미지 3개 중 2개 HP Pavilion 17-e020dx RAM Replacement: 3 단계, 이미지 3개 중 3개
    • Using a nylon spudger, push the two clips on the top stick of RAM to the side.

    • The top stick of RAM will pop up when both clips are pushed away.

    • Remove the top stick of RAM by grabbing it on both ends of the stick.

  4. HP Pavilion 17-e020dx RAM Replacement: 4 단계, 이미지 2개 중 1개 HP Pavilion 17-e020dx RAM Replacement: 4 단계, 이미지 2개 중 2개
    • Repeat step 3 on the bottom stick of RAM.

  5. HP Pavilion 17-e020dx RAM Replacement: 5 단계, 이미지 3개 중 1개 HP Pavilion 17-e020dx RAM Replacement: 5 단계, 이미지 3개 중 2개 HP Pavilion 17-e020dx RAM Replacement: 5 단계, 이미지 3개 중 3개
    • To install the new RAM, grab the RAM by both end.

    • Align the slot of the bottom stick of RAM with the pin in the bottom connector, and push the RAM into the connector until the gold pins are no longer showing.

    • Gently push down on the top of the RAM until the clips click into place.

  6. HP Pavilion 17-e020dx RAM Replacement: 6 단계, 이미지 2개 중 1개 HP Pavilion 17-e020dx RAM Replacement: 6 단계, 이미지 2개 중 2개
    • Repeat step 5 with the top stick of RAM.

  7. HP Pavilion 17-e020dx RAM Replacement: 7 단계, 이미지 3개 중 1개 HP Pavilion 17-e020dx RAM Replacement: 7 단계, 이미지 3개 중 2개 HP Pavilion 17-e020dx RAM Replacement: 7 단계, 이미지 3개 중 3개
    • Align the access tray onto the bottom of the device and firmly push forward until it pops into place.

    • Tighten the screw in the battery tray until just snug. Do not over tighten this screw.

    • Reinstall the battery by placing the top in first and pressing down until you hear a click.

결론

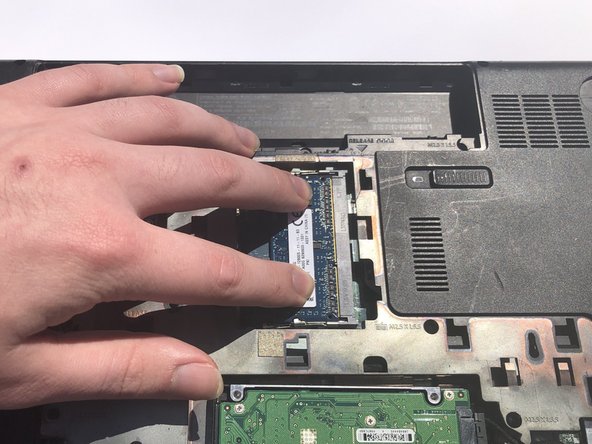
You have successfully replaced the RAM in your device, and your HP Pavillion 17-e020dx should now operate at normal speeds again.

작성자

2다른 기여자 명과 함께

Dylan Hayes

회원 가입일: 03/23/20

145 평판

안내서 1개를 작성함

댓글 0개

댓글 쓰기

조회 통계:

지난 24시간: 0

지난 7일: 2

지난 30일: 8

전체 시간: 923