
HP Pavilion DV5T-1000 Hard Drive Replacement
10 분
쉬움
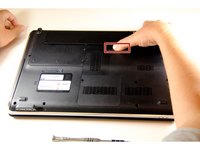
If your HP Pavilion DV5T-1000 laptop has a faulty hard drive, this guide will take you step-by-step in removing and replacing the original hard drive.


거의 끝나갑니다!
To reassemble your device, follow these instructions in reverse order.
결론
To reassemble your device, follow these instructions in reverse order.
다른 6명이 해당 안내서를 완성하였습니다.
팀

Colorado Springs, Team 6-5, Mcmichael Fall 2015 Colorado Springs, Team 6-5, Mcmichael Fall 2015 회원
UCCS-MCMICHAEL-F15S6G5
4 회원들
안내서 1개 작성