

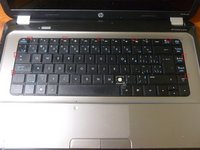
Disassembly to clean dust from the fan and heat sink.


-
-
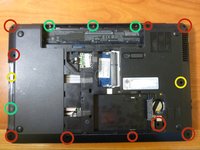
Power off and unplug the laptop.
-
Then, remove the battery. Move the switch in the direction indicated, take the battery out, and set aside.
-
-
-
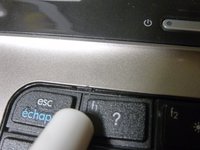
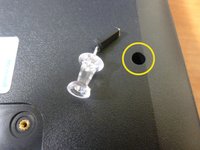
Loosen the two screws indicated (they won't come out all the way).
-
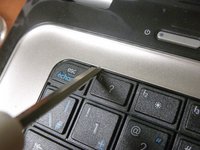
Take your spudgering tool and release the plastic clips, starting at the top. There are no clips on the left side, just tabs.
-
Lift and remove to the upper right, in order to release the tabs.
My Notebook 2000 does not have the two screws in the location shown in the picture. There are screws around the edges. Do I have a different model and a different way to doing step #2 ?
Thanks!
Petite difference sur le mien : une seule vis (solidaire du capot, ça c'est cool !)
-
-
-
Slide the hard drive to the left, clear of the SATA connectors and lift it out.
-
If you're having difficulty removing the hard drive, insert your spudger into the gap and gently ease the hard drive away from the SATA connectors.
-
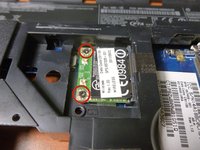
Remove the screw that holds the optical drive in and slide the drive out.
-
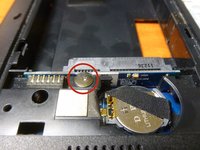
Remove the screw that helps hold the keyboard in.
J'ai retiré la vis du lecteur optique et… rien… je ne vois pas ce que ça a débloqué… j'ai aussi une autre flèche sur le mien indiquant le lecteur optique… il y a une vis mais à 90° complètement inaccessible…
-
-
-
-
To seperate, gently pull the black part up so it's vertical. Then pull the cable out.
It is not clear how to do it (absence pictures), but it
is a critical step and could be easily mishandles causing
connector permanently damaged.
That happened far too often.
In some following steps for ribbon cable disconnecting,
you references to that step, but connectors do not look
like the keyboard connector.
Looking forward to get better explanation.
Thanks,
Anthony
Hi Anthony,
The ribbon connectors are all the same in principal, they just vary in size - the others are much smaller than the keyboard ribbon.
Lift up the black notch from the side the ribbon enters the connection, remove ribbon. When replacing the ribbon ensure they are inserted flush then replace the black connector by clipping it back on top of the ribbon.
-
-
-
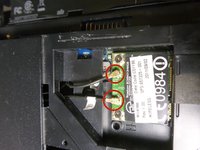
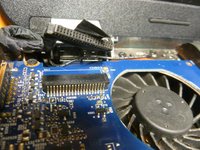
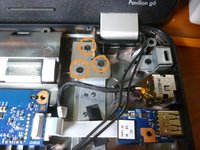
Detach the cables from the wifi card, noting the numbers on the cables and which ports they were plugged into.
-
Unplug the display cable on the left side. First, partly peel the tape away, then use a screwdriver to help detach the cable. There are small tabs on each side to help.
-
-
-
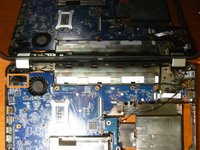
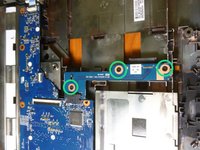
Remove these three screws and move the motherboard to the right to lift it out of the frame.
-
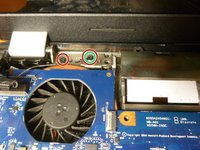
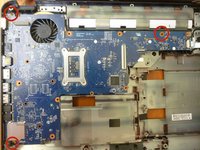
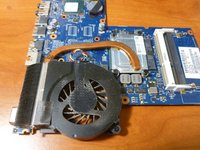
The cooling assembly. Use compressed air to blow all the dust out! I wouldn't recommend removing the CPU heat sink unless you have thermal paste handy to reapply.
Had a great deal of trouble extracting these three screws (marked M2x3). Ended up stripping them all and had to drill them out.
Very well done! The one I'm fixing is a slightly different model but the instructions were the bomb. Perfect!
Dude, instructions are far from perfect!
hmm778 -
Danke. Die Anleitung ist wirklich gut. Der Laptop wird nicht mehr heiß. Ich brauchte doch viel Mut. Der HP ist aber auch nicht sehr Verbraucher freundlich konfiguriert.
These models tend to overheat and the OEM thermal paste dries out over time. Unfortunately, there’s too many steps and screws involved. It’s easy to screw up. For those who say this is a perfect instructional step, it’s not. It’s not showing the location of M2.5x4 screws and a few other steps. Plus, we are not shown how the heatsink and cpu look.
There’s no instructions on how to take disassemble the heatsink and CPU. Afterall, that’s really the point of taking the laptop apart…to clean up the old paste/residue and reapply some arctic silver or other similar thermal paste.
its really simple to remove the haeatsink and fan, its 4 screws on the cpu and 1 on the fan, plus one small fan connector (remember to plug it back in, i forgot to and had to restart :/)
just letting people know, you dont need to remove the screws from the hinges
-


To reassemble your device, follow these instructions in reverse order.
To reassemble your device, follow these instructions in reverse order.
다른 133명이 해당 안내서를 완성하였습니다.

댓글 57개
after cleaning and put it back , now my laptop can't start
If you took reasonable precautions against static electricity, you probably forgot to connect one of the cables.
Patrick -
This guide was unbelievably useful, my G6 was heating up to 80+ degrees under light loads and turning off due to overheating, I was about to write it off, thought I might as well try this.
Once you get to the last step, it is possible to partly remove the fan (it stays attached at one corner) and clean out the gap between the fan and the bladed thing that looks like a barber's hair clipper.
That for me was full of a thick cake of dust, now that's gone the computer stays at 50+ degrees, and the battery life is massively improved (I was getting about 20 minutes due to the fan) and the fan is no longer louder than the speakers. Thanks uploader!
Absolutely amazing instructions! Better than the videos out there because the detail is so precise and easy to follow!
thanks i was trying this without instructions and got stuck at the keyboard clips . i didn't even think of static protection .one question . my screen is busted so I use an external display .some times when I power up its difficult to switch screens and type my password . so can i leave the busted screen unplugged when I reassemble ?
Check and make sure your memory modules are seated properly and that they are in the correct slots. http://support.hp.com/ca-en/document/c03...
Patrick -
Excellent guide. But could you explain or include a picture of what spudgering tool is or looks like? Thank you.
A spudger is an antistatic prying and prodding tool, I added it to the tools list, and you can find a better description on its product page =)
Thank you so very much for making this tutorial! My laptop now works like a stalking cheetah(before it was a wild gorilla). You made this possible. Your instructions were precise and intuitive. Lots of love to you!
Hi. Thanks for instructions. I managed to clean the fan it's perfect now and sounds like new ( not like a taking of plane) but now my screen is black and Caps Lock flashing. What did I do to it?
Thanks
Thanks for the guide. It wasn't very difficult, got the fan cleaned out and new thermal paste on and it doesn't sound like a jet engine anymore. They sure make it more difficult than necessary to clean the laptops!
How did you change the paste? Did you order some?
It actually is very difficult. I tried on a dead G6. I wish people would stop misleading others online. It’s like saying running a 40 mile marathon was easy. It might be easy for some, but the majority it’s not.
hmm778 -
After the reassembly I could not get access to the wifi card, where could I have gone wrong
Did you ensure you connected the cables in the right order?
Patrick -
Excellent set of instructions. My G6 was a little different to the pictures shown but nevertheless, job completed and laptop works perfectly. Thanks for your help.
after following the process and booting the laptop has no display and the fan sound a lot what could be the problem plz
Got as far as the display cable and chickened out as no obvious way to pull it out without ripping the thin wires. It was far enough though to clean around the fan and blow the muck out the heat sink. Reversed the instructions and it works and its quiet now. Very useful. Thanks.
Yeah, it's not the most obvious. IIRC I detached it it using a small slot screwdriver. Alternate between sides, gently and gradually prying it loose.
Patrick -
I just opened parts and about to clean hope everything goes well
How did it go?
Awesome tutorial! Thank you so much! ^_^
xela245121 - 답글
My touchscreen doesnt work pls help
Great instructions but unbelievable how much disassembly is required just to blow out dust, which should be done frequently!
Oh this is definitely not something you need to do often. Spraying canned air inside the vents should suffice. This is more of a deep clean tutorial - something you'd do once a year or less, depending on where you live.
Patrick -
Oh this is definitely not something you do every time. Spraying canned air into the vents should suffice. This is a deep clean tutorial. I do this about once a year (may vary more or less depending where you live)
Patrick -
Fan cleaned and now working again, thank you
My G6 - 2026tx Have a wifi issue. It’s not connected in first time. After several power cycles it connect. some times I use dongle in few minutes & reconnect wifi, then only it connects. Please help.
My G6 -2027tx have wifi issue. It’s not connect in once, need to reboot several times to connect. Sometimes I connect Broad band Dongle few minites & reconnect wifi then it’s connected. Please help
I have same issue. I have to reboot. My guess is this is a mobo issue. I vow never to buy HP again.
hmm778 -
Great Guide! This Will Help Someone Soon!
Couldn't have done it without the guide.
Great Guide for dissembling. I have cleaned the dust and assembled everything. My laptop power is On, but the display couldn’t come. Where should I check? I have checked everything thrice and everything looks good.
Go back to step 10 and make sure the display cable is firmly seated
Patrick -
while taking it apart I took a look at the motherboard and cpu and I saw there is a piece of thick clear square plastic sticking out in between my cpu and the heatsinc I tried looking it up but could come up with nothing does anybody else have this piece sticking out
Great guide even though my G6 layout is different but it worked. I have to take it apart today as well, because after putting it all back together, now the laptop won’t turn on. I prob. forgot to connect a cable, I hope.
As I commented in the problem areas where there needs to be further clarification/visuals, the instructions are good; however, a lot is still missing especially the key part about removing the heatsink and fan to reapply the thermal paste. The paste wears out over time and must be reapplied every 3-5 years. There is a lot of effort here and risk especially damaging existing parts, stripping of screws, not having the right tools (which should also be listed) but are not.
For me, I’m going to take my laptop to a computer store who will do the work for me. To all those who were successful with the teardown, kudos.
A good guide, the k-board details were important.
I went all in and replaced the thermal paste as well and the heat dropped from 80+ to 45+ Celsius
//Thank you!
Rip I have broke the right click taking it apart
I used this guide about 2 years ago. I could not have disassembled, or reassembled the laptop with out it. The computer is still working but does not yet need another cleaning. I hope this website remains open for years to come.
Thank you so much for your time and help, your guidance helped me a lot.
Merci! Clair, structuré, complet… Nice!
Great! Thanks a lot! Changed the fan and cleaned the heatpipe, runs like on the first day again. 5 Stars for ifixit!
Very useful and matched the variation of model I have. Much more clear than the OEM maintenance manual.
Problème possible sur les HP : la batterie est bloquée avec le verrou coincé en position ouvert. Solution : glisser une ou deux cartes plastique dans l'interstice de la batterie et les faire glisser tout le long pour débloquer la batterie
Sylvain Pelloquin - 답글
Pour moi le loquet esg bloquer
jonas agudze - 답글