주요 콘텐츠로 건너뛰기
HP Pavilion Sleekbook 15- b000 Fan

HP Pavilion Sleekbook 15- b000 Fan

Sam Barkley

Sam Barkley3 다른 기여자

최종 수정일 May 31, 2018

20 분
조정

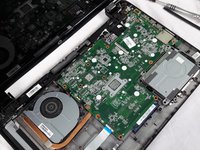
The fan is required to ventilate heat from the laptop and keep it from overheating. This guide will show you the steps to remove the fan from your laptop in case the fan is not working, the laptop is overheating, or needs to be replaced because it is making noise.

필요한 것

도구

  • Spudger
    Spudger
  • Phillips #1 Screwdriver
    Phillips #1 Screwdriver
  • iFixit Opening Tool
    iFixit Opening Tool

더보기...

  1. HP Pavilion Sleekbook 15- b000 Fan, Battery: 1 단계, 이미지 1개 중 1개
    • Unplug laptop from adapter and all other devices.

  2. HP Pavilion Sleekbook 15- b000 Fan: 2 단계, 이미지 1개 중 1개
    • Flip the laptop over with battery facing you.

  3. HP Pavilion Sleekbook 15- b000 Fan: 3 단계, 이미지 2개 중 1개 HP Pavilion Sleekbook 15- b000 Fan: 3 단계, 이미지 2개 중 2개
    • Slide the battery lock on the right side open.

    • Slide the Battery release latch on the left side.

  4. HP Pavilion Sleekbook 15- b000 Fan: 4 단계, 이미지 1개 중 1개
    • Pull battery out.

  5. HP Pavilion Sleekbook 15- b000 Fan, Keyboard: 5 단계, 이미지 1개 중 1개
    • Remove the two 6.5mm Phillips #1 keyboard screws from bottom of laptop.

  6. HP Pavilion Sleekbook 15- b000 Fan: 6 단계, 이미지 1개 중 1개
    • Push screwdriver through screw hole top pop the keyboard.

    • Make sure the screen is open.

  7. HP Pavilion Sleekbook 15- b000 Fan: 7 단계, 이미지 1개 중 1개
    • Pry up the keyboard.

    • The keyboard is still attached by it's ribbon.

  8. HP Pavilion Sleekbook 15- b000 Fan: 8 단계, 이미지 1개 중 1개
    • Remove keyboard wire by popping latch under blue plastic

  9. HP Pavilion Sleekbook 15- b000 Fan, Case: 9 단계, 이미지 1개 중 1개
    • Using the spudger to lift up on the white tabs

    • Pull horizontally on the blue ribbon to disconnect the cables

  10. HP Pavilion Sleekbook 15- b000 Fan: 10 단계, 이미지 1개 중 1개
    • Remove the five 5.5mm Phillips #1 screws from the case

  11. HP Pavilion Sleekbook 15- b000 Fan: 11 단계, 이미지 1개 중 1개
    • Remove eight 6.5mm Phillips #1 screws from the back cover

  12. HP Pavilion Sleekbook 15- b000 Fan: 12 단계, 이미지 3개 중 1개 HP Pavilion Sleekbook 15- b000 Fan: 12 단계, 이미지 3개 중 2개 HP Pavilion Sleekbook 15- b000 Fan: 12 단계, 이미지 3개 중 3개
    • Starting at a top corner, use the pry tool to split the case.

    • Slowly work around the case, pulling up gently to release the clips.

  13. HP Pavilion Sleekbook 15- b000 Fan, Fan: 13 단계, 이미지 1개 중 1개
    • Remove the three x 5.5 mm restraining screws.

  14. HP Pavilion Sleekbook 15- b000 Fan: 14 단계, 이미지 1개 중 1개
    • Pull fan of of heat pipe.

  15. HP Pavilion Sleekbook 15- b000 Fan: 15 단계, 이미지 1개 중 1개
    • Remove fan.

결론

To reassemble your device, follow these instructions in reverse order.

작성자

3다른 기여자 명과 함께

Sam Barkley

회원 가입일: 02/13/18

1,007 평판

안내서 8개를 작성함

USF Tampa, Team S11-G2, Cheng Spring 2018 USF Tampa, Team S11-G2, Cheng Spring 2018 회원

USFT-CHENG-S18S11G2

4 회원들

안내서 18개를 작성함

댓글 0개

댓글 쓰기

조회 통계:

지난 24시간: 2

지난 7일: 14

지난 30일: 15

전체 시간: 417