주요 콘텐츠로 건너뛰기
HP Pavilion Sleekbook 15-b142dx Screen Replacement

HP Pavilion Sleekbook 15-b142dx Screen Replacement

Jonathan

Jonathan8 다른 기여자

최종 수정일 October 16, 2015

10 - 15 분
조정

This guide demonstrates how to properly replace your HP Pavilion Sleekbook 15 Screen.

필요한 것

도구

  1. HP Pavilion Sleekbook 15-b142dx Screen Replacement, Screen: 1 단계, 이미지 3개 중 1개 HP Pavilion Sleekbook 15-b142dx Screen Replacement, Screen: 1 단계, 이미지 3개 중 2개 HP Pavilion Sleekbook 15-b142dx Screen Replacement, Screen: 1 단계, 이미지 3개 중 3개
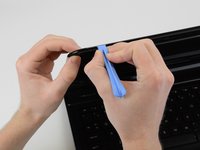
    • Unplug the device before working on it. Begin by opening the laptop and locating the circular rubber covers at the bottom corners of the screen.

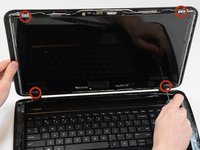
    • Remove the rubber circles by peeling them away from the laptop revealing two black screws. Save the rubber circles for later when you reassemble the screen.

  2. HP Pavilion Sleekbook 15-b142dx Screen Replacement, Screws: 2 단계, 이미지 3개 중 1개 HP Pavilion Sleekbook 15-b142dx Screen Replacement, Screws: 2 단계, 이미지 3개 중 2개 HP Pavilion Sleekbook 15-b142dx Screen Replacement, Screws: 2 단계, 이미지 3개 중 3개
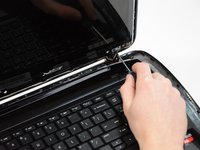
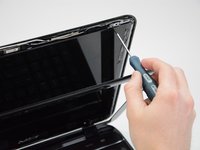
    • Use a screwdriver to remove the two 3.6 mm (smaller) screws from the corners of the devices screen.

  3. HP Pavilion Sleekbook 15-b142dx Screen Replacement: 3 단계, 이미지 2개 중 1개 HP Pavilion Sleekbook 15-b142dx Screen Replacement: 3 단계, 이미지 2개 중 2개
    • Once the screws are removed, use the included plastic pry-tool to separate the edge of the screen from the frame of the laptop.

  4. HP Pavilion Sleekbook 15-b142dx Screen Replacement: 4 단계, 이미지 3개 중 1개 HP Pavilion Sleekbook 15-b142dx Screen Replacement: 4 단계, 이미지 3개 중 2개 HP Pavilion Sleekbook 15-b142dx Screen Replacement: 4 단계, 이미지 3개 중 3개
    • Remove the four 5.7 mm (bigger) screws located towards the corners of the device.

  5. HP Pavilion Sleekbook 15-b142dx Screen Replacement: 5 단계, 이미지 1개 중 1개
    • The screen will only be connected by a single cord at the base of the device. Locate and remove the plastic adhesive attached to the cord. After the plastic is removed, unplug the cord connected to the screen.

결론

To reassemble the device, follow the instructions in the reverse order.

다른 5명이 해당 안내서를 완성하였습니다.

작성자

8다른 기여자 명과 함께

Jonathan

회원 가입일: 01/13/15

758 평판

안내서 3개를 작성함

USF Tampa, Team 3-3, Hickman Winter 2015 USF Tampa, Team 3-3, Hickman Winter 2015 회원

USFT-HICKMAN-W15S3G3

4 회원들

안내서 5개를 작성함

댓글 0개

댓글 쓰기

조회 통계:

지난 24시간: 0

지난 7일: 12

지난 30일: 14

전체 시간: 3,365