주요 콘텐츠로 건너뛰기

HP Pavilion dv7-1285dx RAM Replacement

필요한 것

  1. HP Pavilion dv7-1285dx RAM Replacement, Battery: 1 단계, 이미지 1/1
    • Ensure the device is powered down and unplugged.

    • Turn the device upside down with the battery compartment facing you.

    • Slide the black slider to the right and lift the battery out of its compartment.

  2. HP Pavilion dv7-1285dx RAM Replacement, Back Plate: 2 단계, 이미지 1/1
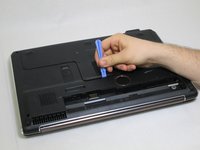
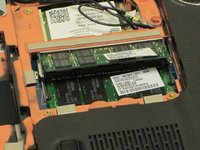
    • Locate and remove the six Phillips PM2.5×7.0 screws around the perimeter of the back plate.

    • These screws do not completely detach from the device when unscrewed.

  3. HP Pavilion dv7-1285dx RAM Replacement: 3 단계, 이미지 1/2 HP Pavilion dv7-1285dx RAM Replacement: 3 단계, 이미지 2/2
    • Use the plastic opening tool to lift up the back plate and set it aside.

  4. HP Pavilion dv7-1285dx RAM Replacement, RAM: 4 단계, 이미지 1/1
    • Rotate the device 90 degrees to the left.

  5. HP Pavilion dv7-1285dx RAM Replacement: 5 단계, 이미지 1/3 HP Pavilion dv7-1285dx RAM Replacement: 5 단계, 이미지 2/3 HP Pavilion dv7-1285dx RAM Replacement: 5 단계, 이미지 3/3
    • Locate the grey clips on the side of the RAM and pull the grey clips away from the RAM using the plastic opening tool.

  6. HP Pavilion dv7-1285dx RAM Replacement: 6 단계, 이미지 1/3 HP Pavilion dv7-1285dx RAM Replacement: 6 단계, 이미지 2/3 HP Pavilion dv7-1285dx RAM Replacement: 6 단계, 이미지 3/3
    • Unplug the RAM.

    • Repeat step 6 to remove the second piece of RAM.

  7. HP Pavilion dv7-1285dx RAM Replacement: 7 단계, 이미지 1/2 HP Pavilion dv7-1285dx RAM Replacement: 7 단계, 이미지 2/2
    • These steps are important in the replacement of the RAM, they will assist in ensuring the device is not damaged.

    • Align the notch in the new RAM with the peg on the plug

    • Ensure the RAM is fully inserted into the plug at a 45 degree angle such that the notch of the RAM lines up with the peg on the plug

  8. HP Pavilion dv7-1285dx RAM Replacement: 8 단계, 이미지 1/2 HP Pavilion dv7-1285dx RAM Replacement: 8 단계, 이미지 2/2
    • Push down gently on the RAM until the grey clips click.

    • Repeat steps 7 and 8 to replace the second piece of RAM.

결론

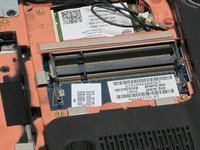
To reassemble your device, follow these instructions in reverse order.

다른 한 분이 해당 안내서를 완성하였습니다.

Jesse Quisido

회원 가입일: 04/14/14

489 평판

안내서 3개 작성하였습니다

Cal Poly, Team 12-34, Maness Spring 2014 Cal Poly, Team 12-34, Maness Spring 2014 회원

CPSU-MANESS-S14S12G34

4 회원들

안내서 7개 작성하였습니다

댓글 0개

댓글 쓰기

조회 통계:

24 시간 전: 0

7일 전: 0

30일 전: 3

전체 시간: 1,118