주요 콘텐츠로 건너뛰기
Honeywell HY-204 Rotation Button Replacement

Honeywell HY-204 Rotation Button Replacement

Nolan Ernotte

Nolan Ernotte4 다른 기여자

최종 수정일 September 3, 2019

15 - 20 분
어려움

This guide shows how to replace the rotation button that controls the oscillation of your fan. Replacing the rotation button requires soldering, so it may be a little tricky for those of you who are inexperienced with soldering.

필요한 것

도구

더보기...

  1. Honeywell HY-204 Rotation Button Replacement, Case: 1 단계, 이미지 2개 중 1개 Honeywell HY-204 Rotation Button Replacement, Case: 1 단계, 이미지 2개 중 2개
    • Before you begin, be sure to unplug the fan.

    • Remove the four 14 mm screws from the back of the device using the Phillips #0 Screwdriver.

  2. Honeywell HY-204 Rotation Button Replacement: 2 단계, 이미지 2개 중 1개 Honeywell HY-204 Rotation Button Replacement: 2 단계, 이미지 2개 중 2개
    • Pull the front and back parts of the case away from each other until the back is free from the front. This may require a large amount of force.

  3. Honeywell HY-204 Rotation Button Replacement, Control Panel: 3 단계, 이미지 2개 중 1개 Honeywell HY-204 Rotation Button Replacement, Control Panel: 3 단계, 이미지 2개 중 2개
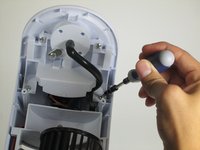
    • Remove the two 3mm screws found just below the top of the device using the Phillips #0 Screwdriver.

  4. Honeywell HY-204 Rotation Button Replacement: 4 단계, 이미지 1개 중 1개
    • Pry off the control panel by forcefully lifting the tab located inside the front of the fan with the plastic opening tool.

  5. Honeywell HY-204 Rotation Button Replacement, Rotation Button: 5 단계, 이미지 2개 중 1개 Honeywell HY-204 Rotation Button Replacement, Rotation Button: 5 단계, 이미지 2개 중 2개
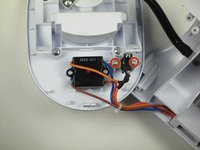
    • Remove the two 10mm Phillips #0 screws that are located next to the rotation button.

  6. Honeywell HY-204 Rotation Button Replacement: 6 단계, 이미지 1개 중 1개
    • Peel back the heat shrink tubing on both wires connecting to the button.

  7. Honeywell HY-204 Rotation Button Replacement: 7 단계, 이미지 1개 중 1개
    • Caution The soldering iron is very hot, be careful to avoid burns.

    • Desolder the two wires connected to the button and remove the button.

결론

To reassemble your device, follow these instructions in reverse order.

작성자

4다른 기여자 명과 함께

Nolan Ernotte

회원 가입일: 10/14/14

384 평판

안내서 3개를 작성함

Cal Poly, Team 10-40, Amido Fall 2014 Cal Poly, Team 10-40, Amido Fall 2014 회원

CPSU-AMIDO-F14S10G40

3 회원들

안내서 7개를 작성함

0가이드 댓글

댓글 쓰기

조회 통계:

지난 24시간: 0

지난 7일: 0

지난 30일: 8

전체 시간: 994