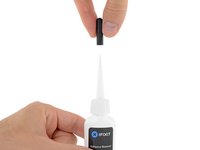
주요 콘텐츠로 건너뛰기

How to Use iFixit Adhesive Remover

필요한 것

  1. How to Use iFixit Adhesive Remover, How to Use iFixit Adhesive Remover: 1 단계, 이미지 1/3 How to Use iFixit Adhesive Remover, How to Use iFixit Adhesive Remover: 1 단계, 이미지 2/3 How to Use iFixit Adhesive Remover, How to Use iFixit Adhesive Remover: 1 단계, 이미지 3/3
    • First, prepare your device for surgery.

    • Always disconnect the battery before you start.

    • Cover or remove any components that may be vulnerable to damage, in case the solvent drips or leaks somewhere it shouldn't. (A sheet of aluminum foil offers good protection.)

    • Vulnerable components include display coatings and plastic parts such as speaker housings and keyboard keys.

    • If necessary, direct the flow of solvent away from sensitive components by elevating one side of your device.

    • If contact with sensitive components can't be avoided, use a milder solvent such as 99% isopropyl alcohol. It will take longer and require more care, but alcohol alone won't damage most electronic components.

  2. How to Use iFixit Adhesive Remover: 2 단계, 이미지 1/2 How to Use iFixit Adhesive Remover: 2 단계, 이미지 2/2
    • Now that your device is prepped, it's time to prep yourself.

    • iFixit adhesive remover contains acetone, a serious eye irritant and a mild skin irritant. Read all cautions on the adhesive remover label.

    • Wear eye protection when handling and applying the adhesive remover. (Eye protection is included in your kit.)

    • Do not wear contact lenses without eye protection.

    • Protective gloves are also included in your kit. If you are concerned about possible skin irritation, put your gloves on now.

  3. How to Use iFixit Adhesive Remover: 3 단계, 이미지 1/3 How to Use iFixit Adhesive Remover: 3 단계, 이미지 2/3 How to Use iFixit Adhesive Remover: 3 단계, 이미지 3/3
    • Pull off the black rubber stopper from your bottle of adhesive remover.

    • Twist to loosen or remove the bottle cap before you cut the applicator tip.

    • This unseals the bottle and allows the pressure to equalize before you cut the applicator tip. If you skip this step, the adhesive remover may spray out unexpectedly when the tip is cut.

    • Use scissors to cut off the sealed tip of the applicator.

    • Cutting close to the narrow tip will give you better control so you can apply the adhesive remover in small amounts.

    • Twist and close the bottle cap securely before you proceed further.

  4. How to Use iFixit Adhesive Remover: 4 단계, 이미지 1/2 How to Use iFixit Adhesive Remover: 4 단계, 이미지 2/2
    • Apply a few drops of adhesive remover evenly along the elevated edge of your glued-down component.

    • A little bit goes a long way, so start with a very small amount. You can always add more later if needed. Applying the solvent in small amounts helps prevent unwanted leaks.

    • Wait 2-3 minutes for the liquid adhesive remover to penetrate and soften the adhesive before you proceed to the next step.

  5. How to Use iFixit Adhesive Remover: 5 단계, 이미지 1/3 How to Use iFixit Adhesive Remover: 5 단계, 이미지 2/3 How to Use iFixit Adhesive Remover: 5 단계, 이미지 3/3
    이 단계에 사용된 도구:
    Plastic Cards
    $2.99
    구매
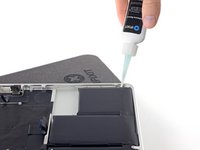
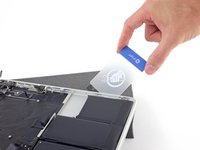
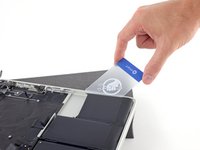
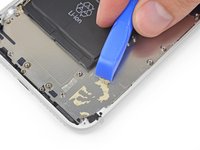
    • Gently slide a plastic card or other thin pry tool under the adhered component.

    • It may help to gently wiggle or twist the card as you go. If you're separating a battery, be careful not to deform or puncture it.

    • If you're struggling, apply a few more drops of adhesive remover and wait about a minute before trying again.

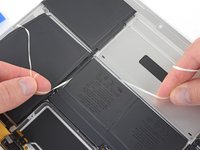
    • If your device has an especially tight fit and you have trouble inserting a tool, try working a piece of floss or wire underneath the component, and pull it side-to-side in a sawing motion to separate the adhesive.

    • Lift and separate your newly-unglued component.

  6. How to Use iFixit Adhesive Remover: 6 단계, 이미지 1/3 How to Use iFixit Adhesive Remover: 6 단계, 이미지 2/3 How to Use iFixit Adhesive Remover: 6 단계, 이미지 3/3
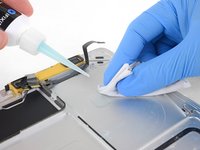
    • Before installing or gluing down any new components, remove any remaining adhesive residue from your device.

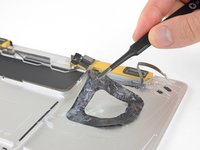
    • Peel off larger pieces of adhesive using tweezers or gloved fingers.

    • Scrape away any remaining adhesive with a plastic tool, and clean the underlying areas with adhesive remover or isopropyl alcohol. Wipe in one direction, not back and forth, until all the adhesive residue is gone.

    • This can take quite a bit of work, so be patient.

    • When your device is clean and dry, go ahead and install your new part and reassemble your device.

결론

Nice work! If you have any leftover adhesive remover, you can save it for your next project.

Take your e-waste to an R2 or e-Stewards certified recycler.

Repair didn’t go as planned? Check out our Answers community for troubleshooting help.

다른 48명이 해당 안내서를 완성하였습니다.

Jeff Suovanen

회원 가입일: 08/06/13

427,144 평판

안내서 259개 작성하였습니다

iFixit iFixit 회원

Staff

136 회원들

안내서 16,580개 작성하였습니다

댓글 8개

Can I use adhesive remover on glued down flex cables? Like the cable for the Touch ID button on the iPhone 7 Plus. Or will this damage the cable? How about isopropyl alcohol based adhesive remover?

havarh - 답글

Mild heat and/or a little isopropyl alcohol should do the trick. You don’t need to risk using anything more aggressive than that.

Jeff Suovanen -

Can I used this to pop open my iPhone 8 Plus?

Tech Savvy Jan - 답글

can i use this to remove thermal adhesive from a s70 adata ssd, the dram modules are glue directly to the heatsink

podermexico - 답글

What if it is a complete plastic budget device?

Yanny 57 - 답글

댓글 쓰기

조회 통계:

24 시간 전: 18

7일 전: 124

30일 전: 532

전체 시간: 22,965