소개
Use this guide to replace the battery in your Huawei Mate 9 smartphone. When reassembling your phone apply new adhesive where it is necessary.
Before disassembling your phone, discharge the battery below 25%. The battery can catch fire and/or explode if accidentally punctured, but the chances of that happening are much lower if discharged.
필요한 것
-
-
-
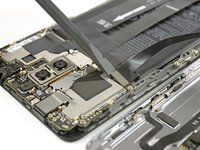
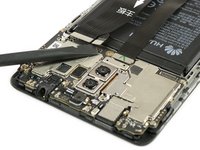
Carefully peel off the plastic sticker that holds both cables to the battery.
-
-
-
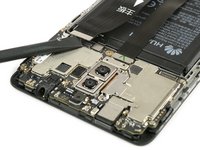
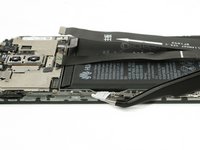
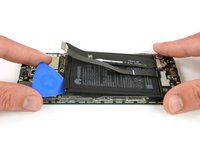
Peel out the adhesive strip which is placed beneath the battery by steadily pulling at the tab in a flat angle.
-


To reassemble your device, follow these instructions in reverse order. When reassembling your phone apply new adhesive where it is necessary.
To reassemble your device, follow these instructions in reverse order. When reassembling your phone apply new adhesive where it is necessary.
다른 28명이 해당 안내서를 완성하였습니다.


댓글 7개
Danke für die detaillierte ANleitung, konnte meinen Akku wechseln und nun ist mein Handy wieder wie neu.
it’s almost impossible to remove the battery without damaging it!
My advice to you is to buy the LCD screen with the battery included.
Das hat sehr gut geklappt mit der Anleitung. Danke dafür, super happy.
Im Basic Rep Set fehlte leider einer der notwendigen Torx Schraubendreher.
War erfolgreich die OP. Die Batterie war allerdings festgeklebt wie verrückt und nur sehr schwer raus zu bekommen. Musste ein flaches Messer zuhilfe nehmen, anders gings nicht. Ich hatte sie vor der Rep. glücklicherweise auf 10% entladen, damit nicht so viel passieren kann, wenn sie beim entfernen hochgeht ;-) Ist allerdings nichts passiert. Die Ladebuchse hab ich bei der Gelegenheit auch gleich getauscht, die hatte auch oft keinen richtigen Steckerkontakt mehr. Alles in Allem ca 1,5 Std. Zeitbedarf. Danke für die Anleitung.