주요 콘텐츠로 건너뛰기

Huawei P9 Lite Battery Replacement

필요한 것

  1. Huawei P9 Lite Battery Replacement, Back Cover: 1 단계, 이미지 1/2 Huawei P9 Lite Battery Replacement, Back Cover: 1 단계, 이미지 2/2
    • Use an opening pick to unclip the rear cover, starting from the bottom corner.

    • Work your way around counterclockwise and carefully pry the plastic tabs open one by one.

  2. Huawei P9 Lite Battery Replacement: 2 단계, 이미지 1/1
    • There is adhesive underneath the back cover that holds it to the battery and the metal plate at the top.

    • Be careful with the flex cable at the right hand side.

    • Twist the opening pick to lever the back cover away and loosen it from the adhesive.

  3. Huawei P9 Lite Battery Replacement: 3 단계, 이미지 1/1
    • When the back cover is freed from the adhesive you can pop it off by hand completely.

  4. Huawei P9 Lite Battery Replacement, Loudspeaker: 4 단계, 이미지 1/3 Huawei P9 Lite Battery Replacement, Loudspeaker: 4 단계, 이미지 2/3 Huawei P9 Lite Battery Replacement, Loudspeaker: 4 단계, 이미지 3/3
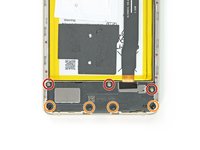
    • On the bottom of the phone remove the following screws:

    • Three 2.9 mm Phillips #00 screws

    • Four 3.8 mm Phillips #00 screws

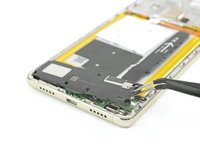
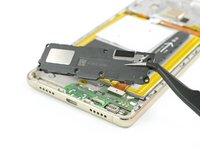
    • Now you can grab the loudspeaker unit and take it out.

  5. Huawei P9 Lite Battery Replacement, Motherboard Shield: 5 단계, 이미지 1/1
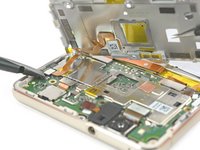
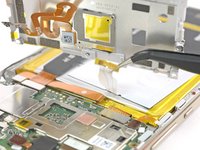
    • Remove the nine Phillips #00 screws that secure the metal shield plate.

    • Some screws may be covered with tamper proof stickers. Remove them to ensure a proper seating for your driver.

  6. Huawei P9 Lite Battery Replacement: 6 단계, 이미지 1/2 Huawei P9 Lite Battery Replacement: 6 단계, 이미지 2/2
    • Do not remove the shield plate yet, it is attached by a connector and an adhered cable.

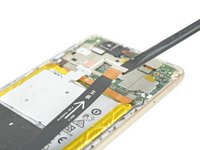
    • Use a spudger to disconnect the fingerprint sensor from the motherboard.

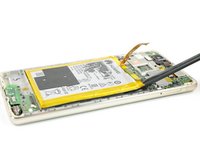
    • Peel the NFC antenna cable off of the metal plate.

  7. Huawei P9 Lite Battery Replacement, Battery: 7 단계, 이미지 1/3 Huawei P9 Lite Battery Replacement, Battery: 7 단계, 이미지 2/3 Huawei P9 Lite Battery Replacement, Battery: 7 단계, 이미지 3/3
    • Disconnect the motherboard flex cable on both ends and take it away.

  8. Huawei P9 Lite Battery Replacement: 8 단계, 이미지 1/2 Huawei P9 Lite Battery Replacement: 8 단계, 이미지 2/2
    • Peel off the NFC antenna from the battery.

    • Be careful not to rip or crease the antenna.

    • If you are just removing the battery to get to the display, you can leave the NFC on the battery.

    • Unplug the battery connector.

  9. Huawei P9 Lite Battery Replacement: 9 단계, 이미지 1/3 Huawei P9 Lite Battery Replacement: 9 단계, 이미지 2/3 Huawei P9 Lite Battery Replacement: 9 단계, 이미지 3/3
    이 단계에 사용된 도구:
    Tesa 61395 Tape
    $5.99
    구매
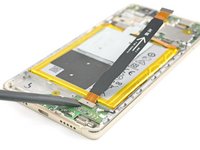
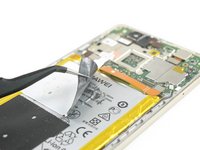
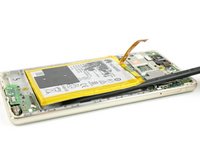
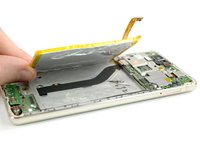
    • Slide the spudger under the battery at the place shown in the picture and pry it loose slowly.

    • Avoid bending the battery and reheat if necessary.

    • Be careful not to damage the display flex cable that runs underneath the battery in the center.

    • When reassembling your phone replace old adhesive with double-sided tape or pre-cut adhesive strips.

결론

To reassemble your device, follow these instructions in reverse order.

다른 86명이 해당 안내서를 완성하였습니다.

Tobias Isakeit

회원 가입일: 03/31/14

116,496 평판

안내서 188개 작성하였습니다

Master Techs Master Techs 회원

Community

322 회원들

안내서 2,495개 작성하였습니다

댓글 24개

There is an extra step where you need to remove the cover of the board at the top of the phone in order to remove the NFC antenna which is not described in this guide. Better watch this https://www.youtube.com/watch?v=ADZiL7JK...

Costas Geraniou - 답글

Thanks Costas for the hint. We added the missing step.

Tobias Isakeit -

Very very thanks!

Artur - 답글

Cercando di rimouorere l'adesivo dell'nfc si è rotto, posso assembrale il telefono senza nfc, ovviamente invalidando questa funzione?

Francesco Staiano - 답글

Si, hai ragione: si può riassemblare il telefono senza l’antenna NFC perdendo questa funzione…

Claire Miesch -

댓글 쓰기

조회 통계:

24 시간 전: 8

7일 전: 42

30일 전: 261

전체 시간: 131,816